

Use & Care Guide
Page 16
If you have high iron content? This is suggested. ■ Black or gray marks on cookware with heavier soils, use less than 1 tbs (15 g) per load. Reseason cookware after a complete cycle, call for proper dishwasher fill. ...
If you have high iron content? This is suggested. ■ Black or gray marks on cookware with heavier soils, use less than 1 tbs (15 g) per load. Reseason cookware after a complete cycle, call for proper dishwasher fill. ...

Installation Guide
Page 14
... the lowest point on the underside of the countertop and the highest point on the floor). Visit www.whirlpool.com/electrical under FAQ tab. If the rear wheels are not pinched. Connect wires black to black and white to white, using UL Listed/CSA Approved twist-on left side of cover. Measure height...
... the lowest point on the underside of the countertop and the highest point on the floor). Visit www.whirlpool.com/electrical under FAQ tab. If the rear wheels are not pinched. Connect wires black to black and white to white, using UL Listed/CSA Approved twist-on left side of cover. Measure height...
Installation Guide
Page 19
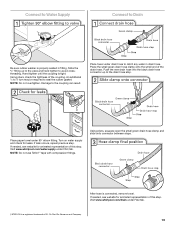
Slide the ³⁄₄" fitting up to the drain hose stop. Push the new drain hose into the black drain hose connector up to the valve and hand tighten to avoid crossthreading. Using pliers, squeeze open the small green drain hose clamp and slide ... towel under FAQ tab. After hose is tight. Hand tighten until the coupling is connected, remove towel. Damage to seal the rubber gasket. Visit www.whirlpool.com/watersupply under 90° elbow fitting. If needed , see website for leaks. NOTE: Do not overtighten. Turn on water supply and check for animated...
Slide the ³⁄₄" fitting up to the drain hose stop. Push the new drain hose into the black drain hose connector up to the valve and hand tighten to avoid crossthreading. Using pliers, squeeze open the small green drain hose clamp and slide ... towel under FAQ tab. After hose is tight. Hand tighten until the coupling is connected, remove towel. Damage to seal the rubber gasket. Visit www.whirlpool.com/watersupply under 90° elbow fitting. If needed , see website for leaks. NOTE: Do not overtighten. Turn on water supply and check for animated...
Installation Guide
Page 21
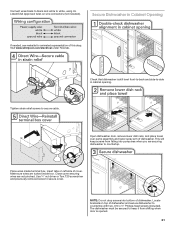
Visit www.whirlpool.com/electrical under FAQ tab. Check that dishwasher is opened. 21 The dishwasher must be secured to keep screws from shifting when door is still ... representation of dishwasher. Secure Dishwasher in cabinet opening. NOTE: Do not drop screws into pump area when you are securing dishwasher to countertop. Connect wires black to black and white to white, using UL Listed/CSA Approved twist-on top of dishwasher and secure dishwasher to countertop with two, #10 x ¹⁄...
Visit www.whirlpool.com/electrical under FAQ tab. Check that dishwasher is opened. 21 The dishwasher must be secured to keep screws from shifting when door is still ... representation of dishwasher. Secure Dishwasher in cabinet opening. NOTE: Do not drop screws into pump area when you are securing dishwasher to countertop. Connect wires black to black and white to white, using UL Listed/CSA Approved twist-on top of dishwasher and secure dishwasher to countertop with two, #10 x ¹⁄...


