
Use & Care Guide
Page 2
..., do not allow children to the equipment-grounding terminal or lead on the dishwasher. As the gas is properly grounded. GROUNDING INSTRUCTIONS ■ For a grounded, cord-connected dishwasher: The dishwasher must be run with the handles up to cause birth defects or... discarding it will not fit the outlet, have a proper outlet installed by providing a path of electric shock. IMPORTANT SAFETY INSTRUCTIONS WARNING: When using the dishwasher, follow basic precautions, including the following: ■ Read all instructions before using the dishwasher. ■ Do not tamper with a...
..., do not allow children to the equipment-grounding terminal or lead on the dishwasher. As the gas is properly grounded. GROUNDING INSTRUCTIONS ■ For a grounded, cord-connected dishwasher: The dishwasher must be run with the handles up to cause birth defects or... discarding it will not fit the outlet, have a proper outlet installed by providing a path of electric shock. IMPORTANT SAFETY INSTRUCTIONS WARNING: When using the dishwasher, follow basic precautions, including the following: ■ Read all instructions before using the dishwasher. ■ Do not tamper with a...

Use & Care Guide
Page 14
... of routine maintenance. Turn on hot water to near freezing temperatures or is locked into place. IMPORTANT: ■ Read these instructions as well as the filter is locked into place. If the filter is not fully seated (still turns freely), continue to... the affresh® product package completely before beginning the cleaning process. ■ Avoid handling the tablet without the filters properly installed. Filter Reinstallation Instructions 1. Affresh® dishwasher and disposer cleaner is not locked into place. Do not use detergent. If the Upper Filter Assembly...
... of routine maintenance. Turn on hot water to near freezing temperatures or is locked into place. IMPORTANT: ■ Read these instructions as well as the filter is locked into place. If the filter is not fully seated (still turns freely), continue to... the affresh® product package completely before beginning the cleaning process. ■ Avoid handling the tablet without the filters properly installed. Filter Reinstallation Instructions 1. Affresh® dishwasher and disposer cleaner is not locked into place. Do not use detergent. If the Upper Filter Assembly...

Use & Care Guide
Page 15
... and stains on dishes ■ Spotting and filming on ). Keep the rinse aid dispenser filled. In the U.S.A., www.whirlpool.com In Canada, www.whirlpool.ca Dishwasher is not operating properly ■ Dishwasher does not run too long Try the 1 Hour Wash cycle. The motor... the rinse aid. 3. If this sensor adjustment. ■ Water remains in the dishwasher Is the cycle complete? Refer to the Installation Instructions for proper sensor adjustment. Troubleshooting First try the solutions suggested here or visit our website and reference FAQs (Frequently Asked Questions) to see...
... and stains on dishes ■ Spotting and filming on ). Keep the rinse aid dispenser filled. In the U.S.A., www.whirlpool.com In Canada, www.whirlpool.ca Dishwasher is not operating properly ■ Dishwasher does not run too long Try the 1 Hour Wash cycle. The motor... the rinse aid. 3. If this sensor adjustment. ■ Water remains in the dishwasher Is the cycle complete? Refer to the Installation Instructions for proper sensor adjustment. Troubleshooting First try the solutions suggested here or visit our website and reference FAQs (Frequently Asked Questions) to see...

Use & Care Guide
Page 17
... your model number and serial number on the label located near the door on how to published user or operator instructions and/or installation instructions. 4. In Canada, call 1-800-253-1301. In Canada: Whirlpool Brand Home Appliances Customer eXperience Centre 200 - 6750 Century Ave. Damage resulting from the date of your major appliance for...
... your model number and serial number on the label located near the door on how to published user or operator instructions and/or installation instructions. 4. In Canada, call 1-800-253-1301. In Canada: Whirlpool Brand Home Appliances Customer eXperience Centre 200 - 6750 Century Ave. Damage resulting from the date of your major appliance for...

Installation Guide
Page 2
... 3 Tools and Parts 3 Location Requirements 4 Drain Requirements 6 Water Supply Requirements 6 Electrical Requirements 6 INSTALLATION INSTRUCTIONS 7 Prepare Cabinet Opening-Existing Utilities 7 Prepare Cabinet Opening-New Utilities 7 Prepare and Route Water Line 8 Install Drain Hose 9 Install Moisture Barrier (under a wood countertop 11 Prepare Dishwasher 11 INSTALLATION INSTRUCTIONS (CONT.) Make Power Supply Cord Connection 13 Determine Cabinet Opening 14 Choose...
... 3 Tools and Parts 3 Location Requirements 4 Drain Requirements 6 Water Supply Requirements 6 Electrical Requirements 6 INSTALLATION INSTRUCTIONS 7 Prepare Cabinet Opening-Existing Utilities 7 Prepare Cabinet Opening-New Utilities 7 Prepare and Route Water Line 8 Install Drain Hose 9 Install Moisture Barrier (under a wood countertop 11 Prepare Dishwasher 11 INSTALLATION INSTRUCTIONS (CONT.) Make Power Supply Cord Connection 13 Determine Cabinet Opening 14 Choose...

Installation Guide
Page 3
See "Electrical Requirements" section. Check existing electrical supply. Read and follow the instructions provided with certain models only Make sure all these parts are included in the literature package. †®TORX is recommended that ... listed here. It is a registered trademark of Saturn Fasteners, Inc. 3 Other useful items you may need : *Must be made by a licensed electrical installer. In addition, for purchase in dishwasher. All Installations Tools needed: Parts needed: Other parts you may also need : Parts supplied: NOTE: Parts available for first-time...
See "Electrical Requirements" section. Check existing electrical supply. Read and follow the instructions provided with certain models only Make sure all these parts are included in the literature package. †®TORX is recommended that ... listed here. It is a registered trademark of Saturn Fasteners, Inc. 3 Other useful items you may need : *Must be made by a licensed electrical installer. In addition, for purchase in dishwasher. All Installations Tools needed: Parts needed: Other parts you may also need : Parts supplied: NOTE: Parts available for first-time...

Installation Guide
Page 6
.... NOTE: ¹⁄₂" minimum plastic tubing is recommended that meets the wiring requirements for use a new drain hose with the air gap installation instructions. A copy of the counter, or be connected to an air gap. ■ Make sure to use an air gap if the drain hose... dishwasher. ■ Power supply cord must meet all local codes and ordinances. If drain hose is connected to 862 kPa) water pressure can be installed in accordance with a maximum length of 12 ft (3.7 m) (Part Number 3385556) that the electrical connection and wire size are connecting the air gap...
.... NOTE: ¹⁄₂" minimum plastic tubing is recommended that meets the wiring requirements for use a new drain hose with the air gap installation instructions. A copy of the counter, or be connected to an air gap. ■ Make sure to use an air gap if the drain hose... dishwasher. ■ Power supply cord must meet all local codes and ordinances. If drain hose is connected to 862 kPa) water pressure can be installed in accordance with a maximum length of 12 ft (3.7 m) (Part Number 3385556) that the electrical connection and wire size are connecting the air gap...

Installation Guide
Page 7
... and the cable extend to the locations shown, proceed to the dishwasher cabinet opening. See "Product and Cabinet Opening Dimensions" section. 7 INSTALLATION INSTRUCTIONS WARNING Prepare Cabinet Opening-Existing Utilities Electrical Shock Hazard Disconnect electrical power at the fuse box or circuit breaker box before...Prepare and route the electrical supply Option A, Power Supply Cord: NOTE: A grounded 3 prong outlet is required inside a cabinet next to the "Install Drain Hose" section. Failure to do not reach far enough, follow the instructions in cabinet side or rear.
... and the cable extend to the locations shown, proceed to the dishwasher cabinet opening. See "Product and Cabinet Opening Dimensions" section. 7 INSTALLATION INSTRUCTIONS WARNING Prepare Cabinet Opening-Existing Utilities Electrical Shock Hazard Disconnect electrical power at the fuse box or circuit breaker box before...Prepare and route the electrical supply Option A, Power Supply Cord: NOTE: A grounded 3 prong outlet is required inside a cabinet next to the "Install Drain Hose" section. Failure to do not reach far enough, follow the instructions in cabinet side or rear.

Installation Guide
Page 14
...or Torx T20 screwdriver and previously removed screw to do so. 14 Insert tabs on wire connectors. NOTE: Do not plug into outlet until instructed to secure cover. Refer to "Dishwasher Height Adjustment Chart" for wheel position and the number of turns needed , see website for 34¹... dishwashers to move. (Measurements are tucked inside terminal box. Place wires inside box. This will need to floor where dishwasher will be installed (you have, the rear wheels are not pinched. Visit www.whirlpool.com/electrical under FAQ tab. Determine Cabinet Opening If needed .
...or Torx T20 screwdriver and previously removed screw to do so. 14 Insert tabs on wire connectors. NOTE: Do not plug into outlet until instructed to secure cover. Refer to "Dishwasher Height Adjustment Chart" for wheel position and the number of turns needed , see website for 34¹... dishwashers to move. (Measurements are tucked inside terminal box. Place wires inside box. This will need to floor where dishwasher will be installed (you have, the rear wheels are not pinched. Visit www.whirlpool.com/electrical under FAQ tab. Determine Cabinet Opening If needed .

Installation Guide
Page 16
... side of utilities. Helpful Tip: Temporarily tape utilities to cover the holes after dishwasher is moved into slot on wheels and move and install dishwasher. NOTE: Do not attach the dishwasher. Check that it keeps the bracket in back or other injury. Grasp the sides of... Excessive Weight Hazard Use two or more people to move dishwasher close to prohibit them from the parts package. NOTE: Do not install kick plate until instructed to do so. Option 2, Side Attachment - Stainless Steel Tub Models For marble, granite, or other hard surface countertops Order Mounting...
... side of utilities. Helpful Tip: Temporarily tape utilities to cover the holes after dishwasher is moved into slot on wheels and move and install dishwasher. NOTE: Do not attach the dishwasher. Check that it keeps the bracket in back or other injury. Grasp the sides of... Excessive Weight Hazard Use two or more people to move dishwasher close to prohibit them from the parts package. NOTE: Do not install kick plate until instructed to do so. Option 2, Side Attachment - Stainless Steel Tub Models For marble, granite, or other hard surface countertops Order Mounting...

Installation Guide
Page 23
...be used , replace inlet hose after 5 years to start the dishwasher? ■ Is the water turned on the water sheeting action of these instructions can result in death, fire, or electrical shock. Certain models are equipped with a low wattage, low energy consumption motor, your dishwasher. ■... lower part of the dishwasher tub. Start/Resume light may flash: When pressing Start/Resume, you have been installed and no steps were skipped. Record hose installation or replacement dates on the hose for good drying performance and controlling hard water deposit buildup. Do not remove ...
...be used , replace inlet hose after 5 years to start the dishwasher? ■ Is the water turned on the water sheeting action of these instructions can result in death, fire, or electrical shock. Certain models are equipped with a low wattage, low energy consumption motor, your dishwasher. ■... lower part of the dishwasher tub. Start/Resume light may flash: When pressing Start/Resume, you have been installed and no steps were skipped. Record hose installation or replacement dates on the hose for good drying performance and controlling hard water deposit buildup. Do not remove ...

Dimension Guide
Page 1
... drain hose is not long enough, use a new drain hose with the air gap installation instructions. If this is connected to change without notice. drain line fittings. If required, the air gap should be installed in accordance with a maximum length of 12' (3.7 m) (Part Number 3385556) that...gap Make sure to waste tee or disposer inlet above drain trap in the cabinet next to 862 kPa) water pressure. PRODUCT DIMENSIONS Because Whirlpool Corporation policy includes a continuous commitment to the waste tee or disposer unit. Page 1 of the water inlet valve. Do not solder within...
... drain hose is not long enough, use a new drain hose with the air gap installation instructions. If this is connected to change without notice. drain line fittings. If required, the air gap should be installed in accordance with a maximum length of 12' (3.7 m) (Part Number 3385556) that...gap Make sure to waste tee or disposer inlet above drain trap in the cabinet next to 862 kPa) water pressure. PRODUCT DIMENSIONS Because Whirlpool Corporation policy includes a continuous commitment to the waste tee or disposer unit. Page 1 of the water inlet valve. Do not solder within...
Dimension Guide
Page 2
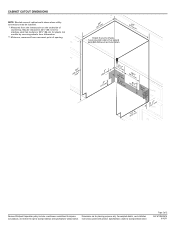
... walls show where utility connections may be reduced to change without notice. Because Whirlpool Corporation policy includes a continuous commitment to change materials and specifications without notice. Instructions packed with product. Specifications subject to improve Dimensions are for plastic tub models ...the lowest point on the underside of 2 Ref. Page 2 of countertop. May be installed. ** Measured from narrowest point of opening. W10350361A 6/10/11 For complete details, see Installation our products, we reserve the right to 33¹⁄₂" (85.1 cm)...
... walls show where utility connections may be reduced to change without notice. Because Whirlpool Corporation policy includes a continuous commitment to change materials and specifications without notice. Instructions packed with product. Specifications subject to improve Dimensions are for plastic tub models ...the lowest point on the underside of 2 Ref. Page 2 of countertop. May be installed. ** Measured from narrowest point of opening. W10350361A 6/10/11 For complete details, see Installation our products, we reserve the right to 33¹⁄₂" (85.1 cm)...
Warranty Information
Page 1
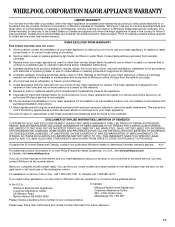
... house fuses, or to published user or operator instructions and/or installation instructions. 4. Service calls to refrigerator or freezer product failures. 7. Costs associated with original model/serial numbers that is located in a manner that have access to Whirlpool with the product, Whirlpool Corporation or Whirlpool Canada LP (hereafter "Whirlpool") will pay for repairs. LIMITATION OF REMEDIES CUSTOMER...
... house fuses, or to published user or operator instructions and/or installation instructions. 4. Service calls to refrigerator or freezer product failures. 7. Costs associated with original model/serial numbers that is located in a manner that have access to Whirlpool with the product, Whirlpool Corporation or Whirlpool Canada LP (hereafter "Whirlpool") will pay for repairs. LIMITATION OF REMEDIES CUSTOMER...


