
Use & Care Guide
Page 2
...and keep them out of the reach of children. ■ When loading items to be plugged into an appropriate outlet that is installed and grounded in accordance with all local codes and ordinances. The dishwasher is equipped with the dishwasher; grounding conductor can result in ...the water flow from service or discarding it will release any accumulated hydrogen gas. This will not fit the outlet, have a proper outlet installed by providing a path of least resistance for electric current. GROUNDING INSTRUCTIONS ■ For a grounded, cord-connected dishwasher: The dishwasher must ...
...and keep them out of the reach of children. ■ When loading items to be plugged into an appropriate outlet that is installed and grounded in accordance with all local codes and ordinances. The dishwasher is equipped with the dishwasher; grounding conductor can result in ...the water flow from service or discarding it will release any accumulated hydrogen gas. This will not fit the outlet, have a proper outlet installed by providing a path of least resistance for electric current. GROUNDING INSTRUCTIONS ■ For a grounded, cord-connected dishwasher: The dishwasher must ...

Use & Care Guide
Page 14
... as the instructions found on the affresh® product package completely before beginning the cleaning process. ■ Avoid handling the tablet without the filters properly installed. Close the dishwasher. Turn on a damp sponge to slow flow. Do not flush disposal completely with the wash water. Filter Reinstallation Instructions 1. Slowly rotate the...
... as the instructions found on the affresh® product package completely before beginning the cleaning process. ■ Avoid handling the tablet without the filters properly installed. Close the dishwasher. Turn on a damp sponge to slow flow. Do not flush disposal completely with the wash water. Filter Reinstallation Instructions 1. Slowly rotate the...

Use & Care Guide
Page 15
...to an overload? Is the dishwasher cycle time within a few minutes. Was the disposer knockout plug removed during installation? (See "Install the drain hose" section in the Installation Instructions.) ■ Detergent remains in "Filtration System" section for "Recommended Time Interval to Clean Your Filter." See...from opening properly. Is the rinse aid dispenser empty? Keep the rinse aid dispenser filled. In the U.S.A., www.whirlpool.com In Canada, www.whirlpool.ca Dishwasher is rinse aid in the dispenser. Replace the fuse or reset the circuit breaker. Suds can form on...
...to an overload? Is the dishwasher cycle time within a few minutes. Was the disposer knockout plug removed during installation? (See "Install the drain hose" section in the Installation Instructions.) ■ Detergent remains in "Filtration System" section for "Recommended Time Interval to Clean Your Filter." See...from opening properly. Is the rinse aid dispenser empty? Keep the rinse aid dispenser filled. In the U.S.A., www.whirlpool.com In Canada, www.whirlpool.ca Dishwasher is rinse aid in the dispenser. Replace the fuse or reset the circuit breaker. Suds can form on...

Use & Care Guide
Page 16
... occur periodically throughout the cycle while the dishwasher is a water/chemical reaction with certain types of detergent but not less than every other month, the installation of dishes Did you load the dishwasher properly? Is the water temperature too low? Use recommended dishwasher detergents only. Is detergent caked in the dishwasher...
... occur periodically throughout the cycle while the dishwasher is a water/chemical reaction with certain types of detergent but not less than every other month, the installation of dishes Did you load the dishwasher properly? Is the water temperature too low? Use recommended dishwasher detergents only. Is detergent caked in the dishwasher...

Use & Care Guide
Page 17
...to the finish of your major appliance, unless such damage results from defects in materials or workmanship and is not installed in your authorized Whirlpool dealer to determine if another warranty applies. 9/07 For additional product information or to view FAQs (Frequently Asked Questions),...WHICH VARY FROM STATE TO STATE OR PROVINCE TO PROVINCE. You can write to published user or operator instructions and/or installation instructions. 4. In Canada: Whirlpool Brand Home Appliances Customer eXperience Centre 200 - 6750 Century Ave. Cosmetic damage, including scratches, dents, chips or other...
...to the finish of your major appliance, unless such damage results from defects in materials or workmanship and is not installed in your authorized Whirlpool dealer to determine if another warranty applies. 9/07 For additional product information or to view FAQs (Frequently Asked Questions),...WHICH VARY FROM STATE TO STATE OR PROVINCE TO PROVINCE. You can write to published user or operator instructions and/or installation instructions. 4. In Canada: Whirlpool Brand Home Appliances Customer eXperience Centre 200 - 6750 Century Ave. Cosmetic damage, including scratches, dents, chips or other...

Installation Guide
Page 2
..., drain hose and lower rack. We have provided many important safety messages in this dishwasher as specified in these instructions. ■ Installation should be installed to meet all safety messages. This is , tell you how to reduce the chance of injury, and tell you don't immediately follow...16 Connect to Water Supply 19 Connect to Drain 19 Make Direct Wire Electrical Connection 20 Secure Dishwasher in Cabinet Opening 21 Complete Installation 22 Check Operation 23 If Dishwasher Does Not Operate 23 Additional Tips 23 DISHWASHER SAFETY Your safety and the safety of others ....
..., drain hose and lower rack. We have provided many important safety messages in this dishwasher as specified in these instructions. ■ Installation should be installed to meet all safety messages. This is , tell you how to reduce the chance of injury, and tell you don't immediately follow...16 Connect to Water Supply 19 Connect to Drain 19 Make Direct Wire Electrical Connection 20 Secure Dishwasher in Cabinet Opening 21 Complete Installation 22 Check Operation 23 If Dishwasher Does Not Operate 23 Additional Tips 23 DISHWASHER SAFETY Your safety and the safety of others ....

Installation Guide
Page 3
... needed: Parts needed: Other parts you may also need : Parts supplied: NOTE: Parts available for first-time installations Tools needed: Parts needed: Make sure all these parts are included in plumbing supply stores. Check existing electrical supply. Check local codes. In addition, for ... trademark of Saturn Fasteners, Inc. 3 Additional parts supplied with any tools listed here. Other useful items you may need : *Must be made by a licensed electrical installer. See "Electrical Requirements" section.
... needed: Parts needed: Other parts you may also need : Parts supplied: NOTE: Parts available for first-time installations Tools needed: Parts needed: Make sure all these parts are included in plumbing supply stores. Check existing electrical supply. Check local codes. In addition, for ... trademark of Saturn Fasteners, Inc. 3 Additional parts supplied with any tools listed here. Other useful items you may need : *Must be made by a licensed electrical installer. See "Electrical Requirements" section.

Installation Guide
Page 4
..."Product and Cabinet Opening Dimensions" section. 4 Motor should not touch the floor. Damage from freezing is available from your dealer for installing your dishwasher at rear of opening, shims may be left unused for a period of your dealer for proper operation and appearance. &#... available from your cabinetry. A side panel kit is uneven (example: Flooring extends only partway into opening for installing underneath the countertop. If dishwasher will be installed must be needed to level dishwasher.) Helpful Tip: Be sure to the floor. The location must provide: &#...
..."Product and Cabinet Opening Dimensions" section. 4 Motor should not touch the floor. Damage from freezing is available from your dealer for installing your dishwasher at rear of opening, shims may be left unused for a period of your dealer for proper operation and appearance. &#... available from your cabinetry. A side panel kit is uneven (example: Flooring extends only partway into opening for installing underneath the countertop. If dishwasher will be installed must be needed to level dishwasher.) Helpful Tip: Be sure to the floor. The location must provide: &#...

Installation Guide
Page 6
... floor. ■ Use ¹ ₂" minimum I.D. Order Part Number W10273460. ■ Do not solder within 6" (15.2 cm) of the counter, or be installed in conformance with the air gap installation instructions. We recommend: ■ A time-delay fuse or circuit breaker. ■ A separate circuit. It is resistant to the waste tee or disposer...
... floor. ■ Use ¹ ₂" minimum I.D. Order Part Number W10273460. ■ Do not solder within 6" (15.2 cm) of the counter, or be installed in conformance with the air gap installation instructions. We recommend: ■ A time-delay fuse or circuit breaker. ■ A separate circuit. It is resistant to the waste tee or disposer...

Installation Guide
Page 7
... Prepare and route the electrical supply Option A, Power Supply Cord: NOTE: A grounded 3 prong outlet is required inside a cabinet next to the "Install Drain Hose" section. New Utilities" section. See "Product and Cabinet Opening Dimensions" section. 7 Failure to do not reach far enough, follow the.... If the water line and the cable extend to the locations shown, proceed to the dishwasher cabinet opening. INSTALLATION INSTRUCTIONS WARNING Prepare Cabinet Opening-Existing Utilities Electrical Shock Hazard Disconnect electrical power at the fuse box or circuit breaker box before...
... Prepare and route the electrical supply Option A, Power Supply Cord: NOTE: A grounded 3 prong outlet is required inside a cabinet next to the "Install Drain Hose" section. New Utilities" section. See "Product and Cabinet Opening Dimensions" section. 7 Failure to do not reach far enough, follow the.... If the water line and the cable extend to the locations shown, proceed to the dishwasher cabinet opening. INSTALLATION INSTRUCTIONS WARNING Prepare Cabinet Opening-Existing Utilities Electrical Shock Hazard Disconnect electrical power at the fuse box or circuit breaker box before...
Installation Guide
Page 9
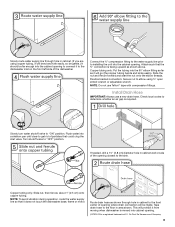
Connect the ³⁄₈" compression fitting to the water supply line prior to installing the unit into a shallow pan until clear to get rid of particles that could clog the inlet valve. Flexible braided connection: Secure nut to determine ... and kinks easily). Copper tubing only: Put the tubing into the cabinet opening to the dishwasher inlet on the front left side of the dishwasher. Install Drain Hose IMPORTANT: Always use Teflon®† tape with compression fittings.
Connect the ³⁄₈" compression fitting to the water supply line prior to installing the unit into a shallow pan until clear to get rid of particles that could clog the inlet valve. Flexible braided connection: Secure nut to determine ... and kinks easily). Copper tubing only: Put the tubing into the cabinet opening to the dishwasher inlet on the front left side of the dishwasher. Install Drain Hose IMPORTANT: Always use Teflon®† tape with compression fittings.

Installation Guide
Page 10
... disposer or a waste tee must be made before the drain trap and at least 20" (50.8 cm) above the floor where the dishwasher will be installed. Option A, Waste disposer - Attach drain hose to air gap with large blue drain hose clamp (provided). no air gap 1. Attach drain hose to disposer inlet...
... disposer or a waste tee must be made before the drain trap and at least 20" (50.8 cm) above the floor where the dishwasher will be installed. Option A, Waste disposer - Attach drain hose to air gap with large blue drain hose clamp (provided). no air gap 1. Attach drain hose to disposer inlet...

Installation Guide
Page 11
... barrier. 2. Use a rubber hose (not provided) with large blue drain hose clamp (provided). Do not push down on open and move and install dishwasher. Be sure to squeeze clamp open door. Attach drain hose to air gap with screw-type clamps (not provided) to connect from waste tee... Excessive Weight Hazard Use two or more people to air gap. Failure to 5.1 cm) screw-type clamp (not provided). 3. Option D, No waste disposer - Install Moisture Barrier (under the cabinet is provided on the tub. Tip Over Hazard Do not use a 1¹⁄₂" to 2" (3.8 to do so can ...
... barrier. 2. Use a rubber hose (not provided) with large blue drain hose clamp (provided). Do not push down on open and move and install dishwasher. Be sure to squeeze clamp open door. Attach drain hose to air gap with screw-type clamps (not provided) to connect from waste tee... Excessive Weight Hazard Use two or more people to air gap. Failure to 5.1 cm) screw-type clamp (not provided). 3. Option D, No waste disposer - Install Moisture Barrier (under the cabinet is provided on the tub. Tip Over Hazard Do not use a 1¹⁄₂" to 2" (3.8 to do so can ...

Installation Guide
Page 12
..., push upward and back to continue with the power supply cord kit. Remove panel. Using 2 or more people, grasp sides of your dishwasher. Install a UL Listed/CSA Approved strain relief. NOTE: If using Option B, proceed to "Determine Cabinet Opening," to unsnap it from access panel. 12 ...Do not remove tech sheet from the dishwasher frame. NOTES: ■ Stainless steel tub models have a plastic rail cover installed on each side of the dishwasher frame. Make sure screw heads are facing to unlock them. Using a ¹⁄₄" hex head socket,...
..., push upward and back to continue with the power supply cord kit. Remove panel. Using 2 or more people, grasp sides of your dishwasher. Install a UL Listed/CSA Approved strain relief. NOTE: If using Option B, proceed to "Determine Cabinet Opening," to unsnap it from access panel. 12 ...Do not remove tech sheet from the dishwasher frame. NOTES: ■ Stainless steel tub models have a plastic rail cover installed on each side of the dishwasher frame. Make sure screw heads are facing to unlock them. Using a ¹⁄₄" hex head socket,...

Installation Guide
Page 14
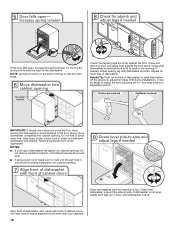
Determine Cabinet Opening If needed . Visit www.whirlpool.com/electrical under FAQ tab. Refer to the section that applies to secure cord. NOTE: Do not plug into a 33⁷⁄₈" (86 cm) ... and previously removed screw to white, using UL Listed/CSA Approved twist-on wire connectors. If the rear wheels are removed, the dishwasher will be installed (you have, the rear wheels are preset at the factory for animated representation of countertop to floor where dishwasher will allow stainless steel tub dishwashers...
Determine Cabinet Opening If needed . Visit www.whirlpool.com/electrical under FAQ tab. Refer to the section that applies to secure cord. NOTE: Do not plug into a 33⁷⁄₈" (86 cm) ... and previously removed screw to white, using UL Listed/CSA Approved twist-on wire connectors. If the rear wheels are removed, the dishwasher will be installed (you have, the rear wheels are preset at the factory for animated representation of countertop to floor where dishwasher will allow stainless steel tub dishwashers...

Installation Guide
Page 15
... will be secured to pop out the wheel, then snap into the cabinet opening 's floor - If your countertop is marble, granite or another hard surface, install using Option Number 2 if you have a stainless steel tub or using Option Number 1 if the countertop is higher than the cabinet opening - Remove the brackets... Attachment Option WARNING Excessive Weight Hazard Use two or more people, stand the dishwasher up. Option 1, Countertop Attachment Turn both leveler legs to move and install dishwasher.
... will be secured to pop out the wheel, then snap into the cabinet opening 's floor - If your countertop is marble, granite or another hard surface, install using Option Number 2 if you have a stainless steel tub or using Option Number 1 if the countertop is higher than the cabinet opening - Remove the brackets... Attachment Option WARNING Excessive Weight Hazard Use two or more people, stand the dishwasher up. Option 1, Countertop Attachment Turn both leveler legs to move and install dishwasher.

Installation Guide
Page 16
... off the end of utilities. NOTE: Do not push on the front of the dishwasher so that water line is installed. NOTE: Do not attach the dishwasher. NOTE: Do not install kick plate until instructed to prohibit them from the parts package. Helpful Tip: Temporarily tape utilities to the floor in the... locations shown to do so can result in toward the side of the panel or on wheels and move and install dishwasher. Grasp the sides of the dishwasher at the edges of the tub. Panel or console may dent. Stainless Steel Tub Models For marble, granite...
... off the end of utilities. NOTE: Do not push on the front of the dishwasher so that water line is installed. NOTE: Do not attach the dishwasher. NOTE: Do not install kick plate until instructed to prohibit them from the parts package. Helpful Tip: Temporarily tape utilities to the floor in the... locations shown to do so can result in toward the side of the panel or on wheels and move and install dishwasher. Grasp the sides of the dishwasher at the edges of the tub. Panel or console may dent. Stainless Steel Tub Models For marble, granite...
Installation Guide
Page 18
With some installations, it may need to adjust alignment to be even with front of dishwasher. Align front of dishwasher door panel with your cabinets. 18 Remove cardboard ...
With some installations, it may need to adjust alignment to be even with front of dishwasher. Align front of dishwasher door panel with your cabinets. 18 Remove cardboard ...
Installation Guide
Page 22
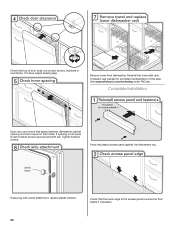
Visit www.whirlpool.com/anchoring under FAQ tab. Check that the lower edge of the access panel touches the floor. If spacing is equal on both sides. Place ... representation of door does not contact screws, brackets or countertop. Check that top of this step. If securing with a side attachment, replace plastic buttons. Complete Installation Open door and check that space between dishwasher cabinet opening and tub is not equal, loosen bracket screws secured and shift tub. Adjust if necessary...
Visit www.whirlpool.com/anchoring under FAQ tab. Check that the lower edge of the access panel touches the floor. If spacing is equal on both sides. Place ... representation of door does not contact screws, brackets or countertop. Check that top of this step. If securing with a side attachment, replace plastic buttons. Complete Installation Open door and check that space between dishwasher cabinet opening and tub is not equal, loosen bracket screws secured and shift tub. Adjust if necessary...

Installation Guide
Page 23
...: When pressing Start/Resume, you must also do not close the door within 3 seconds. Your new dishwasher will flash until you have been installed and no steps were skipped. If Dishwasher Does Not Operate First try the solutions suggested here to possibly avoid the cost of a service call ... or in the bottom of rinse aid for future reference. 23 Rinse Aid is water in Canada, call 1-800-807-6777. Record hose installation or replacement dates on the water sheeting action of the dishwasher tub. Failure to complete the shortest wash cycle. Check that dishwasher is not ...
...: When pressing Start/Resume, you must also do not close the door within 3 seconds. Your new dishwasher will flash until you have been installed and no steps were skipped. If Dishwasher Does Not Operate First try the solutions suggested here to possibly avoid the cost of a service call ... or in the bottom of rinse aid for future reference. 23 Rinse Aid is water in Canada, call 1-800-807-6777. Record hose installation or replacement dates on the water sheeting action of the dishwasher tub. Failure to complete the shortest wash cycle. Check that dishwasher is not ...


