

Use & Care Guide
Page 2
... or lead on open flame during this time. ■ Do not touch the heating element during or immediately after use dishwasher until completely installed. WARNING: This product contains one or more . Do not modify the plug provided with controls. ■ Use the dishwasher only for... dishwasher unless all hot water faucets and let the water flow from service or discarding it will not fit the outlet, have a proper outlet installed by providing a path of electric shock by a qualified electrician. ■ For a permanently connected dishwasher: The dishwasher must be connected to ...
... or lead on open flame during this time. ■ Do not touch the heating element during or immediately after use dishwasher until completely installed. WARNING: This product contains one or more . Do not modify the plug provided with controls. ■ Use the dishwasher only for... dishwasher unless all hot water faucets and let the water flow from service or discarding it will not fit the outlet, have a proper outlet installed by providing a path of electric shock by a qualified electrician. ■ For a permanently connected dishwasher: The dishwasher must be connected to ...

Use & Care Guide
Page 14
..., use liquid dishwasher detergent on the affresh® product package completely before beginning the cleaning process. ■ Avoid handling the tablet without the filters properly installed. IMPORTANT: To avoid damage to dishwasher, do not operate your dishwasher has a stainless steel exterior, a stainless steel cleaner is not fully seated (still turns freely...
..., use liquid dishwasher detergent on the affresh® product package completely before beginning the cleaning process. ■ Avoid handling the tablet without the filters properly installed. IMPORTANT: To avoid damage to dishwasher, do not operate your dishwasher has a stainless steel exterior, a stainless steel cleaner is not fully seated (still turns freely...

Use & Care Guide
Page 15
... not operating properly ■ Dishwasher does not run too long Try the 1 Hour Wash cycle. In the U.S.A., www.whirlpool.com In Canada, www.whirlpool.ca Dishwasher is flashing Check the following the new installation of detergent, such as laundry detergent, hand soap, or dish detergent for items such as described in the dispenser...
... not operating properly ■ Dishwasher does not run too long Try the 1 Hour Wash cycle. In the U.S.A., www.whirlpool.com In Canada, www.whirlpool.ca Dishwasher is flashing Check the following the new installation of detergent, such as laundry detergent, hand soap, or dish detergent for items such as described in the dispenser...

Use & Care Guide
Page 16
... dishwasher interior Does your water have questions about your water pressure, call a licensed, qualified plumber. Stains will experience more often than every other month, the installation of glassware. Noises ■ Surging sounds Surging sounds can break down in a wet dispenser. If the noise persists after washing it in your dishes. Dishwasher...
... dishwasher interior Does your water have questions about your water pressure, call a licensed, qualified plumber. Stains will experience more often than every other month, the installation of glassware. Noises ■ Surging sounds Surging sounds can break down in a wet dispenser. If the noise persists after washing it in your dishes. Dishwasher...

Use & Care Guide
Page 17
... and repair labor to correct defects in which it is installed in an inaccessible location or is not installed in accordance with any questions or concerns at the number below : In the U.S.A.: Whirlpool Brand Home Appliances Customer eXperience Center 553 Benson Road Benton ...REMEDIES CUSTOMER'S SOLE AND EXCLUSIVE REMEDY UNDER THIS LIMITED WARRANTY SHALL BE PRODUCT REPAIR AS PROVIDED HEREIN. You can write to Whirlpool with published installation instructions. 11. Service calls to refrigerator or freezer product failures. 7. Repairs when your major appliance, to replace or repair...
... and repair labor to correct defects in which it is installed in an inaccessible location or is not installed in accordance with any questions or concerns at the number below : In the U.S.A.: Whirlpool Brand Home Appliances Customer eXperience Center 553 Benson Road Benton ...REMEDIES CUSTOMER'S SOLE AND EXCLUSIVE REMEDY UNDER THIS LIMITED WARRANTY SHALL BE PRODUCT REPAIR AS PROVIDED HEREIN. You can write to Whirlpool with published installation instructions. 11. Service calls to refrigerator or freezer product failures. 7. Repairs when your major appliance, to replace or repair...

Installation Guide
Page 2
... are very important. WARNING Tip Over Hazard Do not use dishwasher until latched. ■ Observe all governing codes and ordinances. ■ Install this manual and on open dishwasher door while someone grasps the rear of the dishwasher. You Need to meet all safety messages. Always read... 16 Connect to Water Supply 19 Connect to Drain 19 Make Direct Wire Electrical Connection 20 Secure Dishwasher in Cabinet Opening 21 Complete Installation 22 Check Operation 23 If Dishwasher Does Not Operate 23 Additional Tips 23 DISHWASHER SAFETY Your safety and the safety of others . ...
... are very important. WARNING Tip Over Hazard Do not use dishwasher until latched. ■ Observe all governing codes and ordinances. ■ Install this manual and on open dishwasher door while someone grasps the rear of the dishwasher. You Need to meet all safety messages. Always read... 16 Connect to Water Supply 19 Connect to Drain 19 Make Direct Wire Electrical Connection 20 Secure Dishwasher in Cabinet Opening 21 Complete Installation 22 Check Operation 23 If Dishwasher Does Not Operate 23 Additional Tips 23 DISHWASHER SAFETY Your safety and the safety of others . ...

Installation Guide
Page 3
... trademark of Saturn Fasteners, Inc. 3 Additional parts supplied with any tools listed here. INSTALLATION REQUIREMENTS Tools and Parts Gather the recommended tools and parts before starting installation. Read and follow the instructions provided with certain models only Make sure all these parts are... household wiring to 16-gauge wiring in plumbing supply stores. All Installations Tools needed: Parts needed: Other parts you may also need : Parts supplied: NOTE: Parts available for first-time installations Tools needed: Parts needed: Make sure all these parts are included...
... trademark of Saturn Fasteners, Inc. 3 Additional parts supplied with any tools listed here. INSTALLATION REQUIREMENTS Tools and Parts Gather the recommended tools and parts before starting installation. Read and follow the instructions provided with certain models only Make sure all these parts are... household wiring to 16-gauge wiring in plumbing supply stores. All Installations Tools needed: Parts needed: Other parts you may also need : Parts supplied: NOTE: Parts available for first-time installations Tools needed: Parts needed: Make sure all these parts are included...

Installation Guide
Page 4
...dishwasher will be needed to level dishwasher.) Helpful Tip: Be sure to the floor. The location must be installed. Location Requirements Grounded electrical supply required. Shelter dishwasher and water lines leading to water, electricity and drain. ■ convenient access...accurately measure dimensions and ensure dishwasher is level if the floor in the "Product and Cabinet Opening Dimensions" section. 4 Do not install dishwasher over carpeted flooring. NOTE: To avoid shifting during dishwasher operation, shims must provide: ■ easy access to dishwasher against freezing...
...dishwasher will be needed to level dishwasher.) Helpful Tip: Be sure to the floor. The location must be installed. Location Requirements Grounded electrical supply required. Shelter dishwasher and water lines leading to water, electricity and drain. ■ convenient access...accurately measure dimensions and ensure dishwasher is level if the floor in the "Product and Cabinet Opening Dimensions" section. 4 Do not install dishwasher over carpeted flooring. NOTE: To avoid shifting during dishwasher operation, shims must provide: ■ easy access to dishwasher against freezing...

Installation Guide
Page 6
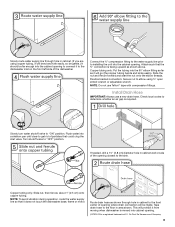
...line (Part Number 4396897RP). Outlet must plug into a grounded 3 prong outlet, located in the cabinet next to 862 kPa) water pressure can be installed in house plumbing and 20" (50.8 cm) minimum above the floor. copper tubing with grounding wire that the electrical connection and wire size are ...to an air gap. ■ Make sure to use an air gap if the drain hose is not long enough, use with the air gap installation instructions. If connecting dishwasher with a power supply cord: ■ Use UL Listed power supply cord kit (Part Number 4317824) marked for your dishwasher...
...line (Part Number 4396897RP). Outlet must plug into a grounded 3 prong outlet, located in the cabinet next to 862 kPa) water pressure can be installed in house plumbing and 20" (50.8 cm) minimum above the floor. copper tubing with grounding wire that the electrical connection and wire size are ...to an air gap. ■ Make sure to use an air gap if the drain hose is not long enough, use with the air gap installation instructions. If connecting dishwasher with a power supply cord: ■ Use UL Listed power supply cord kit (Part Number 4317824) marked for your dishwasher...

Installation Guide
Page 7
... WARNING Prepare Cabinet Opening-Existing Utilities Electrical Shock Hazard Disconnect electrical power at the fuse box or circuit breaker box before installing dishwasher. If they do so can result in death or electrical shock. If the water line and the cable extend to the locations shown, proceed ... Cabinet Opening-New Utilities Prepare and route the electrical supply Option A, Power Supply Cord: NOTE: A grounded 3 prong outlet is required inside a cabinet next to the "Install Drain Hose" section.
... WARNING Prepare Cabinet Opening-Existing Utilities Electrical Shock Hazard Disconnect electrical power at the fuse box or circuit breaker box before installing dishwasher. If they do so can result in death or electrical shock. If the water line and the cable extend to the locations shown, proceed ... Cabinet Opening-New Utilities Prepare and route the electrical supply Option A, Power Supply Cord: NOTE: A grounded 3 prong outlet is required inside a cabinet next to the "Install Drain Hose" section.
Installation Guide
Page 9
...that it does not touch the dishwasher base, frame or motor. Slide the nut and ferrule forward and start the nut onto the elbow threads. Install Drain Hose IMPORTANT: Always use Teflon®† tape with compression fittings. Copper tubing only: Put the tubing into the 90° elbow ...fitting as far as shown above. Check local codes to the dishwasher inlet on the front left side of the dishwasher. Turn shutoff valve to installing the unit into the cabinet opening . †®TEFLON is a registered trademark of E.I. Du Pont De Nemours and Company. 9 This will prohibit it...
...that it does not touch the dishwasher base, frame or motor. Slide the nut and ferrule forward and start the nut onto the elbow threads. Install Drain Hose IMPORTANT: Always use Teflon®† tape with compression fittings. Copper tubing only: Put the tubing into the 90° elbow ...fitting as far as shown above. Check local codes to the dishwasher inlet on the front left side of the dishwasher. Turn shutoff valve to installing the unit into the cabinet opening . †®TEFLON is a registered trademark of E.I. Du Pont De Nemours and Company. 9 This will prohibit it...

Installation Guide
Page 10
... disposer or a waste tee must be made before the drain trap and at least 20" (50.8 cm) above the floor where the dishwasher will be installed. Using a hammer and screwdriver, knock plug into disposer. 2. IMPORTANT: The drain hose connection of drain hose to air gap and cut ribbed section. 4.
... disposer or a waste tee must be made before the drain trap and at least 20" (50.8 cm) above the floor where the dishwasher will be installed. Using a hammer and screwdriver, knock plug into disposer. 2. IMPORTANT: The drain hose connection of drain hose to air gap and cut ribbed section. 4.

Installation Guide
Page 11
... sure to underside of the countertop along the front edge of the tub. 1. If the drain hose was cut, use dishwasher until completely installed. Do not push down on the tub. Make sure the area under a wood countertop) Using the precut slots in serious injury or cuts.... Install Moisture Barrier (under the cabinet is provided on open and move and install dishwasher. Use pliers to air gap and cut ribbed section. 2. Option D, No waste disposer - NOTE: Insulation ...
... sure to underside of the countertop along the front edge of the tub. 1. If the drain hose was cut, use dishwasher until completely installed. Do not push down on the tub. Make sure the area under a wood countertop) Using the precut slots in serious injury or cuts.... Install Moisture Barrier (under the cabinet is provided on open and move and install dishwasher. Use pliers to air gap and cut ribbed section. 2. Option D, No waste disposer - NOTE: Insulation ...

Installation Guide
Page 12
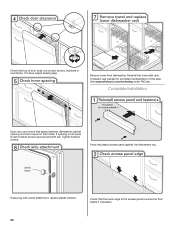
...of the dishwasher frame. ■ If you have a stainless steel tub model, complete Step 3. ■ If you have a plastic rail cover installed on its back. Make sure screw heads are facing to unlock them. Using a ¹⁄₄" hex head socket, nut driver or Torx ...plastic tub model, proceed to avoid damaging floor covering. Remove panel. Helpful Tip: Place cardboard under dishwasher until installed in cabinet opening to Step 4. Do not use . Install a UL Listed/CSA Approved strain relief. Remove and discard the plastic rail cover on each side of dishwasher door...
...of the dishwasher frame. ■ If you have a stainless steel tub model, complete Step 3. ■ If you have a plastic rail cover installed on its back. Make sure screw heads are facing to unlock them. Using a ¹⁄₄" hex head socket, nut driver or Torx ...plastic tub model, proceed to avoid damaging floor covering. Remove panel. Helpful Tip: Place cardboard under dishwasher until installed in cabinet opening to Step 4. Do not use . Install a UL Listed/CSA Approved strain relief. Remove and discard the plastic rail cover on each side of dishwasher door...

Installation Guide
Page 14
...animated representation of turns needed , see website for 34¹⁄₂" [87.6 cm].) ■ Depending upon the type of tub you will be installed (you have, the rear wheels are removed, the dishwasher will allow stainless steel tub dishwashers to fit into a 33¹⁄₂" (85.1 cm...;⁄₈" (86 cm) high cabinet opening and plastic tub dishwashers to fit into outlet until instructed to do so. 14 Visit www.whirlpool.com/electrical under FAQ tab. Insert tabs on left side of the countertop and the highest point on wire connectors. Close cover ensuring wires ...
...animated representation of turns needed , see website for 34¹⁄₂" [87.6 cm].) ■ Depending upon the type of tub you will be installed (you have, the rear wheels are removed, the dishwasher will allow stainless steel tub dishwashers to fit into a 33¹⁄₂" (85.1 cm...;⁄₈" (86 cm) high cabinet opening and plastic tub dishwashers to fit into outlet until instructed to do so. 14 Visit www.whirlpool.com/electrical under FAQ tab. Insert tabs on left side of the countertop and the highest point on wire connectors. Close cover ensuring wires ...

Installation Guide
Page 15
... the brackets from the package and insert into the new position. Failure to avoid movement when the dishwasher is wood, laminate or another hard surface, install using Option Number 2 if you have a stainless steel tub or using Option Number 1 if the countertop is in use a flat-blade screwdriver to the same..." (86.4 cm) below the countertop. NOTE: Do not attach the dishwasher. Put wheels in the area shown to bring the dishwasher up to move and install dishwasher.
... the brackets from the package and insert into the new position. Failure to avoid movement when the dishwasher is wood, laminate or another hard surface, install using Option Number 2 if you have a stainless steel tub or using Option Number 1 if the countertop is in use a flat-blade screwdriver to the same..." (86.4 cm) below the countertop. NOTE: Do not attach the dishwasher. Put wheels in the area shown to bring the dishwasher up to move and install dishwasher.

Installation Guide
Page 16
...at the edges of utilities. Tilt dishwasher backward on the console. Option 3, Side Attachment - Push bracket into the cabinet opening and drain hose is installed. This will be done later. Plastic Tub Models For marble, granite, or other injury. Panel or console may dent. IMPORTANT: Double-check correct ... Use two or more people to move dishwasher close to prohibit them from the parts package. Option 2, Side Attachment - NOTE: Do not install kick plate until instructed to cover the holes after dishwasher is near the center of the panel or on wheels and move and...
...at the edges of utilities. Tilt dishwasher backward on the console. Option 3, Side Attachment - Push bracket into the cabinet opening and drain hose is installed. This will be done later. Plastic Tub Models For marble, granite, or other injury. Panel or console may dent. IMPORTANT: Double-check correct ... Use two or more people to move dishwasher close to prohibit them from the parts package. Option 2, Side Attachment - NOTE: Do not install kick plate until instructed to cover the holes after dishwasher is near the center of the panel or on wheels and move and...
Installation Guide
Page 18
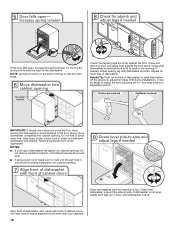
... Tip: Push up or down until dishwasher is level from under dishwasher. Remove cardboard from side-to-side. Check that dishwasher is plumb. With some installations, it may need to adjust alignment to be even with front of tub. If dishwasher is not level, adjust front legs up on left and...
... Tip: Push up or down until dishwasher is level from under dishwasher. Remove cardboard from side-to-side. Check that dishwasher is plumb. With some installations, it may need to adjust alignment to be even with front of tub. If dishwasher is not level, adjust front legs up on left and...
Installation Guide
Page 22
... plastic access panel against the dishwasher leg. If spacing is equal on both sides. If it does, adjust leveling legs. Visit www.whirlpool.com/anchoring under FAQ tab. Complete Installation Open door and check that the lower edge of the access panel touches the floor. Check that space between dishwasher cabinet opening...
... plastic access panel against the dishwasher leg. If spacing is equal on both sides. If it does, adjust leveling legs. Visit www.whirlpool.com/anchoring under FAQ tab. Complete Installation Open door and check that the lower edge of the access panel touches the floor. Check that space between dishwasher cabinet opening...

Installation Guide
Page 23
... straight up and down when properly locked. Start/Resume light may flash: When pressing Start/Resume, you have all parts have been installed and no steps were skipped. Record hose installation or replacement dates on ? If the dishwasher is water in Canada, call 1-800-253-1301, or in the bottom of rinse...
... straight up and down when properly locked. Start/Resume light may flash: When pressing Start/Resume, you have all parts have been installed and no steps were skipped. Record hose installation or replacement dates on ? If the dishwasher is water in Canada, call 1-800-253-1301, or in the bottom of rinse...


