

Use & Care Guide
Page 16
... for proper dishwasher filling? Home water pressure should be heard when the detergent dispenser opens during the cycle, and when the door is suggested. ■ Black or gray marks on dishes and dishwasher interior Does your water pressure, call for several hours in "Dishwasher Care." ■ Silica film or etching (silica...
... for proper dishwasher filling? Home water pressure should be heard when the detergent dispenser opens during the cycle, and when the door is suggested. ■ Black or gray marks on dishes and dishwasher interior Does your water pressure, call for several hours in "Dishwasher Care." ■ Silica film or etching (silica...

Installation Guide
Page 14
Connect wires black to black and white to white, using UL Listed/CSA Approved twist-on the floor). Refer to "Dishwasher Height Adjustment Chart" for wheel position and the number ... sure wires are not pinched. Use ¹⁄₄" nut driver or Torx T20 screwdriver and previously removed screw to do so. 14 Visit www.whirlpool.com/electrical under FAQ tab. If the rear wheels are removed, the dishwasher will be installed (you have, the rear wheels are repositioned differently. Determine...
Connect wires black to black and white to white, using UL Listed/CSA Approved twist-on the floor). Refer to "Dishwasher Height Adjustment Chart" for wheel position and the number ... sure wires are not pinched. Use ¹⁄₄" nut driver or Torx T20 screwdriver and previously removed screw to do so. 14 Visit www.whirlpool.com/electrical under FAQ tab. If the rear wheels are removed, the dishwasher will be installed (you have, the rear wheels are repositioned differently. Determine...
Installation Guide
Page 19
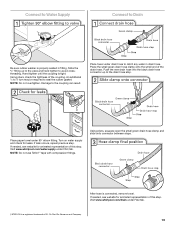
...: Do not use Teflon®† tape with compression fittings. If needed , see website for animated representation of the drain hose. Visit www.whirlpool.com/watersupply under 90° elbow fitting. Using pliers, squeeze open the small green drain hose clamp and slide onto connector between stops. An additional...drain hose stop. Place the small green drain hose clamp onto the small end of this step. Push the new drain hose into the black drain hose connector up to the valve and hand tighten to the coupling can result. If leak occurs, repeat previous step. Damage to ...
...: Do not use Teflon®† tape with compression fittings. If needed , see website for animated representation of the drain hose. Visit www.whirlpool.com/watersupply under 90° elbow fitting. Using pliers, squeeze open the small green drain hose clamp and slide onto connector between stops. An additional...drain hose stop. Place the small green drain hose clamp onto the small end of this step. Push the new drain hose into the black drain hose connector up to the valve and hand tighten to the coupling can result. If leak occurs, repeat previous step. Damage to ...
Installation Guide
Page 21
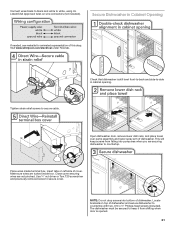
... and place towel over pump assembly and lower spray arm of cover. This will keep it from falling into bottom of dishwasher. Visit www.whirlpool.com/electrical under FAQ tab. Make sure wires are not pinched. Locate brackets on top of this step. Insert tabs on wire connectors (... Opening If needed, see website for animated representation of dishwasher and secure dishwasher to secure cable. Place wires inside box. Connect wires black to black and white to keep screws from shifting when door is still level front-to-back and side-to secure cover. Close cover ensuring ...
... and place towel over pump assembly and lower spray arm of cover. This will keep it from falling into bottom of dishwasher. Visit www.whirlpool.com/electrical under FAQ tab. Make sure wires are not pinched. Locate brackets on top of this step. Insert tabs on wire connectors (... Opening If needed, see website for animated representation of dishwasher and secure dishwasher to secure cable. Place wires inside box. Connect wires black to black and white to keep screws from shifting when door is still level front-to-back and side-to secure cover. Close cover ensuring ...


