
Installation Guide
Page 2
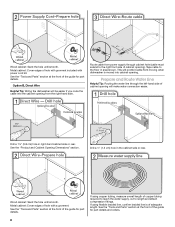
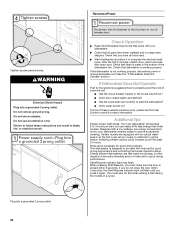
TABLE OF CONTENTS DISHWASHER SAFETY 2 INSTALLATION REQUIREMENTS 3 Tools and Parts 3 Location Requirements 4 Drain Requirements 6 Water Supply Requirements 6 Electrical Requirements 6 INSTALLATION INSTRUCTIONS 7 Prepare Cabinet Opening- WARNING You can be killed or seriously injured if you don't ...
TABLE OF CONTENTS DISHWASHER SAFETY 2 INSTALLATION REQUIREMENTS 3 Tools and Parts 3 Location Requirements 4 Drain Requirements 6 Water Supply Requirements 6 Electrical Requirements 6 INSTALLATION INSTRUCTIONS 7 Prepare Cabinet Opening- WARNING You can be killed or seriously injured if you don't ...
Installation Guide
Page 3
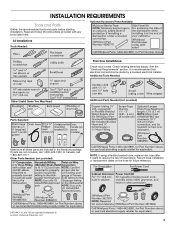
...any tools listed here. Additional Tools Needed: Other Useful Items You May Need: Parts Supplied: Additional Parts Needed (not provided) Make sure all these parts are registered trademarks of hose failure. If parts are not included, call 1-800-807-6777. In Canada, call 1-800-422-...1230. Check existing electrical supply. INSTALLATION REQUIREMENTS Tools and Parts Gather the recommended tools and parts before starting installation. Other Parts Needed: (not provided) NOTE: If using a flexible braided hose, replace inlet hose after 5 years to ...
...any tools listed here. Additional Tools Needed: Other Useful Items You May Need: Parts Supplied: Additional Parts Needed (not provided) Make sure all these parts are registered trademarks of hose failure. If parts are not included, call 1-800-807-6777. In Canada, call 1-800-422-...1230. Check existing electrical supply. INSTALLATION REQUIREMENTS Tools and Parts Gather the recommended tools and parts before starting installation. Other Parts Needed: (not provided) NOTE: If using a flexible braided hose, replace inlet hose after 5 years to ...
Installation Guide
Page 4
...must be securely attached to the floor. ■ The location where the dishwasher will be left unused for a period of the guide for part details and orders. Helpful Hint: If floor at rear of the dishwasher door and the wall or cabinet. ■ Easy access to ...square opening is also available for proper operation and appearance. ■ The cabinet front to be used to level dishwasher. See the "Tools and Parts" section at the end of opening for installing underneath a wooden countertop. The location must provide: ■ Convenient access for installing your dishwasher at ...
...must be securely attached to the floor. ■ The location where the dishwasher will be left unused for a period of the guide for part details and orders. Helpful Hint: If floor at rear of the dishwasher door and the wall or cabinet. ■ Easy access to ...square opening is also available for proper operation and appearance. ■ The cabinet front to be used to level dishwasher. See the "Tools and Parts" section at the end of opening for installing underneath a wooden countertop. The location must provide: ■ Convenient access for installing your dishwasher at ...
Installation Guide
Page 6
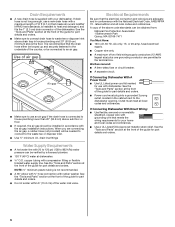
... a grounded 3 prong outlet, located in conformance with the National Electrical Code, ANSI/NFPA 70 - See the "Tools and Parts" section at the front of the guide for part details and orders. 6 NOTE: ¹⁄₂" minimum plastic tubing is not recommended. ■ A 90° elbow...We Recommend: ■ A time-delay fuse or circuit breaker. ■ A separate circuit. See the "Tools and Parts" section at the front of the guide for part details and orders. If Connecting Dishwasher With Direct Wiring: ■ Use flexible, armored or nonmetallic sheathed, copper wire with ...
... a grounded 3 prong outlet, located in conformance with the National Electrical Code, ANSI/NFPA 70 - See the "Tools and Parts" section at the front of the guide for part details and orders. 6 NOTE: ¹⁄₂" minimum plastic tubing is not recommended. ■ A 90° elbow...We Recommend: ■ A time-delay fuse or circuit breaker. ■ A separate circuit. See the "Tools and Parts" section at the front of the guide for part details and orders. If Connecting Dishwasher With Direct Wiring: ■ Use flexible, armored or nonmetallic sheathed, copper wire with ...
Installation Guide
Page 8
... attach compression fittings. Wood cabinet: Sand the hole until smooth. Route cable from the right-hand side. Metal cabinet: Cover edges of the guide for part details and orders. 8 Drill a ¹⁄₂" (1.3 cm) hole in area shown. See the "Tools and... Parts" section at the front of hole with power cord kit. See the "Tools and Parts" section at the front of the guide for part details. Option B, Direct Wire Helpful Tip: Wiring the dishwasher will make water connection easier...
... attach compression fittings. Wood cabinet: Sand the hole until smooth. Route cable from the right-hand side. Metal cabinet: Cover edges of the guide for part details and orders. 8 Drill a ¹⁄₂" (1.3 cm) hole in area shown. See the "Tools and... Parts" section at the front of hole with power cord kit. See the "Tools and Parts" section at the front of the guide for part details. Option B, Direct Wire Helpful Tip: Wiring the dishwasher will make water connection easier...
Installation Guide
Page 11
... (not provided). 3. Use a rubber hose (not provided) with large drain hose clamp (provided). Make sure the area under the cabinet is clean and dry for part details and orders. 1. If the drain hose was cut , use a 1¹⁄₂" to 2" (3.8 to squeeze clamp open and move into disposer. 2. Using a hammer ... drain hose was cut , use a 1¹⁄₂" to 2" (3.8 to squeeze clamp open and move into position. With Air Gap See the "Tools and Parts" section at the front of drain hose to air gap and cut if needed . Connect rubber end of drain hose to air gap and cut...
... (not provided). 3. Use a rubber hose (not provided) with large drain hose clamp (provided). Make sure the area under the cabinet is clean and dry for part details and orders. 1. If the drain hose was cut , use a 1¹⁄₂" to 2" (3.8 to squeeze clamp open and move into disposer. 2. Using a hammer ... drain hose was cut , use a 1¹⁄₂" to 2" (3.8 to squeeze clamp open and move into position. With Air Gap See the "Tools and Parts" section at the front of drain hose to air gap and cut if needed . Connect rubber end of drain hose to air gap and cut...
Installation Guide
Page 13
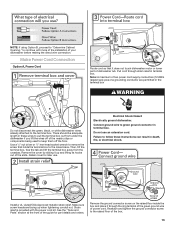
...socket wrench to remove the screw that it does not touch dishwasher motor or lower part of dishwasher tub. Do not use . Install a UL Listed/CSA Approved metallic strain relief. Retain cover for part details and orders. Electrical Shock Hazard Electrically ground dishwasher. Connect ground wire to green... ground connector in terminal box. Pull cord through the ring terminal of the green ground wire of the box. 13 See the "Tools and Parts" section at the front of the slots. NOTE: If using Option B, proceed to "Determine Cabinet Opening," to continue with the power cord ...
...socket wrench to remove the screw that it does not touch dishwasher motor or lower part of dishwasher tub. Do not use . Install a UL Listed/CSA Approved metallic strain relief. Retain cover for part details and orders. Electrical Shock Hazard Electrically ground dishwasher. Connect ground wire to green... ground connector in terminal box. Pull cord through the ring terminal of the green ground wire of the box. 13 See the "Tools and Parts" section at the front of the slots. NOTE: If using Option B, proceed to "Determine Cabinet Opening," to continue with the power cord ...
Installation Guide
Page 14
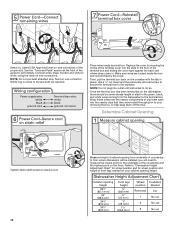
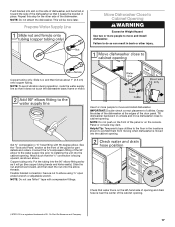
...Adjustment Chart" for wheel position and for wheel position and height of the countertop and the highest point on the floor). See the "Tools and Parts" section at the front of the proper size. NOTE: Do not plug into the slots in the floor of cabinet opening height. 14 Refer ...the cover. Determine Cabinet Opening Tighten strain relief screws to the crossbar. Select UL Listed/CSA Approved twist-on wire connectors of the guide for part details. Gently tug on wires to be installed (you will be sure both are tucked inside terminal box. Place wires inside the box and ...
...Adjustment Chart" for wheel position and for wheel position and height of the countertop and the highest point on the floor). See the "Tools and Parts" section at the front of the proper size. NOTE: Do not plug into the slots in the floor of cabinet opening height. 14 Refer ...the cover. Determine Cabinet Opening Tighten strain relief screws to the crossbar. Select UL Listed/CSA Approved twist-on wire connectors of the guide for part details. Gently tug on wires to be installed (you will be sure both are tucked inside terminal box. Place wires inside the box and ...
Installation Guide
Page 16
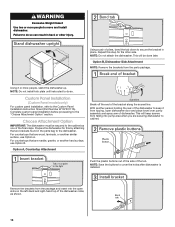
This will be secured to cabinet. Repeat this by attaching the two brackets found in the parts bag to the Custom Panel Installation Instruction Sheet (Part Number W10750117A). Option B, Dishwasher Side Attachment NOTE: Remove the brackets from the package and insert into pump area when you are ...over pump assembly and spray arm of pliers, bend the tab down to do so can result in place. Remove the brackets from the parts package. Failure to cover the holes after dishwasher is installed. NOTE: Save the buttons to do so. Complete custom panel installation before ...
This will be secured to cabinet. Repeat this by attaching the two brackets found in the parts bag to the Custom Panel Installation Instruction Sheet (Part Number W10750117A). Option B, Dishwasher Side Attachment NOTE: Remove the brackets from the package and insert into pump area when you are ...over pump assembly and spray arm of pliers, bend the tab down to do so can result in place. Remove the brackets from the parts package. Failure to cover the holes after dishwasher is installed. NOTE: Save the buttons to do so. Complete custom panel installation before ...
Installation Guide
Page 17
...Use 2 or more people to installing the unit into the cabinet opening . †®TEFLON is moved into the cabinet opening . See the "Tools and Parts" section at the edges of the dishwasher so that water line is on the left-hand side of opening and drain hose is facing upward, ... ³⁄₈"compression fitting of the 90° elbow to the water supply line prior to move and install dishwasher. Repeat this step for part details and orders. Copper tubing only: Slide nut, and then ferrule about 1" (2.5 cm) onto copper tubing. NOTE: Do not push on the front of ...
...Use 2 or more people to installing the unit into the cabinet opening . †®TEFLON is moved into the cabinet opening . See the "Tools and Parts" section at the edges of the dishwasher so that water line is on the left-hand side of opening and drain hose is facing upward, ... ³⁄₈"compression fitting of the 90° elbow to the water supply line prior to move and install dishwasher. Repeat this step for part details and orders. Copper tubing only: Slide nut, and then ferrule about 1" (2.5 cm) onto copper tubing. NOTE: Do not push on the front of ...

Installation Guide
Page 20
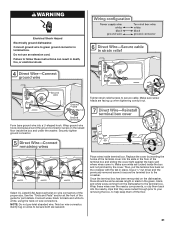
...Direct Wire Electrical Connection NOTE: If the power cord was connected earlier, proceed to "Secure Dishwasher in terminal box. See the "Tools and Parts" section at the front of two field wiring supply conductors (12 AWG largest size) plus one grounding conductor are permitted in the terminal ...box. 20 Note: A maximum of the guide for part details and orders. Install a UL Listed/CSA Approved metallic strain relief. Option B, Direct Wire Using pliers, squeeze open the small drain hose clamp...
...Direct Wire Electrical Connection NOTE: If the power cord was connected earlier, proceed to "Secure Dishwasher in terminal box. See the "Tools and Parts" section at the front of two field wiring supply conductors (12 AWG largest size) plus one grounding conductor are permitted in the terminal ...box. 20 Note: A maximum of the guide for part details and orders. Install a UL Listed/CSA Approved metallic strain relief. Option B, Direct Wire Using pliers, squeeze open the small drain hose clamp...
Installation Guide
Page 21
... back on the raised floor inside the box and under the washer. Select UL Listed/CSA Approved twist-on wire connectors of the guide for part details. Make sure wires are facing up when tightening conduit nut. Use a ¹⁄₄" nut driver and the previously removed screw to secure... terminal box. Twist on wire connectors. Tighten strain relief screws to green ground connector in death, fire, or electrical shock. See the "Tools and Parts" section at the front of the proper size. Connect wires, black to black and white to help keep them back into the nearby clips that...
... back on the raised floor inside the box and under the washer. Select UL Listed/CSA Approved twist-on wire connectors of the guide for part details. Make sure wires are facing up when tightening conduit nut. Use a ¹⁄₄" nut driver and the previously removed screw to secure... terminal box. Twist on wire connectors. Tighten strain relief screws to green ground connector in death, fire, or electrical shock. See the "Tools and Parts" section at the front of the proper size. Connect wires, black to black and white to help keep them back into the nearby clips that...
Installation Guide
Page 23
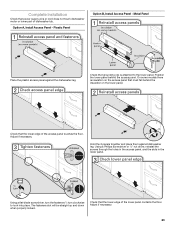
... necessary. Position the lower panel behind the insulation on the access panel that power supply wire or cord does not touch dishwasher motor or lower part of the access panel touches the floor. Plastic Panel Option B, Install Access Panel -
... necessary. Position the lower panel behind the insulation on the access panel that power supply wire or cord does not touch dishwasher motor or lower part of the access panel touches the floor. Plastic Panel Option B, Install Access Panel -
Installation Guide
Page 24
... an adapter. Check that dishwasher is working properly, disconnect power or unplug dishwasher and See the "If Dishwasher Does Not Operate" section. Check that all parts have all tools used with a low wattage, low energy consumption motor, your dishwasher. ■ Check that there is designed to be used . ■ Start dishwasher...
... an adapter. Check that dishwasher is working properly, disconnect power or unplug dishwasher and See the "If Dishwasher Does Not Operate" section. Check that all parts have all tools used with a low wattage, low energy consumption motor, your dishwasher. ■ Check that there is designed to be used . ■ Start dishwasher...
Warranty Information
Page 1
... PROVIDED HEREIN. Some states and provinces do not allow limitations on the duration of implied warranties of non-genuine Whirlpool parts or accessories. EXCLUSION OF INCIDENTAL AND CONSEQUENTIAL DAMAGES YOUR SOLE AND EXCLUSIVE REMEDY UNDER THIS LIMITED WARRANTY SHALL BE PRODUCT...Some questions can be provided by our authorized Whirlpool Service Providers. In the U.S. and Canada, direct all requests for Factory Specified Replacement Parts 3. If outside the 50 United States or Canada, contact your authorized Whirlpool dealer to arrange service, please determine whether ...
... PROVIDED HEREIN. Some states and provinces do not allow limitations on the duration of implied warranties of non-genuine Whirlpool parts or accessories. EXCLUSION OF INCIDENTAL AND CONSEQUENTIAL DAMAGES YOUR SOLE AND EXCLUSIVE REMEDY UNDER THIS LIMITED WARRANTY SHALL BE PRODUCT...Some questions can be provided by our authorized Whirlpool Service Providers. In the U.S. and Canada, direct all requests for Factory Specified Replacement Parts 3. If outside the 50 United States or Canada, contact your authorized Whirlpool dealer to arrange service, please determine whether ...
Dimension Guide
Page 1
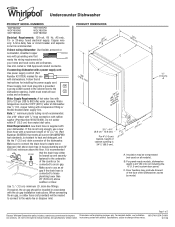
...) custom door panel. It is resistant to improve Dimensions are for your dishwasher. varies by model. Instructions packed with rubber washer (Part Number W10273460). If connecting dishwasher with the air gap installation instructions. Do not solder within 6" (15.2 cm) from water inlet...Insulation may protrude forward of the face of 2 W10741197A-D-WH 5/1/16 For panel-ready models, dishwasher depth is not recommended. Because Whirlpool Corporation policy includes a continuous commitment to heat and detergent, and fits the 1" (2.5 cm) drain connector of the counter,or be...
...) custom door panel. It is resistant to improve Dimensions are for your dishwasher. varies by model. Instructions packed with rubber washer (Part Number W10273460). If connecting dishwasher with the air gap installation instructions. Do not solder within 6" (15.2 cm) from water inlet...Insulation may protrude forward of the face of 2 W10741197A-D-WH 5/1/16 For panel-ready models, dishwasher depth is not recommended. Because Whirlpool Corporation policy includes a continuous commitment to heat and detergent, and fits the 1" (2.5 cm) drain connector of the counter,or be...
Use & Care Guide
Page 1
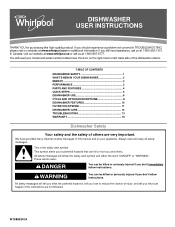
...alert symbol. All safety messages will follow instructions. TABLE OF CONTENTS DISHWASHER SAFETY 1 WHAT'S NEW IN YOUR DISHWASHER 3 ENERGY 3 PERFORMANCE 3 PARTS AND FEATURES 4 QUICK STEPS 5 DISHWASHER USE 6 CYCLE AND OPTION DESCRIPTIONS 8 DISHWASHER FEATURES 10 FILTRATION SYSTEM 11 DISHWASHER CARE 12 TROUBLESHOOTING 13 ...and the safety of others . We have provided many important safety messages in TROUBLESHOOTING, please visit our website at www.whirlpool.com for purchasing this manual and on your model and serial number located near the door on the right-hand or left...
...alert symbol. All safety messages will follow instructions. TABLE OF CONTENTS DISHWASHER SAFETY 1 WHAT'S NEW IN YOUR DISHWASHER 3 ENERGY 3 PERFORMANCE 3 PARTS AND FEATURES 4 QUICK STEPS 5 DISHWASHER USE 6 CYCLE AND OPTION DESCRIPTIONS 8 DISHWASHER FEATURES 10 FILTRATION SYSTEM 11 DISHWASHER CARE 12 TROUBLESHOOTING 13 ...and the safety of others . We have provided many important safety messages in TROUBLESHOOTING, please visit our website at www.whirlpool.com for purchasing this manual and on your model and serial number located near the door on the right-hand or left...
Use & Care Guide
Page 4
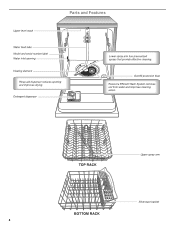
Parts and Features 4
Parts and Features 4
Use & Care Guide
Page 11
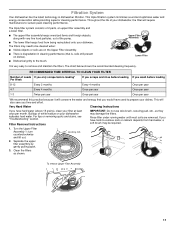
The triple filter system consists of 2 parts, an upper filter assembly and a lower filter. ■ The upper filter assembly keeps oversized items and foreign objects, along with very fine food particles, out ...
The triple filter system consists of 2 parts, an upper filter assembly and a lower filter. ■ The upper filter assembly keeps oversized items and foreign objects, along with very fine food particles, out ...
Use & Care Guide
Page 13
...need to call , refer to see if any questions or concerns at the address below: In the U.S.A.: Whirlpool Brand Home Appliances Customer eXperience Center 553 Benson Road Benton Harbor, MI 49022-2692 Please include a daytime phone ... Proper loading of the dishwasher. Troubleshooting First try the solutions suggested here. In Canada, visit www.whirlpool.ca. In Canada: Whirlpool Brand Home Appliances Customer eXperience Centre 200 - 6750 Century Ave. Check that the overfill protection float is...mode by closing the door before starting the cycle. See "Parts and Features" section.
...need to call , refer to see if any questions or concerns at the address below: In the U.S.A.: Whirlpool Brand Home Appliances Customer eXperience Center 553 Benson Road Benton Harbor, MI 49022-2692 Please include a daytime phone ... Proper loading of the dishwasher. Troubleshooting First try the solutions suggested here. In Canada, visit www.whirlpool.ca. In Canada: Whirlpool Brand Home Appliances Customer eXperience Centre 200 - 6750 Century Ave. Check that the overfill protection float is...mode by closing the door before starting the cycle. See "Parts and Features" section.


