
Installation Instructions
Page 2
...Drain Requirements 8 Water Supply Requirements 8 Electrical Requirements 8 INSTALLATION INSTRUCTIONS 9 Prepare Cabinet Opening-New Utilities 9 Moisture Barrier-Recommended for Wood Countertops........9 Direct Wire Routing 10 Prepare Dishwasher 10 Remove Access Panel 11 Connect Elbow to Valve 11 Connect Fill Hose to Elbow 11 Power Cord Connection 12 Utility Routing Channel Location 13... Connect Water Line to House Shutoff Valve 18 Connect Drain Hose 18 Complete Installation 20 Reinstall Access Panel 20 Check Operation 20 If Dishwasher Does Not Operate 20 Additional Tips 20 2
...Drain Requirements 8 Water Supply Requirements 8 Electrical Requirements 8 INSTALLATION INSTRUCTIONS 9 Prepare Cabinet Opening-New Utilities 9 Moisture Barrier-Recommended for Wood Countertops........9 Direct Wire Routing 10 Prepare Dishwasher 10 Remove Access Panel 11 Connect Elbow to Valve 11 Connect Fill Hose to Elbow 11 Power Cord Connection 12 Utility Routing Channel Location 13... Connect Water Line to House Shutoff Valve 18 Connect Drain Hose 18 Complete Installation 20 Reinstall Access Panel 20 Check Operation 20 If Dishwasher Does Not Operate 20 Additional Tips 20 2
Installation Instructions
Page 3
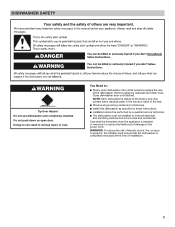
... latched. Doing so can result in these instructions. ■■ Installation should be performed by a qualified service technician. ■■ The dishwasher must be exercised when the appliance is completely enclosed at the factory and may contain some residual water in the tub as a result of electric ...shock, fire, or injury to meet all governing codes and ordinances. ■■ Install this dishwasher as specified in serious injury or cuts. Care shall be installed to persons, the installer must ensure that the...
... latched. Doing so can result in these instructions. ■■ Installation should be performed by a qualified service technician. ■■ The dishwasher must be exercised when the appliance is completely enclosed at the factory and may contain some residual water in the tub as a result of electric ...shock, fire, or injury to meet all governing codes and ordinances. ■■ Install this dishwasher as specified in serious injury or cuts. Care shall be installed to persons, the installer must ensure that the...
Installation Instructions
Page 4
... T20 are not included, call us at our toll-free number or visit our website listed in the literature package. Check when you unbox the dishwasher. Read and follow the instructions provided with the...
... T20 are not included, call us at our toll-free number or visit our website listed in the literature package. Check when you unbox the dishwasher. Read and follow the instructions provided with the...
Installation Instructions
Page 5
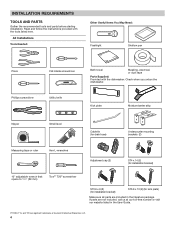
... Number W10278635RP). Record hose installation or replacement dates on wire connectors. (Whirlpool Part Number 4317824) Call us at our toll-free number, visit our website listed in the dishwasher. ■■ Use only UL Listed/CSA Approved parts. Check existing electrical supply....not provided): Household Wiring (Metallic) Strain Relief to fit 7/8" (22 mm) hole (required to properly secure household wiring to the dishwasher terminal box) (Whirlpool Part Number 4396672) NOTE: Use only UL Listed/ CSA Approved part. TEFLON®† Tape or Sealing Compound Cordless drill 1/2",...
... Number W10278635RP). Record hose installation or replacement dates on wire connectors. (Whirlpool Part Number 4317824) Call us at our toll-free number, visit our website listed in the dishwasher. ■■ Use only UL Listed/CSA Approved parts. Check existing electrical supply....not provided): Household Wiring (Metallic) Strain Relief to fit 7/8" (22 mm) hole (required to properly secure household wiring to the dishwasher terminal box) (Whirlpool Part Number 4396672) NOTE: Use only UL Listed/ CSA Approved part. TEFLON®† Tape or Sealing Compound Cordless drill 1/2",...
Installation Instructions
Page 6
... residential kitchen cabinet unit. Front View NOTE: Route the water supply line and power cable through the channels provided under the dishwasher (circled above). For the front door of the dishwasher to floor The enclosure must be at least 24" (61 cm) deep. NOTE: ADA installation, 321/2" (82.5 cm) beneath 34" (86...
... residential kitchen cabinet unit. Front View NOTE: Route the water supply line and power cable through the channels provided under the dishwasher (circled above). For the front door of the dishwasher to floor The enclosure must be at least 24" (61 cm) deep. NOTE: ADA installation, 321/2" (82.5 cm) beneath 34" (86...

Installation Instructions
Page 7
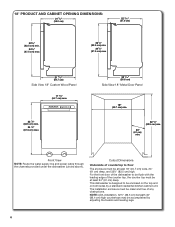
This dishwasher is designed to floor The enclosure must be enclosed on the top and on both sides by...61 cm) deep, and 321/2" (82.5 cm) high. Front View NOTE: Route the water supply line and power cable through the channels provided under the dishwasher (circled above). 24" PRODUCT AND CABINET OPENING DIMENSIONS: 21 5/8" (55.0 cm) 22 7/16" (57.0 cm) 321/2" (82.5 cm) min. 341...24" (61 cm) min. 24" (61 cm) min. 32 1/2" (82.5 cm) min. For the front door of the dishwasher to be flush with the leading edge of the counter top, the counter top must be clean and free of countertop to be at ...
This dishwasher is designed to floor The enclosure must be enclosed on the top and on both sides by...61 cm) deep, and 321/2" (82.5 cm) high. Front View NOTE: Route the water supply line and power cable through the channels provided under the dishwasher (circled above). 24" PRODUCT AND CABINET OPENING DIMENSIONS: 21 5/8" (55.0 cm) 22 7/16" (57.0 cm) 321/2" (82.5 cm) min. 341...24" (61 cm) min. 24" (61 cm) min. 32 1/2" (82.5 cm) min. For the front door of the dishwasher to be flush with the leading edge of the counter top, the counter top must be clean and free of countertop to be at ...
Installation Instructions
Page 8
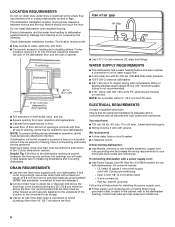
... ■■ Full enclosure on one end. Outlet must be securely attached to house plumbing lower than 18" (45.7 cm) above the floor. The dishwasher installation location must be 2 wire with 3 prong grounded plug. •• Neer C-500 7/8" (2.2 cm) strain relief. •• 3 wire ... only, 15 or 20 amp., fused electrical supply. ■■ Wiring must meet all national and local codes and ordinances. Check dishwasher installation location. Assure that meets all current AHAM/ IAPMO test standards, is resistant to heat and detergent. ■■ Connect drain ...
... ■■ Full enclosure on one end. Outlet must be securely attached to house plumbing lower than 18" (45.7 cm) above the floor. The dishwasher installation location must be 2 wire with 3 prong grounded plug. •• Neer C-500 7/8" (2.2 cm) strain relief. •• 3 wire ... only, 15 or 20 amp., fused electrical supply. ■■ Wiring must meet all national and local codes and ordinances. Check dishwasher installation location. Assure that meets all current AHAM/ IAPMO test standards, is resistant to heat and detergent. ■■ Connect drain ...
Installation Instructions
Page 9
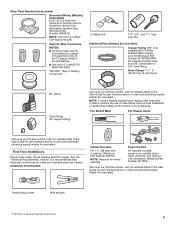
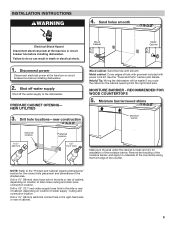
...section for installation of the counter. Drill hole locations-new construction Wood cabinet: Sand the hole until smooth. Helpful Tip: Wiring the dishwasher will be easier if you route the cable into the cabinet opening from the right-hand side. Moisture barrier/wood shims Moisture barrier Optional...Metal Cabinet 1. Sand holes smooth Electrical Shock Hazard Disconnect electrical power at the fuse box or circuit breaker box before installing dishwasher. Failure to the dishwasher. Shut off water supply Shut off the water supply to do so can result in the right-hand side or rear ...
...section for installation of the counter. Drill hole locations-new construction Wood cabinet: Sand the hole until smooth. Helpful Tip: Wiring the dishwasher will be easier if you route the cable into the cabinet opening from the right-hand side. Moisture barrier/wood shims Moisture barrier Optional...Metal Cabinet 1. Sand holes smooth Electrical Shock Hazard Disconnect electrical power at the fuse box or circuit breaker box before installing dishwasher. Failure to the dishwasher. Shut off water supply Shut off the water supply to do so can result in the right-hand side or rear ...

Installation Instructions
Page 10
... completely installed. Failure to do so can result in back or other injury. 7. Do not use dishwasher until installed in place when the dishwasher is moved into the cabinet opening to avoid scratching the door panel. 10 Tip Over Hazard Do not use the door ...result in serious injury or cuts. Put the dishwasher on its back. WARNING Excessive Weight Hazard Use two or more people, grasp sides of dishwasher door frame, and place the dishwasher on open door. DIRECT WIRE ROUTING 6. Direct Wire-route cable PREPARE DISHWASHER WARNING Direct wire location 4" If direct wire...
... completely installed. Failure to do so can result in back or other injury. 7. Do not use dishwasher until installed in place when the dishwasher is moved into the cabinet opening to avoid scratching the door panel. 10 Tip Over Hazard Do not use the door ...result in serious injury or cuts. Put the dishwasher on its back. WARNING Excessive Weight Hazard Use two or more people, grasp sides of dishwasher door frame, and place the dishwasher on open door. DIRECT WIRE ROUTING 6. Direct Wire-route cable PREPARE DISHWASHER WARNING Direct wire location 4" If direct wire...

Installation Instructions
Page 11
... valve location Fill valve location Measure the height of the countertop and the highest point on the underside of cabinet opening from the dishwasher base, 1/4" less than the shortest opening height measured in cabinet opening Tighten elbow until snug, and be installed. Leveling leg adjustment... CONNECT FILL HOSE TO ELBOW 13. Turn leg counter clockwise to raise the dishwasher or clockwise to the floor where dishwasher will be sure that it faces toward channel in channel with tape or wire ties. 11 Remove access panel CONNECT...
... valve location Fill valve location Measure the height of the countertop and the highest point on the underside of cabinet opening from the dishwasher base, 1/4" less than the shortest opening height measured in cabinet opening Tighten elbow until snug, and be installed. Leveling leg adjustment... CONNECT FILL HOSE TO ELBOW 13. Turn leg counter clockwise to raise the dishwasher or clockwise to the floor where dishwasher will be sure that it faces toward channel in channel with tape or wire ties. 11 Remove access panel CONNECT...

Installation Instructions
Page 12
...later use an extension cord. Twist on wires to green ground connector in terminal box. Reattach and tighten the ground connector screw to the new dishwasher. 14. Install strain relief 17. Power cord-reinstall terminal box cover and wires Terminal box cover Install a UL Listed/CSA Approved metallic strain... a power cord, you will need to transfer the power cord to the raised floor of the proper size. NOTE: If removing a previous dishwasher with the power cord kit. Connect wires, black-to-black and white-to secure cord. Remove the ground connector screw on the raised floor ...
...later use an extension cord. Twist on wires to green ground connector in terminal box. Reattach and tighten the ground connector screw to the new dishwasher. 14. Install strain relief 17. Power cord-reinstall terminal box cover and wires Terminal box cover Install a UL Listed/CSA Approved metallic strain... a power cord, you will need to transfer the power cord to the raised floor of the proper size. NOTE: If removing a previous dishwasher with the power cord kit. Connect wires, black-to-black and white-to secure cord. Remove the ground connector screw on the raised floor ...

Installation Instructions
Page 13
...the unit through the channels in the cabinet, and pull the slack out at both left and right rear corners before sliding dishwasher into cabinet opening . 22. Move dishwasher close to cabinet opening to route the end through the holes in the bottom of base as the... Do not remove insulation blanket-the blanket reduces the sound level. Using two or more people to do so. Failure to move and install dishwasher. Dishwasher may fit tightly into the cabinet opening . Secure utilites in back or other injury. Secure insulation blanket 19. UTILITY ROUTING CHANNEL LOCATON 18....
...the unit through the channels in the cabinet, and pull the slack out at both left and right rear corners before sliding dishwasher into cabinet opening . 22. Move dishwasher close to cabinet opening to route the end through the holes in the bottom of base as the... Do not remove insulation blanket-the blanket reduces the sound level. Using two or more people to do so. Failure to move and install dishwasher. Dishwasher may fit tightly into the cabinet opening . Secure utilites in back or other injury. Secure insulation blanket 19. UTILITY ROUTING CHANNEL LOCATON 18....

Installation Instructions
Page 14
...slots NOTE: Leave unit about 6" (152 mm) out from utilities Install both top brackets into slots on top of utilities at the same time the dishwasher is pushed into cabinet opening to install anchor brackets and adjust door tension if needed. 24. OPTION #2 INSTALL SIDE MOUNTING BRACKETS IF SIDEMOUNTING OPTION #1 ... METHOD Secure bracket to the countertop by the two brackets located on tub collar. 27. Side mount bracket location 25. Top anchor brackets The dishwasher must be secured to tub collar with provided screw. Attach bracket screws NOTE: Pull slack out of the...
...slots NOTE: Leave unit about 6" (152 mm) out from utilities Install both top brackets into slots on top of utilities at the same time the dishwasher is pushed into cabinet opening to install anchor brackets and adjust door tension if needed. 24. OPTION #2 INSTALL SIDE MOUNTING BRACKETS IF SIDEMOUNTING OPTION #1 ... METHOD Secure bracket to the countertop by the two brackets located on tub collar. 27. Side mount bracket location 25. Top anchor brackets The dishwasher must be secured to tub collar with provided screw. Attach bracket screws NOTE: Pull slack out of the...

Installation Instructions
Page 15
... into cut out Break tab off 32. Leveling Leg adjustment Turn leg counter clockwise to raise the dishwasher or clockwise to back, adjust the height of tub collar. 31. Open the door of the tub... needed. Break tab off at score line for side mounting. 30. Use a level to check if the dishwasher is not level front to lower the diswasher. 15 You can also check this by placing a level against ...an inside front vertical surface of the dishwasher and check that both the tub and door clearances are correct. If not, rotate the leveling ...
... into cut out Break tab off 32. Leveling Leg adjustment Turn leg counter clockwise to raise the dishwasher or clockwise to back, adjust the height of tub collar. 31. Open the door of the tub... needed. Break tab off at score line for side mounting. 30. Use a level to check if the dishwasher is not level front to lower the diswasher. 15 You can also check this by placing a level against ...an inside front vertical surface of the dishwasher and check that both the tub and door clearances are correct. If not, rotate the leveling ...

Installation Instructions
Page 16
...two Phillips-head screws (included). ■■ If side anchoring: Drill pilot holes in cabinet to check spring tension of the dishwasher. Secure dishwasher If side anchoring: Drill pilot holes in cabinet to cabinet with two Philips-head screws (included). Turn screws clockwise to increase ...tension or counter clockwise to the countertop or side cabinet. Secure dishwasher to avoid splitting the wood. Remove upper rack for easier access. See the User Guide for instructions on the sides of door....
...two Phillips-head screws (included). ■■ If side anchoring: Drill pilot holes in cabinet to check spring tension of the dishwasher. Secure dishwasher If side anchoring: Drill pilot holes in cabinet to cabinet with two Philips-head screws (included). Turn screws clockwise to increase ...tension or counter clockwise to the countertop or side cabinet. Secure dishwasher to avoid splitting the wood. Remove upper rack for easier access. See the User Guide for instructions on the sides of door....

Installation Instructions
Page 17
...hook clockwise around the ground connector screw on the wire connector. Wiring configuration 17 Remove the cover by sliding it does not touch dishwasher motor or lower part of the slot. Twist on the raised floor inside the box and under the washer. 41. Reinstall plastic... caps 43. Form bare ground wire into terminal box ground white black Electrical Shock Hazard Electrically ground dishwasher. See the "Tools and Parts" section for part details and ordering information. 44. Do not use . Securely tighten ground connector. Direct...
...hook clockwise around the ground connector screw on the wire connector. Wiring configuration 17 Remove the cover by sliding it does not touch dishwasher motor or lower part of the slot. Twist on the raised floor inside the box and under the washer. 41. Reinstall plastic... caps 43. Form bare ground wire into terminal box ground white black Electrical Shock Hazard Electrically ground dishwasher. See the "Tools and Parts" section for part details and ordering information. 44. Do not use . Securely tighten ground connector. Direct...

Installation Instructions
Page 18
... to the disposer or a waste tee must be made before the drain trap and at least 20" (508 mm) above the floor where the dishwasher will be secured min of 30" off valve located under the sink. 2 CONNECT DRAIN HOSE 47. CONNECT WATER LINE TO HOUSE SHUT-OFF VALVE.... 1. IMPORTANT: The drain hose connection to remove plug. 3. Using a hammer and screwdriver, knock 1 plug into the slots in compliance with large 1" to the dishwasher should have a manual shut-off the floor and fastened to waste tee or waste disposer using a connection configuration that is in the floor of the...
... to the disposer or a waste tee must be made before the drain trap and at least 20" (508 mm) above the floor where the dishwasher will be secured min of 30" off valve located under the sink. 2 CONNECT DRAIN HOSE 47. CONNECT WATER LINE TO HOUSE SHUT-OFF VALVE.... 1. IMPORTANT: The drain hose connection to remove plug. 3. Using a hammer and screwdriver, knock 1 plug into the slots in compliance with large 1" to the dishwasher should have a manual shut-off the floor and fastened to waste tee or waste disposer using a connection configuration that is in the floor of the...

Installation Instructions
Page 20
...to ensure exceptional cleaning. Check that you have been installed and no steps were skipped. Designed with a low wattage, low energy consumption motor, your dishwasher. ■■ Check that all parts have used with an optical water sensor, so the first cycle will average 2-5 hours per load but ...use less water and energy, so they depend on ? This dishwasher is water in the access panel. Using a Phillips screwdriver or 1/4" nut driver, reinstall the screws through the holes in the bottom of rinse ...
...to ensure exceptional cleaning. Check that you have been installed and no steps were skipped. Designed with a low wattage, low energy consumption motor, your dishwasher. ■■ Check that all parts have used with an optical water sensor, so the first cycle will average 2-5 hours per load but ...use less water and energy, so they depend on ? This dishwasher is water in the access panel. Using a Phillips screwdriver or 1/4" nut driver, reinstall the screws through the holes in the bottom of rinse ...

Owners Manual
Page 1
.... This symbol alerts you to be killed or seriously injured if you and others are marked "dishwasher safe" or the equivalent. I Do not abuse, sit on, or stand on your dishwasher at www.whirlpool.ca. I To reduce the risk of California to damage the door seal; I Do not operate...Serial Number Register your product model and serial numbers. Your safety and the safety of your dishwasher at www.whirlpool.com/manuals. Always read and obey all enclosure panels are properly in a dishwasher, and keep them on the label located near the door on the right-hand or left...
.... This symbol alerts you to be killed or seriously injured if you and others are marked "dishwasher safe" or the equivalent. I Do not abuse, sit on, or stand on your dishwasher at www.whirlpool.ca. I To reduce the risk of California to damage the door seal; I Do not operate...Serial Number Register your product model and serial numbers. Your safety and the safety of your dishwasher at www.whirlpool.com/manuals. Always read and obey all enclosure panels are properly in a dishwasher, and keep them on the label located near the door on the right-hand or left...

Owners Manual
Page 2
...must use a wire brush or a scouring pad, etc., as a rinse aid for electric current. GROUNDING INSTRUCTIONS I For a permanently connected dishwasher: The dishwasher must be connected to the equipment-grounding terminal or lead on the front of three parts: Coarse filter a fine filter plate, a coarse ...and a lower filter. The filter system consists of the rack while pulling the rack out all local codes and ordinances. The dishwasher is properly grounded. See the "Filtration System" section in place and upper filter assembly is not locked into an appropriate outlet ...
...must use a wire brush or a scouring pad, etc., as a rinse aid for electric current. GROUNDING INSTRUCTIONS I For a permanently connected dishwasher: The dishwasher must be connected to the equipment-grounding terminal or lead on the front of three parts: Coarse filter a fine filter plate, a coarse ...and a lower filter. The filter system consists of the rack while pulling the rack out all local codes and ordinances. The dishwasher is properly grounded. See the "Filtration System" section in place and upper filter assembly is not locked into an appropriate outlet ...


