Installation Instructions
Page 2
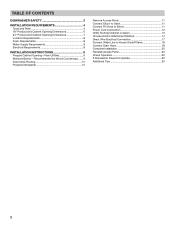
TABLE OF CONTENTS DISHWASHER SAFETY 3 INSTALLATION REQUIREMENTS 4 Tools and Parts 4 18" Product and Cabinet Opening Dimensions 6 24" Product and Cabinet Opening Dimensions 7 Location Requirements 8 Drain Requirements 8 Water Supply Requirements 8 Electrical Requirements 8 INSTALLATION INSTRUCTIONS 9 Prepare Cabinet Opening-New Utilities 9 Moisture Barrier-Recommended for Wood Countertops........9 Direct Wire Routing ...
TABLE OF CONTENTS DISHWASHER SAFETY 3 INSTALLATION REQUIREMENTS 4 Tools and Parts 4 18" Product and Cabinet Opening Dimensions 6 24" Product and Cabinet Opening Dimensions 7 Location Requirements 8 Drain Requirements 8 Water Supply Requirements 8 Electrical Requirements 8 INSTALLATION INSTRUCTIONS 9 Prepare Cabinet Opening-New Utilities 9 Moisture Barrier-Recommended for Wood Countertops........9 Direct Wire Routing ...
Installation Instructions
Page 6
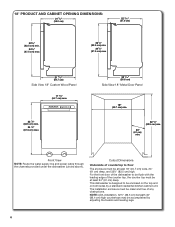
Front View NOTE: Route the water supply line and power cable through the channels provided under the dishwasher (circled above). Cutout Dimensions Underside of the dishwasher to be enclosed on the top and on both sides by adjusting the toekick and leveling legs. 6 For the front door ... at least 24" (61 cm) deep. This dishwasher is designed to be flush with the leading edge of any obstructions. 18" PRODUCT AND CABINET OPENING DIMENSIONS: 21 5/8" (55.0 cm) 22 7/16" (57.0 cm) 321/2" (82.5 cm) min. 341/2" (87.5 cm) max 321/2" (82.5 cm) min. 341/2" (87.5 cm) max 21 9/16...
Front View NOTE: Route the water supply line and power cable through the channels provided under the dishwasher (circled above). Cutout Dimensions Underside of the dishwasher to be enclosed on the top and on both sides by adjusting the toekick and leveling legs. 6 For the front door ... at least 24" (61 cm) deep. This dishwasher is designed to be flush with the leading edge of any obstructions. 18" PRODUCT AND CABINET OPENING DIMENSIONS: 21 5/8" (55.0 cm) 22 7/16" (57.0 cm) 321/2" (82.5 cm) min. 341/2" (87.5 cm) max 321/2" (82.5 cm) min. 341/2" (87.5 cm) max 21 9/16...

Installation Instructions
Page 7
24" PRODUCT AND CABINET OPENING DIMENSIONS: 21 5/8" (55.0 cm) 22 7/16" (57.0 cm) 321/2" (82.5 cm) min. 341/2" (87.5 cm) max 321/2" (82.5 cm) min. 341/2" (87.5 cm) max 21 9/16" (... line and power cable through the channels provided under the dishwasher (circled above). The installation enclosure must be at least 24" (61 cm) deep. Cutout Dimensions Underside of any obstructions. For the front door of the dishwasher to be flush with the leading edge of the counter top, the counter top...
24" PRODUCT AND CABINET OPENING DIMENSIONS: 21 5/8" (55.0 cm) 22 7/16" (57.0 cm) 321/2" (82.5 cm) min. 341/2" (87.5 cm) max 321/2" (82.5 cm) min. 341/2" (87.5 cm) max 21 9/16" (... line and power cable through the channels provided under the dishwasher (circled above). The installation enclosure must be at least 24" (61 cm) deep. Cutout Dimensions Underside of any obstructions. For the front door of the dishwasher to be flush with the leading edge of the counter top, the counter top...
Installation Instructions
Page 8
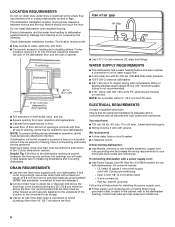
.... If this is not long enough, use with a maximum length of the counter, or be securely attached to take special care in measuring dimensions and in the "Cutout dimensions" section. We recommend: ■■ A time-delay fuse or circuit breaker. ■■ A separate circuit. If connecting dishwasher with floor at front of...
.... If this is not long enough, use with a maximum length of the counter, or be securely attached to take special care in measuring dimensions and in the "Cutout dimensions" section. We recommend: ■■ A time-delay fuse or circuit breaker. ■■ A separate circuit. If connecting dishwasher with floor at front of...
Installation Instructions
Page 9
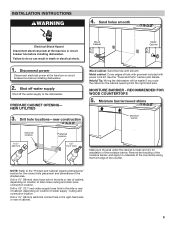
... the hole until smooth. RECOMMENDED FOR WOOD COUNTERTOPS 5. Shut off water supply Shut off the water supply to the "Product and Cabinet Opening Dimensions" section for installation of drain hose routing and drain hose connection location. Metal cabinet: Cover edges of the counter. Remove the backing of ...11/2" (38 mm) Preferred location 1/2" (12.7 mm) Make sure the area under the cabinet is clean and dry for the correct hole placement and dimensions of cabinet. 9 MOISTURE BARRIER - Drill a 11/2" (38 mm) drain hose hole in the side or rear of cabinet, depending on location of ...
... the hole until smooth. RECOMMENDED FOR WOOD COUNTERTOPS 5. Shut off water supply Shut off the water supply to the "Product and Cabinet Opening Dimensions" section for installation of drain hose routing and drain hose connection location. Metal cabinet: Cover edges of the counter. Remove the backing of ...11/2" (38 mm) Preferred location 1/2" (12.7 mm) Make sure the area under the cabinet is clean and dry for the correct hole placement and dimensions of cabinet. 9 MOISTURE BARRIER - Drill a 11/2" (38 mm) drain hose hole in the side or rear of cabinet, depending on location of ...

