
Dimension Guide
Page 1
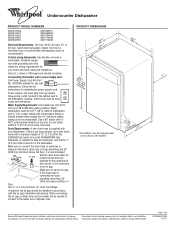
...WDF310PCA WDF310PLA WDF510PAY WDF530PAY WDF530PLY WDF530PSY WDF730PAY WDT710PAY WDT770PAY Electrical Requirements: 120-volt, 60-Hz, AC-only, 15- Copper wire only. If direct wiring dishwasher: Use flexible, armored or nonmetallic, sheathed copper wire with grounding wire that the drain hose ...threads on one end. If this is not long enough, use a new drain hose with the air gap installation instructions. Use ¹⁄₂" (1.3 cm) minimum I.D. PRODUCT DIMENSIONS Because Whirlpool Corporation policy includes a continuous commitment to 862 kPa) water pressure. Specifications ...
...WDF310PCA WDF310PLA WDF510PAY WDF530PAY WDF530PLY WDF530PSY WDF730PAY WDT710PAY WDT770PAY Electrical Requirements: 120-volt, 60-Hz, AC-only, 15- Copper wire only. If direct wiring dishwasher: Use flexible, armored or nonmetallic, sheathed copper wire with grounding wire that the drain hose ...threads on one end. If this is not long enough, use a new drain hose with the air gap installation instructions. Use ¹⁄₂" (1.3 cm) minimum I.D. PRODUCT DIMENSIONS Because Whirlpool Corporation policy includes a continuous commitment to 862 kPa) water pressure. Specifications ...

Use & Care Guide
Page 5
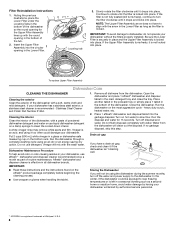
... surfaces. ■ Make sure that when the dishwasher door is designed to Hard Water (7-12 grains per U.S. They also improve drying by allowing water to drain off . Lock fill - -- 6 5 4 -- - --- STEP 2 Add Detergent NOTE: If you use too little in better cleaning. Dishwasher Use STEP 1 Prepare and Load the Dishwasher IMPORTANT: Remove...
... surfaces. ■ Make sure that when the dishwasher door is designed to Hard Water (7-12 grains per U.S. They also improve drying by allowing water to drain off . Lock fill - -- 6 5 4 -- - --- STEP 2 Add Detergent NOTE: If you use too little in better cleaning. Dishwasher Use STEP 1 Prepare and Load the Dishwasher IMPORTANT: Remove...
Use & Care Guide
Page 8
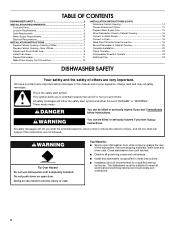
...in all dishware from the dishwasher will not be exposed to near freezing temperatures or is left in a seasonal dwelling such as part of Whirlpool, U.S.A. 8 Cleaning the interior Clean the interior of the tub. 2. Do not use affresh®† dishwasher and disposer cleaner (recommended...most aggressive cycle - Insert the Upper Filter Assembly into place. Slowly rotate the filter clockwise until it if the dishwasher isn't draining well. ■ Read these instructions and the instructions found on the affresh® product package completely before beginning the cleaning process....
...in all dishware from the dishwasher will not be exposed to near freezing temperatures or is left in a seasonal dwelling such as part of Whirlpool, U.S.A. 8 Cleaning the interior Clean the interior of the tub. 2. Do not use affresh®† dishwasher and disposer cleaner (recommended...most aggressive cycle - Insert the Upper Filter Assembly into place. Slowly rotate the filter clockwise until it if the dishwasher isn't draining well. ■ Read these instructions and the instructions found on the affresh® product package completely before beginning the cleaning process....
Installation Guide
Page 2
...tell you and others are not followed. TABLE OF CONTENTS DISHWASHER SAFETY 2 INSTALLATION REQUIREMENTS 3 Tools and Parts 3 Location Requirements 4 Drain Requirements 6 Water Supply Requirements 6 Electrical Requirements 6 INSTALLATION INSTRUCTIONS 7 Prepare Cabinet Opening-Existing Utilities 7 Prepare Cabinet Opening-New Utilities 7 ... Water Supply Line 15 Move Dishwasher Close to Cabinet Opening 16 Connect to Water Supply 18 Connect to Drain 18 Make Direct Wire Electrical Connection 19 Secure Dishwasher in Cabinet Opening 20 Complete Installation 22 Check Operation ...
...tell you and others are not followed. TABLE OF CONTENTS DISHWASHER SAFETY 2 INSTALLATION REQUIREMENTS 3 Tools and Parts 3 Location Requirements 4 Drain Requirements 6 Water Supply Requirements 6 Electrical Requirements 6 INSTALLATION INSTRUCTIONS 7 Prepare Cabinet Opening-Existing Utilities 7 Prepare Cabinet Opening-New Utilities 7 ... Water Supply Line 15 Move Dishwasher Close to Cabinet Opening 16 Connect to Water Supply 18 Connect to Drain 18 Make Direct Wire Electrical Connection 19 Secure Dishwasher in Cabinet Opening 20 Complete Installation 22 Check Operation ...
Installation Guide
Page 4
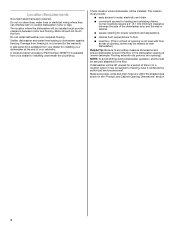
...opening, shims may be installed. NOTE: To avoid shifting during dishwasher operation, shims must provide: ■ easy access to water, electricity and drain. ■ convenient access for installing your cabinetry. Corner locations require a 2" (5.1 cm) minimum clearance between motor and flooring. Check location ...where dishwasher will be needed to level dishwasher.) Helpful Tip: Be sure to dishwasher against freezing. Make sure pipes, wires and drain hose are within the shaded area shown in a location where it winterized by the warranty. Motor should not touch the floor....
...opening, shims may be installed. NOTE: To avoid shifting during dishwasher operation, shims must provide: ■ easy access to water, electricity and drain. ■ convenient access for installing your cabinetry. Corner locations require a 2" (5.1 cm) minimum clearance between motor and flooring. Check location ...where dishwasher will be needed to level dishwasher.) Helpful Tip: Be sure to dishwasher against freezing. Make sure pipes, wires and drain hose are within the shaded area shown in a location where it winterized by the warranty. Motor should not touch the floor....
Installation Guide
Page 6
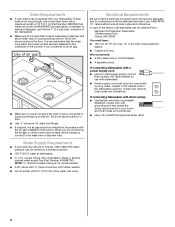
...50.8 cm) minimum above code standards can be verified by a licensed plumber. ■ 120°F (49°C) water at dishwasher O.D. If drain hose is not long enough, use with your home and local codes and ordinances. ■ Use a UL Listed/CSA Approved strain relief. 6 ... recommend: ■ A time-delay fuse or circuit breaker. ■ A separate circuit. latest edition and all local codes and ordinances. Drain Requirements ■ A new drain hose is supplied with dishwasher. ■ Power supply cord must plug into a grounded 3 prong outlet, located in the cabinet next to ...
...50.8 cm) minimum above code standards can be verified by a licensed plumber. ■ 120°F (49°C) water at dishwasher O.D. If drain hose is not long enough, use with your home and local codes and ordinances. ■ Use a UL Listed/CSA Approved strain relief. 6 ... recommend: ■ A time-delay fuse or circuit breaker. ■ A separate circuit. latest edition and all local codes and ordinances. Drain Requirements ■ A new drain hose is supplied with dishwasher. ■ Power supply cord must plug into a grounded 3 prong outlet, located in the cabinet next to ...
Installation Guide
Page 7
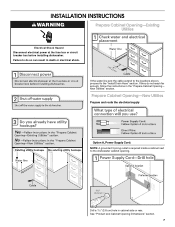
... Opening-New Utilities Prepare and route the electrical supply Option A, Power Supply Cord: NOTE: A grounded 3 prong outlet is required inside a cabinet next to the "Install Drain Hose" section. If they do so can result in death or electrical shock. INSTALLATION INSTRUCTIONS WARNING Prepare Cabinet Opening-Existing Utilities Electrical Shock Hazard Disconnect...
... Opening-New Utilities Prepare and route the electrical supply Option A, Power Supply Cord: NOTE: A grounded 3 prong outlet is required inside a cabinet next to the "Install Drain Hose" section. If they do so can result in death or electrical shock. INSTALLATION INSTRUCTIONS WARNING Prepare Cabinet Opening-Existing Utilities Electrical Shock Hazard Disconnect...

Installation Guide
Page 9
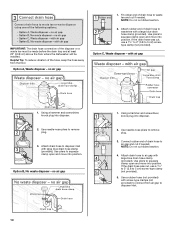
... Turn shutoff valve to the front center of particles that is moved into cabinet opening . Route drain hose as shown through hole in area shown. Install Drain Hose IMPORTANT: Always use a new drain hose. This will be far enough into a shallow pan until clear to get rid of opening...in area shown. Check local codes to the floor in cabinet. (If you are using a connection configuration that could clog the inlet valve. Tape drain hose to determine whether an air gap is moved into cabinet opening . If needed, drill a 1¹⁄₂" (3.8 cm) diameter hole in...
... Turn shutoff valve to the front center of particles that is moved into cabinet opening . Route drain hose as shown through hole in area shown. Install Drain Hose IMPORTANT: Always use a new drain hose. This will be far enough into a shallow pan until clear to get rid of opening...in area shown. Check local codes to the floor in cabinet. (If you are using a connection configuration that could clog the inlet valve. Tape drain hose to determine whether an air gap is moved into cabinet opening . If needed, drill a 1¹⁄₂" (3.8 cm) diameter hole in...
Installation Guide
Page 10
...-type clamps (not provided) to connect from the floor. Attach rubber end of the disposer or a waste tee must be made before the drain trap and at least 20" (50.8 cm) above the floor where the dishwasher will be installed. Use pliers to squeeze clamp open and ...3. Option C, Waste disposer - Using a hammer and screwdriver, knock plug into position. Use needle-nose pliers to air gap with large blue drain hose clamp (provided). Attach drain hose to remove plug. 3. Using a hammer and screwdriver, knock plug into disposer. 2. Use needle-nose pliers to disposer inlet with large blue...
...-type clamps (not provided) to connect from the floor. Attach rubber end of the disposer or a waste tee must be made before the drain trap and at least 20" (50.8 cm) above the floor where the dishwasher will be installed. Use pliers to squeeze clamp open and ...3. Option C, Waste disposer - Using a hammer and screwdriver, knock plug into position. Use needle-nose pliers to air gap with large blue drain hose clamp (provided). Attach drain hose to remove plug. 3. Using a hammer and screwdriver, knock plug into disposer. 2. Use needle-nose pliers to disposer inlet with large blue...
Installation Guide
Page 11
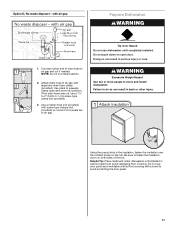
... air gap. Use a rubber hose (not provided) with screw-type clamps (not provided) to connect from waste tee to squeeze clamp open door. If the drain hose was cut, use a 1¹⁄₂" to 2" (3.8 to fasten the insulation down on open and move and install dishwasher. Be sure to 5.1 ... 3. Connect rubber end of the tub. Using the precut slots in the insulation, fasten the insulation over the molded hooks on both sides of drain hose to move into position. WARNING Excessive Weight Hazard Use two or more people to air gap and cut ribbed section. 2. Helpful Tip: Place...
... air gap. Use a rubber hose (not provided) with screw-type clamps (not provided) to connect from waste tee to squeeze clamp open door. If the drain hose was cut, use a 1¹⁄₂" to 2" (3.8 to fasten the insulation down on open and move and install dishwasher. Be sure to 5.1 ... 3. Connect rubber end of the tub. Using the precut slots in the insulation, fasten the insulation over the molded hooks on both sides of drain hose to move into position. WARNING Excessive Weight Hazard Use two or more people to air gap and cut ribbed section. 2. Helpful Tip: Place...
Installation Guide
Page 16
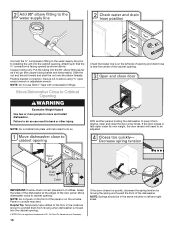
... dishwasher. Move dishwasher close the door a few times. NOTE: Do not push on the front of the panel or on left side of opening and drain hose is near the center of the cabinet opening . †®TEFLON is moved into the cabinet opening . NOTE: Springs should be adjusted. Connect the...
... dishwasher. Move dishwasher close the door a few times. NOTE: Do not push on the front of the panel or on left side of opening and drain hose is near the center of the cabinet opening . †®TEFLON is moved into the cabinet opening . NOTE: Springs should be adjusted. Connect the...
Installation Guide
Page 17
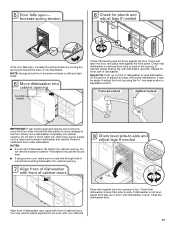
... the same notches on front of the dishwasher. Helpful Tip: Push up or down until dishwasher is level. Do not kink or pinch water line, drain hose, power supply cord or direct wire between dishwasher and cabinet. NOTES: ■ It is level from under dishwasher. Check that leveling legs are firmly...
... the same notches on front of the dishwasher. Helpful Tip: Push up or down until dishwasher is level. Do not kink or pinch water line, drain hose, power supply cord or direct wire between dishwasher and cabinet. NOTES: ■ It is level from under dishwasher. Check that leveling legs are firmly...
Installation Guide
Page 18
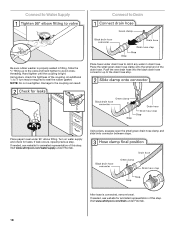
...leak occurs, repeat previous step. Using pliers, squeeze open the small green drain hose clamp and slide onto connector between stops. Visit www.whirlpool.com/drain under FAQ tab. Push the new drain hose into the black drain hose connector up to the valve and hand tighten to the coupling can ...result. An additional ¹⁄₄ to ¹⁄₂ turn may be required to the drain hose stop. Visit www.whirlpool.com/watersupply under FAQ tab. 18 After hose is tight. Hand tighten until the coupling is connected, remove towel. Turn on...
...leak occurs, repeat previous step. Using pliers, squeeze open the small green drain hose clamp and slide onto connector between stops. Visit www.whirlpool.com/drain under FAQ tab. Push the new drain hose into the black drain hose connector up to the valve and hand tighten to the coupling can ...result. An additional ¹⁄₄ to ¹⁄₂ turn may be required to the drain hose stop. Visit www.whirlpool.com/watersupply under FAQ tab. 18 After hose is tight. Hand tighten until the coupling is connected, remove towel. Turn on...


