
Installation Guide
Page 2
TABLE OF CONTENTS DISHWASHER SAFETY 3 INSTALLATION REQUIREMENTS 4 Tools and Parts 4 Location Requirements 6 Product and Cabinet Opening Dimensions 7 Drain Requirements 8 Water Supply Requirements 8 Electrical Requirements 8 INSTALLATION INSTRUCTIONS 9 Prepare Cabinet Opening - New Utilities 9 Install Optional Moisture Barrier 9 ...
TABLE OF CONTENTS DISHWASHER SAFETY 3 INSTALLATION REQUIREMENTS 4 Tools and Parts 4 Location Requirements 6 Product and Cabinet Opening Dimensions 7 Drain Requirements 8 Water Supply Requirements 8 Electrical Requirements 8 INSTALLATION INSTRUCTIONS 9 Prepare Cabinet Opening - New Utilities 9 Install Optional Moisture Barrier 9 ...
Installation Guide
Page 4
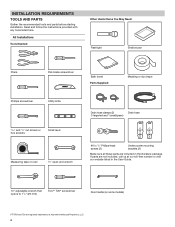
... installation. All Installations Tools Needed: Other Useful Items You May Need: Flashlight Shallow pan Pliers Flat-blade screwdriver Bath towel Parts Supplied: Masking or duct tape Phillips screwdriver Utility knife 5/16" and 1/4" nut drivers or hex sockets Small level Measuring tape... hose clamps (2) Drain hose (1 large/red and 1 small/green) #10 x 1/2" Phillips-head screws (2) Undercounter mounting brackets (2) Make sure all these parts are included in the User Guide. 10" adjustable wrench that opens to 11/8" (29 mm) Torx®† T20® screwdriver Door handle (on...
... installation. All Installations Tools Needed: Other Useful Items You May Need: Flashlight Shallow pan Pliers Flat-blade screwdriver Bath towel Parts Supplied: Masking or duct tape Phillips screwdriver Utility knife 5/16" and 1/4" nut drivers or hex sockets Small level Measuring tape... hose clamps (2) Drain hose (1 large/red and 1 small/green) #10 x 1/2" Phillips-head screws (2) Undercounter mounting brackets (2) Make sure all these parts are included in the User Guide. 10" adjustable wrench that opens to 11/8" (29 mm) Torx®† T20® screwdriver Door handle (on...
Installation Guide
Page 5
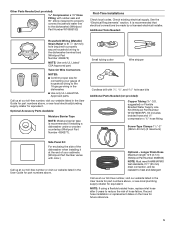
... installation or replacement dates on the hose for connecting your gauge of household wiring to reduce the risk of your cabinetry (Whirlpool Part Number varies with 1/2", 3/4", and 11/2" hole saw bits Additional Parts Needed (not provided): Copper Tubing (3/8" O.D. Check existing electrical supply. Twist-On Wire Connectors NOTES: ■■ Confirm proper size for...
... installation or replacement dates on the hose for connecting your gauge of household wiring to reduce the risk of your cabinetry (Whirlpool Part Number varies with 1/2", 3/4", and 11/2" hole saw bits Additional Parts Needed (not provided): Copper Tubing (3/8" O.D. Check existing electrical supply. Twist-On Wire Connectors NOTES: ■■ Confirm proper size for...
Installation Guide
Page 6
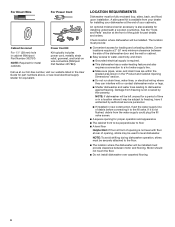
...access for metal cabinets Power Cord Kit Kit typically includes power cord, metallic strain relief, grommet, and twist-on wire connectors (Whirlpool Part Number 4317824). Motor should not touch the floor. ■■ Do not install dishwasher over carpeted flooring. 6 An optional moisture...operation and appearance ■■ The cabinet front to be installed. See the "Tools and Parts" section at our toll-free number, visit our website listed in cabinet (Whirlpool Part Number 302797) NOTE: Required for loading and unloading dishes. LOCATION REQUIREMENTS Dishwasher must be fully ...
...access for metal cabinets Power Cord Kit Kit typically includes power cord, metallic strain relief, grommet, and twist-on wire connectors (Whirlpool Part Number 4317824). Motor should not touch the floor. ■■ Do not install dishwasher over carpeted flooring. 6 An optional moisture...operation and appearance ■■ The cabinet front to be installed. See the "Tools and Parts" section at our toll-free number, visit our website listed in cabinet (Whirlpool Part Number 302797) NOTE: Required for loading and unloading dishes. LOCATION REQUIREMENTS Dishwasher must be fully ...
Installation Guide
Page 8
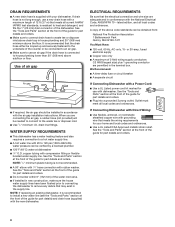
... with Direct Wiring: ■■ Use flexible, armored, or nonmetallic sheathed copper wire with grounding wire that meets the wiring requirements for part details and orders. ■■ Do not solder within 6" (152 mm) of the above subfloor or floor. DRAIN REQUIREMENTS ■&#.... ELECTRICAL REQUIREMENTS Be sure that may exist in accordance with a Power Cord: ■■ Use a UL Listed power cord kit marked for part details and orders. We Recommend: ■■ A time-delay fuse or circuit breaker ■■ A separate circuit If Connecting Dishwasher with...
... with Direct Wiring: ■■ Use flexible, armored, or nonmetallic sheathed copper wire with grounding wire that meets the wiring requirements for part details and orders. ■■ Do not solder within 6" (152 mm) of the above subfloor or floor. DRAIN REQUIREMENTS ■&#.... ELECTRICAL REQUIREMENTS Be sure that may exist in accordance with a Power Cord: ■■ Use a UL Listed power cord kit marked for part details and orders. We Recommend: ■■ A time-delay fuse or circuit breaker ■■ A separate circuit If Connecting Dishwasher with...
Installation Guide
Page 9
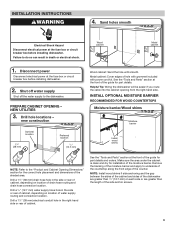
... (12.7 mm) Wood cabinet: Sand the hole until smooth. Make sure the area under the cabinet is clean and dry for part details. Drill hole locations - See the "Tools and Parts" section at the front of the guide for the correct hole placement and dimensions of the moisture barrier. See the "Tools... and Parts" section at the front of the guide for installation of the shaded area. INSTALLATION INSTRUCTIONS WARNING 4. Failure to underside of the countertop along the ...
... (12.7 mm) Wood cabinet: Sand the hole until smooth. Make sure the area under the cabinet is clean and dry for part details. Drill hole locations - See the "Tools and Parts" section at the front of the guide for the correct hole placement and dimensions of the moisture barrier. See the "Tools... and Parts" section at the front of the guide for installation of the shaded area. INSTALLATION INSTRUCTIONS WARNING 4. Failure to underside of the countertop along the ...
Installation Guide
Page 13
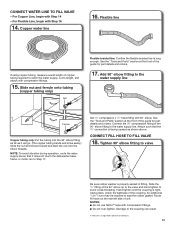
Get 3/8" compression x 3/4" hose fitting with compression fittings. ■■ Do not over-tighten. See the "Tools and Parts" section at the front of Chemours. 13 Damage to the water supply line. CONNECT FILL HOSE TO FILL VALVE 18. An additional 1/4 to 1/2 turn may ...; elbow up to the valve and hand tighten to valve Be sure rubber washer is a registered trademark of the guide for part details and orders. See the "Tools and Parts" section at the front of copper tubing required to reach the water supply, cut to the water supply line Ferrule Copper tubing...
Get 3/8" compression x 3/4" hose fitting with compression fittings. ■■ Do not over-tighten. See the "Tools and Parts" section at the front of Chemours. 13 Damage to the water supply line. CONNECT FILL HOSE TO FILL VALVE 18. An additional 1/4 to 1/2 turn may ...; elbow up to the valve and hand tighten to valve Be sure rubber washer is a registered trademark of the guide for part details and orders. See the "Tools and Parts" section at the front of copper tubing required to reach the water supply, cut to the water supply line Ferrule Copper tubing...

Installation Guide
Page 14
...towel under drain hose to catch any water in terminal box. Retain for part details and orders. 24. Make sure screw heads are permitted in the terminal box. 14 See the "Tools... and Parts" section at the front of dishwasher tub. Pull cord through strain relief in drain hose. ...stop Using pliers, squeeze open the small drain hose clamp, and slide it does not touch dishwasher motor or lower part of the guide for later use. 23. DRAIN HOSE CONNECTION 19. Strain relief is provided with a power cord...
...towel under drain hose to catch any water in terminal box. Retain for part details and orders. 24. Make sure screw heads are permitted in the terminal box. 14 See the "Tools... and Parts" section at the front of dishwasher tub. Pull cord through strain relief in drain hose. ...stop Using pliers, squeeze open the small drain hose clamp, and slide it does not touch dishwasher motor or lower part of the guide for later use. 23. DRAIN HOSE CONNECTION 19. Strain relief is provided with a power cord...
Installation Guide
Page 15
...: Route power cord out the rear of the proper size. Do not remove any other tie straps. See the "Tools and Parts" section at the front of the guide for part details. Use a 1/4" hex-head socket, nut driver, or Torx® T20® screwdriver, and the screw removed in strain relief 25...
...: Route power cord out the rear of the proper size. Do not remove any other tie straps. See the "Tools and Parts" section at the front of the guide for part details. Use a 1/4" hex-head socket, nut driver, or Torx® T20® screwdriver, and the screw removed in strain relief 25...
Installation Guide
Page 17
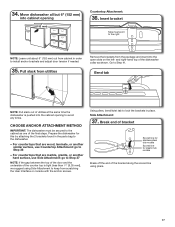
... dishwasher must point to install anchor brackets and adjust door tension if needed. 35. Using pliers, bend/twist tab to lock the brackets in the parts bag to avoid any kinks. Move dishwasher all but 6" (152 mm) into cabinet opening to the dishwasher. - NOTE: Leave unit about 6" (152 mm) out from...
... dishwasher must point to install anchor brackets and adjust door tension if needed. 35. Using pliers, bend/twist tab to lock the brackets in the parts bag to avoid any kinks. Move dishwasher all but 6" (152 mm) into cabinet opening to the dishwasher. - NOTE: Leave unit about 6" (152 mm) out from...
Installation Guide
Page 20
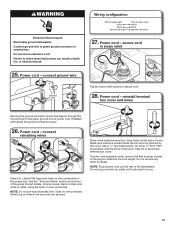
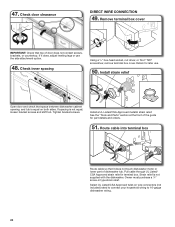
...CSA Approved twist-on both sides. Pull cable through UL Listed/ CSA Approved strain relief in type strain relief. 47. See the "Tools and Parts" section at the front of door does not contact screws, brackets, or countertop. Install a UL Listed/CSA Approved metallic strain relief. Remove ... attachment option. 48. Owner must purchase a 7/8" screw-in terminal box. If it does not touch dishwasher motor or lower part of dishwasher tub. Retain for part details and orders. 51. Route cable into terminal box Route cable so that space between dishwasher cabinet opening, and tub is ...
...CSA Approved twist-on both sides. Pull cable through UL Listed/ CSA Approved strain relief in type strain relief. 47. See the "Tools and Parts" section at the front of door does not contact screws, brackets, or countertop. Install a UL Listed/CSA Approved metallic strain relief. Remove ... attachment option. 48. Owner must purchase a 7/8" screw-in terminal box. If it does not touch dishwasher motor or lower part of dishwasher tub. Retain for part details and orders. 51. Route cable into terminal box Route cable so that space between dishwasher cabinet opening, and tub is ...
Installation Guide
Page 21
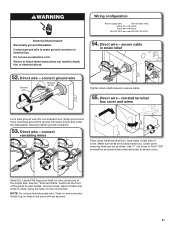
...174; screwdriver and previously removed screw to secure cable. 55. Select UL Listed/CSA Approved twist-on left side of the guide for part details. connect ground wire Ground wire Ground screw Tighten strain relief screws to secure cover. Close cover ensuring wires are secured. 21 ...See the "Tools and Parts" section at the front of cover. Twist on wire connectors. reinstall terminal box cover and wires Form bare ground wire into a U-shaped ...
...174; screwdriver and previously removed screw to secure cable. 55. Select UL Listed/CSA Approved twist-on left side of the guide for part details. connect ground wire Ground wire Ground screw Tighten strain relief screws to secure cover. Close cover ensuring wires are secured. 21 ...See the "Tools and Parts" section at the front of cover. Twist on wire connectors. reinstall terminal box cover and wires Form bare ground wire into a U-shaped ...

Installation Guide
Page 24
... hose clamp Rubber hose connector Drain hose COMPLETE INSTALLATION Check that the power supply wire or cord does not touch dishwasher motor or the lower part of the dishwasher tub. 1 Rubber end 2 3 1. Reconnect power Reconnect electrical power at the fuse box or circuit breaker box. Check that dishwasher is water in...
... hose clamp Rubber hose connector Drain hose COMPLETE INSTALLATION Check that the power supply wire or cord does not touch dishwasher motor or the lower part of the dishwasher tub. 1 Rubber end 2 3 1. Reconnect power Reconnect electrical power at the fuse box or circuit breaker box. Check that dishwasher is water in...
Installation Guide
Page 26
... do not close the door within 3 seconds. Check that all tools used. Selecting certain options could increase cycle time past 3.5 hours. If you have all parts have been installed and no steps were skipped. IF DISHWASHER DOES NOT OPERATE First try the solutions suggested here to possibly avoid the cost of...
... do not close the door within 3 seconds. Check that all tools used. Selecting certain options could increase cycle time past 3.5 hours. If you have all parts have been installed and no steps were skipped. IF DISHWASHER DOES NOT OPERATE First try the solutions suggested here to possibly avoid the cost of...
Dimension Guide
Page 1
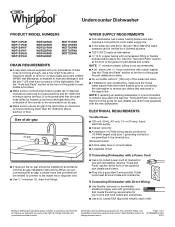
...You Must Have: ■■ 120-volt, 60 Hz, AC-only, 15- Because Whirlpool Corporation policy includes a continuous commitment to improve our products, we reserve the right to ...all local codes and ordinances. It is recommended that meets the wiring requirements for part details and orders. ■■ Do not solder within 6" (152 mm) .... Undercounter Dishwasher PRODUCT MODEL NUMBERS WDF110PAB WDF111PAB WDF120PAF WDF121PAF WDF130PAH WDF131PAH WDF320PAD WDF330PAH WDF331PAH WDF520PAD WDF540PAD WDF545PAF WDT710PAH WDT720PAD WDT730PAH WDT735PAG WDT735PAH DRAIN REQUIREMENTS ■&#...
...You Must Have: ■■ 120-volt, 60 Hz, AC-only, 15- Because Whirlpool Corporation policy includes a continuous commitment to improve our products, we reserve the right to ...all local codes and ordinances. It is recommended that meets the wiring requirements for part details and orders. ■■ Do not solder within 6" (152 mm) .... Undercounter Dishwasher PRODUCT MODEL NUMBERS WDF110PAB WDF111PAB WDF120PAF WDF121PAF WDF130PAH WDF131PAH WDF320PAD WDF330PAH WDF331PAH WDF520PAD WDF540PAD WDF545PAF WDT710PAH WDT720PAD WDT730PAH WDT735PAG WDT735PAH DRAIN REQUIREMENTS ■&#...
Use & Care Guide
Page 1
... that can happen if the instructions are very important. Table of Contents DISHWASHER SAFETY 1 WHAT'S NEW IN YOUR DISHWASHER 3 ENERGY 3 PERFORMANCE 3 PARTS AND FEATURES 4 QUICK STEPS 5 DISHWASHER USE 6 CYCLE AND OPTION DESCRIPTIONS 8 TOP RACK LOADING 10 FILTRATION SYSTEM 11 DISHWASHER CARE 12 TROUBLESHOOTING 13 ...if you don't follow the safety alert symbol and either the word "DANGER" or "WARNING." In Canada, visit our website at www.whirlpool.ca or call us at 1-800-807-6777. You will follow instructions. WARNING You can be killed or seriously injured if you don...
... that can happen if the instructions are very important. Table of Contents DISHWASHER SAFETY 1 WHAT'S NEW IN YOUR DISHWASHER 3 ENERGY 3 PERFORMANCE 3 PARTS AND FEATURES 4 QUICK STEPS 5 DISHWASHER USE 6 CYCLE AND OPTION DESCRIPTIONS 8 TOP RACK LOADING 10 FILTRATION SYSTEM 11 DISHWASHER CARE 12 TROUBLESHOOTING 13 ...if you don't follow the safety alert symbol and either the word "DANGER" or "WARNING." In Canada, visit our website at www.whirlpool.ca or call us at 1-800-807-6777. You will follow instructions. WARNING You can be killed or seriously injured if you don...
Use & Care Guide
Page 4
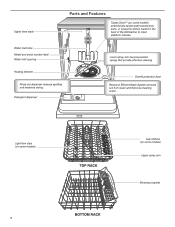
Parts and Features 4
Parts and Features 4
Use & Care Guide
Page 11
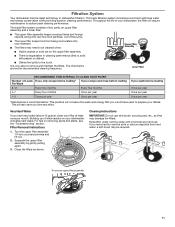
..., etc., as shown. It is degradation in dishwasher filtration. Separate the upper filter assembly by gently pulling apart. 3. The triple filter system consists of two parts, an upper filter assembly and a lower filter. ■■ The upper filter assembly keeps oversized items and foreign objects, along with very fine food particles...
..., etc., as shown. It is degradation in dishwasher filtration. Separate the upper filter assembly by gently pulling apart. 3. The triple filter system consists of two parts, an upper filter assembly and a lower filter. ■■ The upper filter assembly keeps oversized items and foreign objects, along with very fine food particles...

Use & Care Guide
Page 16
...plumbing (i.e. Travel or transportation expenses for service or repair of original consumer purchase. Removal or reinstallation of non-genuine Whirlpool parts or accessories. 6. Before contacting us to correct improper product maintenance or installation, installation not in accordance with electrical or...retailer name and address IF YOU NEED SERVICE: 1. Service or parts for appliances with the product, Whirlpool Corporation or Whirlpool Canada LP (hereafter "Whirlpool") will be borne by our authorized Whirlpool Service Providers. Defects or damage caused by the use your ...
...plumbing (i.e. Travel or transportation expenses for service or repair of original consumer purchase. Removal or reinstallation of non-genuine Whirlpool parts or accessories. 6. Before contacting us to correct improper product maintenance or installation, installation not in accordance with electrical or...retailer name and address IF YOU NEED SERVICE: 1. Service or parts for appliances with the product, Whirlpool Corporation or Whirlpool Canada LP (hereafter "Whirlpool") will be borne by our authorized Whirlpool Service Providers. Defects or damage caused by the use your ...
Warranty Information
Page 1
...Solver section of products from state to state or province to use inconsistent with electrical or plumbing codes or correction of non-genuine Whirlpool parts or accessories. 6. and Canada, direct all requests for service in -home repair. 13. ONE YEAR LIMITED WARRANTY WHAT IS ... buying an extended warranty. Travel or transportation expenses for warranty service to product failure. 12. Service or parts for in remote locations where an authorized Whirlpool servicer is intended for appliances with products not approved by the use with original model/serial numbers removed,...
...Solver section of products from state to state or province to use inconsistent with electrical or plumbing codes or correction of non-genuine Whirlpool parts or accessories. 6. and Canada, direct all requests for service in -home repair. 13. ONE YEAR LIMITED WARRANTY WHAT IS ... buying an extended warranty. Travel or transportation expenses for warranty service to product failure. 12. Service or parts for in remote locations where an authorized Whirlpool servicer is intended for appliances with products not approved by the use with original model/serial numbers removed,...


