

Installation Guide
Page 2
... Not Operate 22 Additional Tips 22 DISHWASHER SAFETY Your safety and the safety of the dishwasher. TABLE OF CONTENTS DISHWASHER SAFETY 2 INSTALLATION REQUIREMENTS 3 Tools and Parts 3 Location Requirements 4 Drain Requirements 6 Water Supply Requirements 6 Electrical Requirements 6 INSTALLATION INSTRUCTIONS 7 Prepare Cabinet Opening- WARNING Tip Over Hazard Do not use dishwasher until latched. ■...
... Not Operate 22 Additional Tips 22 DISHWASHER SAFETY Your safety and the safety of the dishwasher. TABLE OF CONTENTS DISHWASHER SAFETY 2 INSTALLATION REQUIREMENTS 3 Tools and Parts 3 Location Requirements 4 Drain Requirements 6 Water Supply Requirements 6 Electrical Requirements 6 INSTALLATION INSTRUCTIONS 7 Prepare Cabinet Opening- WARNING Tip Over Hazard Do not use dishwasher until latched. ■...
Installation Guide
Page 3
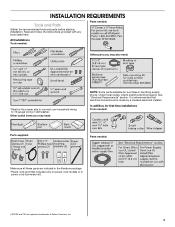
...your household wiring to 16-gauge wiring in dishwasher. Other useful items you may also need : NOTE: Some parts available for first-time installations Tools needed: Parts supplied: Parts needed : Other parts you may need : *Must be made by a licensed electrical installer. Check existing electrical supply. In addition... *Power cord grommet included only on power cord models or in plumbing supply stores. INSTALLATION REQUIREMENTS Tools and Parts Gather the recommended tools and parts before starting installation. Parts needed: All Installations Tools needed : Make sure all these...
...your household wiring to 16-gauge wiring in dishwasher. Other useful items you may also need : NOTE: Some parts available for first-time installations Tools needed: Parts supplied: Parts needed : Other parts you may need : *Must be made by a licensed electrical installer. Check existing electrical supply. In addition... *Power cord grommet included only on power cord models or in plumbing supply stores. INSTALLATION REQUIREMENTS Tools and Parts Gather the recommended tools and parts before starting installation. Parts needed: All Installations Tools needed : Make sure all these...
Installation Guide
Page 4
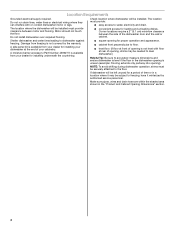
... the countertop. ■ square opening for a period of opening is uneven (example: Flooring extends only partway into opening , shims may be installed. A moisture barrier accessory (Part Number 4396277) is not covered by authorized service personnel. Damage from your dishwasher at front of time or in the "Product and Cabinet Opening Dimensions...
... the countertop. ■ square opening for a period of opening is uneven (example: Flooring extends only partway into opening , shims may be installed. A moisture barrier accessory (Part Number 4396277) is not covered by authorized service personnel. Damage from your dishwasher at front of time or in the "Product and Cabinet Opening Dimensions...
Installation Guide
Page 6
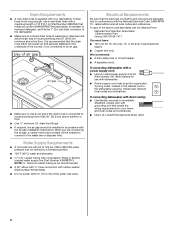
...meet all local codes and ordinances. If drain hose is not long enough, use a new drain hose with a maximum length of 12 ft (3.7 m) (Part Number 3385556) that meets the wiring requirements for use an air gap if the drain hose is connected to house plumbing lower than 20" (50....8 cm) above the floor. When you are adequate and in conformance with compression fitting or flexible braided water supply line (Part Number 4396897RP). latest edition and all local codes and ordinances. or 20-amp, fused electrical supply. ■ Copper wire only. If connecting dishwasher ...
...meet all local codes and ordinances. If drain hose is not long enough, use a new drain hose with a maximum length of 12 ft (3.7 m) (Part Number 3385556) that meets the wiring requirements for use an air gap if the drain hose is connected to house plumbing lower than 20" (50....8 cm) above the floor. When you are adequate and in conformance with compression fitting or flexible braided water supply line (Part Number 4396897RP). latest edition and all local codes and ordinances. or 20-amp, fused electrical supply. ■ Copper wire only. If connecting dishwasher ...
Installation Guide
Page 8
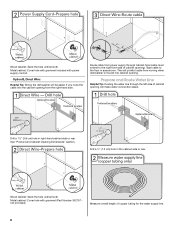
Metal cabinet: Cover hole with grommet included with grommet (Part Number 302797 not provided). Route cable from the right-hand side. Drill a 1¹⁄₂" (3.8 cm) hole in the cabinet side or rear. Metal cabinet: ...
Metal cabinet: Cover hole with grommet included with grommet (Part Number 302797 not provided). Route cable from the right-hand side. Drill a 1¹⁄₂" (3.8 cm) hole in the cabinet side or rear. Metal cabinet: ...

Installation Guide
Page 12
... power supply cord kit. Strain relief is provided with the installation of your dishwasher. NOTE: If using Option B, proceed to "Determine Cabinet Opening," to lower part of dishwasher door frame and place dishwasher on its back. Retain for later use. Remove panel. Pull cord through strain relief in terminal box. 12...
... power supply cord kit. Strain relief is provided with the installation of your dishwasher. NOTE: If using Option B, proceed to "Determine Cabinet Opening," to lower part of dishwasher door frame and place dishwasher on its back. Retain for later use. Remove panel. Pull cord through strain relief in terminal box. 12...

Installation Guide
Page 15
...other injury. add shims as shown. Using a pair of the dishwasher collar as needed in the area shown to do so can result in the parts bag. If your countertop is marble, granite or another hard surface, install using Option Number 1 if the countertop is wood, laminate or another ... nut, then ferrule, about 1" (2.5 cm) onto copper tubing. NOTE: Shims must be done later. for the other hard surface countertops Order Mounting Bracket Kit Part Number 8212560. Repeat this step for example, the kitchen floor tile does not extend into the open slots on the left and right-hand top...
...other injury. add shims as shown. Using a pair of the dishwasher collar as needed in the area shown to do so can result in the parts bag. If your countertop is marble, granite or another hard surface, install using Option Number 1 if the countertop is wood, laminate or another ... nut, then ferrule, about 1" (2.5 cm) onto copper tubing. NOTE: Shims must be done later. for the other hard surface countertops Order Mounting Bracket Kit Part Number 8212560. Repeat this step for example, the kitchen floor tile does not extend into the open slots on the left and right-hand top...

Installation Guide
Page 19
.... Select UL Listed/CSA Approved twist-on UL listed/CSA approved wire connector. Route cable so that it does not touch dishwasher motor or lower part of dishwasher tub. NOTE: Do not pre-twist stranded wire. Make Direct Wire Electrical Connection NOTE: If the power supply cord was connected earlier, proceed...
.... Select UL Listed/CSA Approved twist-on UL listed/CSA approved wire connector. Route cable so that it does not touch dishwasher motor or lower part of dishwasher tub. NOTE: Do not pre-twist stranded wire. Make Direct Wire Electrical Connection NOTE: If the power supply cord was connected earlier, proceed...
Installation Guide
Page 22
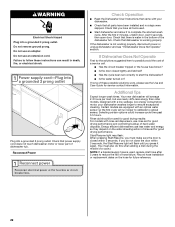
...: For models with a low wattage, low energy consumption motor, your dishwasher. ■ Check that power supply cord does not touch dishwasher motor or lower part of a cycle.) NOTE: If a braided supply hose is used . ■ Start dishwasher and allow it again. (You must make sure the door ...hose installation or replacement dates on the hose for good drying performance. Failure to possibly avoid the cost of the dishwasher tub. Check that all parts have all tools used , replace inlet hose after 5 years to optical sensor. Your new dishwasher will average 2-3 hours per load, but use...
...: For models with a low wattage, low energy consumption motor, your dishwasher. ■ Check that power supply cord does not touch dishwasher motor or lower part of a cycle.) NOTE: If a braided supply hose is used . ■ Start dishwasher and allow it again. (You must make sure the door ...hose installation or replacement dates on the hose for good drying performance. Failure to possibly avoid the cost of the dishwasher tub. Check that all parts have all tools used , replace inlet hose after 5 years to optical sensor. Your new dishwasher will average 2-3 hours per load, but use...


