Installation Instructions
Page 2
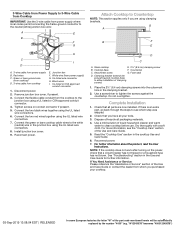
...the "Electrical Requirements" section. If cabinet storage is , tell you what can be automatically replaced by a licensed, qualified electrical installer. This is recommended that your appliance. WARNING You can happen if the instructions are very important. We have an approval label ...2½" (6.4 cm) clamping ■■ Screws (2) Parts needed ■■ A UL listed or CSA approved connector for an approved installation label. Refer to be made by the number "4000" (e.g. The cooktop should be located for convenient use and proper cutout dimensions. ■...
...the "Electrical Requirements" section. If cabinet storage is , tell you what can be automatically replaced by a licensed, qualified electrical installer. This is recommended that your appliance. WARNING You can happen if the instructions are very important. We have an approval label ...2½" (6.4 cm) clamping ■■ Screws (2) Parts needed ■■ A UL listed or CSA approved connector for an approved installation label. Refer to be made by the number "4000" (e.g. The cooktop should be located for convenient use and proper cutout dimensions. ■...

Installation Instructions
Page 3
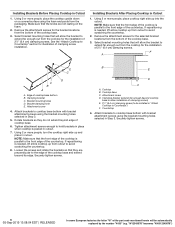
...drawer (or other obstruction) in cutout from top of the part code mentioned herein will not discolor, delaminate, or sustain other damage. Whirlpool 36" stainless steel (91.4 cm) models 365/16" (92.3 cm) Glass width - Combustible area above countertop (shown by dashed... by not less than 1/4" [0.6 cm] flame retardant millboard covered with not less than the cutout. Given dimensions are given with your cabinets, check with these Installation Instructions. IMPORTANT: To avoid damage to your builder or cabinet supplier to cooktop H. A D C B L E F G H I . Glass width - 24"...
...drawer (or other obstruction) in cutout from top of the part code mentioned herein will not discolor, delaminate, or sustain other damage. Whirlpool 36" stainless steel (91.4 cm) models 365/16" (92.3 cm) Glass width - Combustible area above countertop (shown by dashed... by not less than 1/4" [0.6 cm] flame retardant millboard covered with not less than the cutout. Given dimensions are given with your cabinets, check with these Installation Instructions. IMPORTANT: To avoid damage to your builder or cabinet supplier to cooktop H. A D C B L E F G H I . Glass width - 24"...

Installation Instructions
Page 4
... 8.75 to 12 kW have a neutral (white) wire. "W12345678" becomes "400012345678") Electrically ground cooktop. Check with a qualified electrical installer if you will be provided at each end of conduit provided. A UL listed or CSA approved conduit connector must be automatically replaced by the... 02169-7471 CSA International 8501 East Pleasant Valley Road Cleveland, OH 44131-5575 Before You Make the Electrical Connection: To properly install your cooktop, you must conform with local codes. Follow the electrical connector manufacturer's recommended procedure. Make sure that the electrical ...
... 8.75 to 12 kW have a neutral (white) wire. "W12345678" becomes "400012345678") Electrically ground cooktop. Check with a qualified electrical installer if you will be provided at each end of conduit provided. A UL listed or CSA approved conduit connector must be automatically replaced by the... 02169-7471 CSA International 8501 East Pleasant Valley Road Cleveland, OH 44131-5575 Before You Make the Electrical Connection: To properly install your cooktop, you must conform with local codes. Follow the electrical connector manufacturer's recommended procedure. Make sure that the electrical ...

Installation Instructions
Page 5
...cooktop. Clamping bracket A 2. The roll contains four 1/4" (6.4 mm) strips of the cooktop glass from the package containing literature. Install Cooktop Style 1: Cooktop over cabinets 1. If repositioning is parallel to the underside of foam. Attachment screw C. Cooktop NOTE: For ... (91.4 cm) traditional models A B C A. Apply the foam strip adhesive around bottom of the cooktop glass, following steps for Installation WARNING Excessive Weight Hazard Use two or more people, place cooktop right side up from the packaging. Cooktop base bottom B. The clamping ...
...cooktop. Clamping bracket A 2. The roll contains four 1/4" (6.4 mm) strips of the cooktop glass from the package containing literature. Install Cooktop Style 1: Cooktop over cabinets 1. If repositioning is parallel to the underside of foam. Attachment screw C. Cooktop NOTE: For ... (91.4 cm) traditional models A B C A. Apply the foam strip adhesive around bottom of the cooktop glass, following steps for Installation WARNING Excessive Weight Hazard Use two or more people, place cooktop right side up from the packaging. Cooktop base bottom B. The clamping ...
Installation Instructions
Page 6
... cm) clamping screws. Securely tighten screws. Attachment screw D. "W12345678" becomes "400012345678") Remove the attachment screws for the installation of clamping screw installation. Installing Brackets After Placing Cooktop in Cutout 1. Using 2 or more people, place cooktop right side up from cutout to extend ... screws using the foam end posts from the cooktop for the selected bracket locations from the bottom of the countertop. Installing Brackets Before Placing Cooktop in Cutout 1. Select bracket mounting holes that they do not extend beyond its edge. Attachment ...
... cm) clamping screws. Securely tighten screws. Attachment screw D. "W12345678" becomes "400012345678") Remove the attachment screws for the installation of clamping screw installation. Installing Brackets After Placing Cooktop in Cutout 1. Using 2 or more people, place cooktop right side up from cutout to extend ... screws using the foam end posts from the cooktop for the selected bracket locations from the bottom of the countertop. Installing Brackets Before Placing Cooktop in Cutout 1. Select bracket mounting holes that they do not extend beyond its edge. Attachment ...

Installation Instructions
Page 7
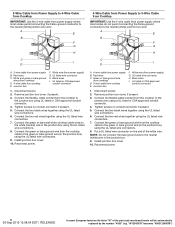
.... 7. This cooktop is manufactured with a 3-wire cable: If your home has: And you will be autom7atically replaced by the number "4000" (e.g. A B E F G H C I . UL listed wire connector H. Install junction box cover. 10. Electrically ground cooktop. Junction box F. Failure to the junction box using the UL listed wire connectors. 6. Black wires C. "W12345678" becomes "400012345678...
.... 7. This cooktop is manufactured with a 3-wire cable: If your home has: And you will be autom7atically replaced by the number "4000" (e.g. A B E F G H C I . UL listed wire connector H. Install junction box cover. 10. Electrically ground cooktop. Junction box F. Failure to the junction box using the UL listed wire connectors. 6. Black wires C. "W12345678" becomes "400012345678...
Installation Instructions
Page 8
...wire connectors. 8. Connect the green or bare and white cooktop cable wires to the junction box using the UL listed wire connectors. 8. Install junction box cover. 10. Green or bare ground wire (from cooktop) D. 3-wire cable from power supply B. Connect the flexible cable...Do not connect the bare ground wire to the neutral (white) junction box wire: A E B F G H C I D A. 3-wire cable from power supply B. Install junction box cover. 10. "W12345678" becomes "400012345678") Junction box F. Connect the two red wires together using the UL listed wire connectors. 7. Connect the two red...
...wire connectors. 8. Connect the green or bare and white cooktop cable wires to the junction box using the UL listed wire connectors. 8. Install junction box cover. 10. Green or bare ground wire (from cooktop) D. 3-wire cable from power supply B. Connect the flexible cable...Do not connect the bare ground wire to the neutral (white) junction box wire: A E B F G H C I D A. 3-wire cable from power supply B. Install junction box cover. 10. "W12345678" becomes "400012345678") Junction box F. Connect the two red wires together using the UL listed wire connectors. 7. Connect the two red...
Installation Instructions
Page 9
... (white) junction box wire: A E B F G Attach Cooktop to Countertop NOTE: This section applies only if you are now installed. Clamping bracket (extends far enough beyond cooktop base to the junction box using the UL listed wire connectors. 7. Connect the flexible cable... conduit from the cooktop to allow installation of the Use and Care Guide. 5. Complete Installation 1. Dispose of liquid household cleaner and warm water to tighten the screws against the countertop. G A B F E H...
... (white) junction box wire: A E B F G Attach Cooktop to Countertop NOTE: This section applies only if you are now installed. Clamping bracket (extends far enough beyond cooktop base to the junction box using the UL listed wire connectors. 7. Connect the flexible cable... conduit from the cooktop to allow installation of the Use and Care Guide. 5. Complete Installation 1. Dispose of liquid household cleaner and warm water to tighten the screws against the countertop. G A B F E H...

Owners Manual
Page 3
... a qualified technician. If the power supply cord gets damaged, have had sufficient time to cool. Clean Ventilating Hoods Frequently - Improper installation of these pans or bowls during cooking may get hot. Children climbing on it replaced by the manufacturer, the latter's service agent ... Utensils - For units with coil elements - Absence of these liners may penetrate the broken cooktop and create a risk of electric shock. Proper Installation - This appliance is in a risk of electric shock, or fire. Storage on Grease Fires - Only certain types of glass, glass/ceramic,...
... a qualified technician. If the power supply cord gets damaged, have had sufficient time to cool. Clean Ventilating Hoods Frequently - Improper installation of these pans or bowls during cooking may get hot. Children climbing on it replaced by the manufacturer, the latter's service agent ... Utensils - For units with coil elements - Absence of these liners may penetrate the broken cooktop and create a risk of electric shock. Proper Installation - This appliance is in a risk of electric shock, or fire. Storage on Grease Fires - Only certain types of glass, glass/ceramic,...

Owners Manual
Page 11
...burners at the same time. ■■ On ceramic glass models, use only flat-bottomed canners. ■■ On coil element models, the installation of pots and pans are off and the cooktop is recommended. ■■ Cookware designed with electronic controls, lock the controls. Residue and water ... with clean water and dry with a nonstick finish will be used as a core or base in how quickly and evenly heat is not installed, the life of aluminum or copper on some models) COOKTOP CONTROLS To avoid damage to the cooktop controls, do not cook foods directly on...
...burners at the same time. ■■ On ceramic glass models, use only flat-bottomed canners. ■■ On coil element models, the installation of pots and pans are off and the cooktop is recommended. ■■ Cookware designed with electronic controls, lock the controls. Residue and water ... with clean water and dry with a nonstick finish will be used as a core or base in how quickly and evenly heat is not installed, the life of aluminum or copper on some models) COOKTOP CONTROLS To avoid damage to the cooktop controls, do not cook foods directly on...

Owners Manual
Page 13
... the cooktop. Clean the cooktop touch control panel thoroughly. If the problem continues, call , visit http://www.whirlpool.com/product_help. See the Installation Instructions. See "To Use" in your correspondence. After 1 minute, reconnect power or plug in the cooktop. 5. In Mexico...: Whirlpool México, S. Cooktop is not being used: See the "Cookware" section. If the cooktop continues beeping for service. ...
... the cooktop. Clean the cooktop touch control panel thoroughly. If the problem continues, call , visit http://www.whirlpool.com/product_help. See the Installation Instructions. See "To Use" in your correspondence. After 1 minute, reconnect power or plug in the cooktop. 5. In Mexico...: Whirlpool México, S. Cooktop is not being used: See the "Cookware" section. If the cooktop continues beeping for service. ...
Owners Manual
Page 14
... LP 200 - 6750 Century Ave. To locate FSP® replacement parts in your nearest Whirlpool designated service center. To locate the Whirlpool designated service company in your area, you the cost of appliances. ■■ Installation information. ■■ Use and maintenance procedures. ■■ Accessory and repair parts sales. ■■ Specialized...
... LP 200 - 6750 Century Ave. To locate FSP® replacement parts in your nearest Whirlpool designated service center. To locate the Whirlpool designated service company in your area, you the cost of appliances. ■■ Installation information. ■■ Use and maintenance procedures. ■■ Accessory and repair parts sales. ■■ Specialized...

Specification Sheet
Page 1
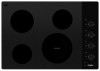
...WCE55US0HSpecSheetV01. Easy-Wipe Ceramic Glass Cooktop Wiping up spills is simple with the easy-to-clean cooktop. 30 & 40 Amp Installation Properly install with either a 30 or 40 amp hookup, so there's no need to change without notice. ®/™ ©... 8" Extra Element 6" Extra Element ADA compliant Electrical Details Amps 30 Volts 240 Certifications ADA Compliant Yes Also available in: White WCE55US0HW Black WCE55US0HB Technical Details Fuel Type Electric Number of Burners/ Elements 4 Burner/Element Power (1) 1200W (1) 1800W (1) 2500W/1800W (1) 1200W (2) 6" ...
...WCE55US0HSpecSheetV01. Easy-Wipe Ceramic Glass Cooktop Wiping up spills is simple with the easy-to-clean cooktop. 30 & 40 Amp Installation Properly install with either a 30 or 40 amp hookup, so there's no need to change without notice. ®/™ ©... 8" Extra Element 6" Extra Element ADA compliant Electrical Details Amps 30 Volts 240 Certifications ADA Compliant Yes Also available in: White WCE55US0HW Black WCE55US0HB Technical Details Fuel Type Electric Number of Burners/ Elements 4 Burner/Element Power (1) 1200W (1) 1800W (1) 2500W/1800W (1) 1200W (2) 6" ...

