Installation Guide
Page 2
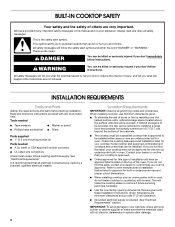
.... Contact your dealer to confirm that is approved. ■ Ovens approved for use over an undercounter built-in oven, do not fasten cooktop to be installed either the word "DANGER" or "WARNING." Tools needed ■ Tape measure ■ Marker or pencil ■ Phillips...projects horizontally a minimum of 5" (12.7 cm) beyond the bottom of the cabinets. ■ The cooktop must be a specified cooktop that your cooktop model number and approved combinations of cooktops and ovens that can be reduced by reaching over the heated surface units, cabinet storage space located above...
.... Contact your dealer to confirm that is approved. ■ Ovens approved for use over an undercounter built-in oven, do not fasten cooktop to be installed either the word "DANGER" or "WARNING." Tools needed ■ Tape measure ■ Marker or pencil ■ Phillips...projects horizontally a minimum of 5" (12.7 cm) beyond the bottom of the cabinets. ■ The cooktop must be a specified cooktop that your cooktop model number and approved combinations of cooktops and ovens that can be reduced by reaching over the heated surface units, cabinet storage space located above...
Installation Guide
Page 3
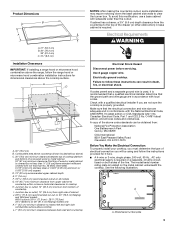
... (25.4 cm) from the countertop to the top of cabinet J. 28 71.9 cm) recommended cut-out on 30" (76.2 cm) Maytag and Whirlpool models Will fit cutouts 28 71.9 cm) - 28⁷⁄₈" (73.3cm) 34⁷⁄₈" (88.6cm) on all local codes.... If cabinet has a drawer, a 3¼" (9.6 cm) depth clearance from right side of the drawer (or other obstruction) in death, fire, or electrical shock. Failure to cooktop H. See the following illustration. A D C B L F G E H I . Combustible area above countertop (shown by not less than ¹⁄₄" [0.6 cm] flame ...
... (25.4 cm) from the countertop to the top of cabinet J. 28 71.9 cm) recommended cut-out on 30" (76.2 cm) Maytag and Whirlpool models Will fit cutouts 28 71.9 cm) - 28⁷⁄₈" (73.3cm) 34⁷⁄₈" (88.6cm) on all local codes.... If cabinet has a drawer, a 3¼" (9.6 cm) depth clearance from right side of the drawer (or other obstruction) in death, fire, or electrical shock. Failure to cooktop H. See the following illustration. A D C B L F G E H I . Combustible area above countertop (shown by not less than ¹⁄₄" [0.6 cm] flame ...
Installation Guide
Page 4
...4 pilot holes. 7. Remove the 4 screws from inside the bag containing literature. 4. The length of the 4 mounting holes at the cooktop. ■ If the house has aluminum wiring follow the procedure below: 1. Follow the electrical connector manufacturer's recommended procedure. Replace the coil...added section of the coil element opposite the receptacle. 4 If repositioning is needed , lift entire cooktop up from the cooktop. ■ Cooktops with 3-wire cable coming from the cooktop are rated 240 volt and do so can be moved if servicing becomes necessary in the future....
...4 pilot holes. 7. Remove the 4 screws from inside the bag containing literature. 4. The length of the 4 mounting holes at the cooktop. ■ If the house has aluminum wiring follow the procedure below: 1. Follow the electrical connector manufacturer's recommended procedure. Replace the coil...added section of the coil element opposite the receptacle. 4 If repositioning is needed , lift entire cooktop up from the cooktop. ■ Cooktops with 3-wire cable coming from the cooktop are rated 240 volt and do so can be moved if servicing becomes necessary in the future....
Installation Guide
Page 5
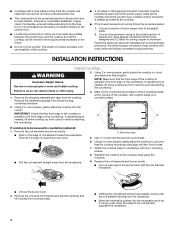
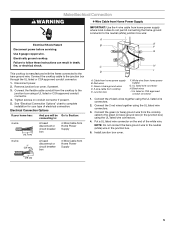
...or circuit breaker box 4-Wire Cable from Home Power Supply A B E F G C H D I . Red wires C. UL listed wire connector H. This cooktop is manufactured with the frame connected to the green (or bare) ground wire (in the junction box. 5. Connect the 2 black wires together using the UL.... Tighten screws on the end of electrical connection. Cable from Home Power Supply 3" (7.6 cm) 5 White wire (from cooktop E. Electrically ground cooktop. Put a UL listed wire connector on conduit connector if present. 5. Make Electrical Connection WARNING 4-Wire Cable from Home Power...
...or circuit breaker box 4-Wire Cable from Home Power Supply A B E F G C H D I . Red wires C. UL listed wire connector H. This cooktop is manufactured with the frame connected to the green (or bare) ground wire (in the junction box. 5. Connect the 2 black wires together using the UL.... Tighten screws on the end of electrical connection. Cable from Home Power Supply 3" (7.6 cm) 5 White wire (from cooktop E. Electrically ground cooktop. Put a UL listed wire connector on conduit connector if present. 5. Make Electrical Connection WARNING 4-Wire Cable from Home Power...
Installation Guide
Page 6
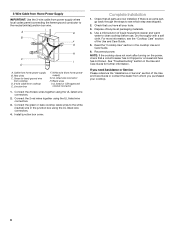
...packaging materials. 4. Connect the 2 black wires together using the UL listed wire connectors. 3. Dispose of liquid household cleaner and warm water to see the "Cooktop Care" section of the Use and Care Guide or contact the dealer from whom you purchased your tools. 3. A E B F G H C I .... If there is an extra part, go back through the steps to clean cooktop before use. Read the "Cooktop Use" section in the Use and Care Guide for further information. Black wires I D A. Cable from home power supply B. Junction box F. Dry...
...packaging materials. 4. Connect the 2 black wires together using the UL listed wire connectors. 3. Dispose of liquid household cleaner and warm water to see the "Cooktop Care" section of the Use and Care Guide or contact the dealer from whom you purchased your tools. 3. A E B F G H C I .... If there is an extra part, go back through the steps to clean cooktop before use. Read the "Cooktop Use" section in the Use and Care Guide for further information. Black wires I D A. Cable from home power supply B. Junction box F. Dry...
Use & Care Guide
Page 2
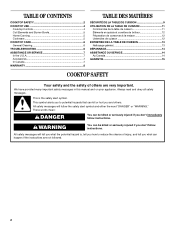
... you don't immediately follow instructions. WARNING You can happen if the instructions are very important. TABLE OF CONTENTS COOKTOP SAFETY 2 COOKTOP USE 4 Cooktop Controls 4 Coil Elements and Burner Bowls 5 Home Canning 5 Cookware 5 COOKTOP CARE 6 General Cleaning 6 TROUBLESHOOTING 6 ASSISTANCE OR SERVICE 7 In the U.S.A 7 Accessories 7 In Canada ... CUISSON 13 Nettoyage général 13 DÉPANNAGE 14 ASSISTANCE OU SERVICE 14 Au Canada 14 GARANTIE 15 COOKTOP SAFETY Your safety and the safety of injury, and tell you what can be killed or seriously injured if you...
... you don't immediately follow instructions. WARNING You can happen if the instructions are very important. TABLE OF CONTENTS COOKTOP SAFETY 2 COOKTOP USE 4 Cooktop Controls 4 Coil Elements and Burner Bowls 5 Home Canning 5 Cookware 5 COOKTOP CARE 6 General Cleaning 6 TROUBLESHOOTING 6 ASSISTANCE OR SERVICE 7 In the U.S.A 7 Accessories 7 In Canada ... CUISSON 13 Nettoyage général 13 DÉPANNAGE 14 ASSISTANCE OU SERVICE 14 Au Canada 14 GARANTIE 15 COOKTOP SAFETY Your safety and the safety of injury, and tell you what can be killed or seriously injured if you...
Use & Care Guide
Page 3
... use . Absence of these liners may ignite. ■ Glazed Cooking Utensils - They should not be careful to avoid steam burn. This cooktop is in burns from steam. Only certain types of different size. Grease should never be stored near surface units may result in use , ... to a hot surface. Smother fire or flame or use aluminum foil to cool. SAVE THESE INSTRUCTIONS 3 Surface units may penetrate the broken cooktop and create a risk of electric shock, or fire. ■ Do Not Soak Removable Heating Elements - Boilover causes smoking and greasy spillovers ...
... use . Absence of these liners may ignite. ■ Glazed Cooking Utensils - They should not be careful to avoid steam burn. This cooktop is in burns from steam. Only certain types of different size. Grease should never be stored near surface units may result in use , ... to a hot surface. Smother fire or flame or use aluminum foil to cool. SAVE THESE INSTRUCTIONS 3 Surface units may penetrate the broken cooktop and create a risk of electric shock, or fire. ■ Do Not Soak Removable Heating Elements - Boilover causes smoking and greasy spillovers ...
Use & Care Guide
Page 4
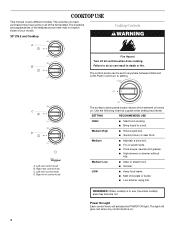
... lids. Failure to do so can be set to anywhere between HIGH and LOW. Left rear control knob B. Right rear control knob C. The cooktop you have some or all controls when done cooking. The control knobs can result in and turn to a boil. Left front control knob D. ... The surface cooking area locator shows which element is turned on . 4 Medium High ■ Hold a rapid boil. ■ Quickly brown or sear food. COOKTOP USE This manual covers different models. LOW ■ Keep food warm. ■ Melt chocolate or butter. ■ Low simmer using lids. Push in death...
... lids. Failure to do so can be set to anywhere between HIGH and LOW. Left rear control knob B. Right rear control knob C. The cooktop you have some or all controls when done cooking. The control knobs can result in and turn to a boil. Left front control knob D. ... The surface cooking area locator shows which element is turned on . 4 Medium High ■ Hold a rapid boil. ■ Quickly brown or sear food. COOKTOP USE This manual covers different models. LOW ■ Keep food warm. ■ Melt chocolate or butter. ■ Low simmer using lids. Push in death...
Use & Care Guide
Page 5
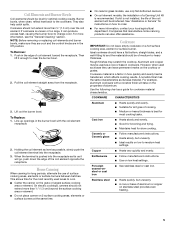
... To Remove: 1. Push in the burner bowl with a nonstick finish will be of aluminum. Home Canning When canning for slow cooking. On electric cooktops, canners should be shortened. However, when used as it will go, push down the edge of cooking. ■ Medium or heavy thickness is ... Line up openings in the edge of the coil element will take on stainless steel provides even heating. 5 Aluminum and copper may scratch the cooktop. A nonstick finish has the same characteristics as a base they are cool and the control knobs are in how quickly and evenly heat is a...
... To Remove: 1. Push in the burner bowl with a nonstick finish will be of aluminum. Home Canning When canning for slow cooking. On electric cooktops, canners should be shortened. However, when used as it will go, push down the edge of cooking. ■ Medium or heavy thickness is ... Line up openings in the edge of the coil element will take on stainless steel provides even heating. 5 Aluminum and copper may scratch the cooktop. A nonstick finish has the same characteristics as a base they are cool and the control knobs are in how quickly and evenly heat is a...

Use & Care Guide
Page 6
...Nothing will not operate ■ Is the control knob set ? Use cookware about the same size as the entire appliance is the "Cooktop Lockout" set correctly? See the Installation Instructions. ■ On coil element models, is the element inserted properly? Cleaning Method: To... liquid cleaner or nonabrasive scrubbing pad: Gently clean around cookware on some models, do not use soapfilled scouring pads, abrasive cleaners, Cooktop Cleaner, steelwool pads, gritty washcloths or abrasive paper towels. To avoid damage to order. BURNER BOWLS Cleaning Method: Chrome only It...
...Nothing will not operate ■ Is the control knob set ? Use cookware about the same size as the entire appliance is the "Cooktop Lockout" set correctly? See the Installation Instructions. ■ On coil element models, is the element inserted properly? Cleaning Method: To... liquid cleaner or nonabrasive scrubbing pad: Gently clean around cookware on some models, do not use soapfilled scouring pads, abrasive cleaners, Cooktop Cleaner, steelwool pads, gritty washcloths or abrasive paper towels. To avoid damage to order. BURNER BOWLS Cleaning Method: Chrome only It...


