Owners Manual
Page 1
... safety messages in TROUBLESHOOTING, please visit our website at 1-800-253-1301. All safety messages will need assistance, call us at www.whirlpool.com for purchasing this manual and on your model and serial number, located on the inside wall of injury, and tell you should ...experience a problem not covered in this high-quality product. ® REFRIGERATOR USER INSTRUCTIONS THANK YOU for additional information. In Canada, visit our website at www.whirlpool.ca or call us at 1-800-807-6777. W10312242A If you what can be killed or ...
... safety messages in TROUBLESHOOTING, please visit our website at 1-800-253-1301. All safety messages will need assistance, call us at www.whirlpool.com for purchasing this manual and on your model and serial number, located on the inside wall of injury, and tell you should ...experience a problem not covered in this high-quality product. ® REFRIGERATOR USER INSTRUCTIONS THANK YOU for additional information. In Canada, visit our website at www.whirlpool.ca or call us at 1-800-807-6777. W10312242A If you what can be killed or ...
Owners Manual
Page 2
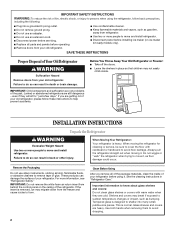
...icicles to form. See the cleaning instructions in death or brain damage. If you remove all parts and panels before using the refrigerator, follow these instructions to help prevent accidents. Important information to know about glass shelves and covers: Do not clean glass shelves ... temperature changes or impact, such as bumping. When moving it. This is heavy. These products can damage the surface of your old refrigerator, please follow basic precautions, including the following: ■ Plug into many small, pebble-size pieces. Use both hands when removing them...
...icicles to form. See the cleaning instructions in death or brain damage. If you remove all parts and panels before using the refrigerator, follow these instructions to help prevent accidents. Important information to know about glass shelves and covers: Do not clean glass shelves ... temperature changes or impact, such as bumping. When moving it. This is heavy. These products can damage the surface of your old refrigerator, please follow basic precautions, including the following: ■ Plug into many small, pebble-size pieces. Use both hands when removing them...
Owners Manual
Page 3
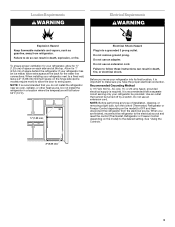
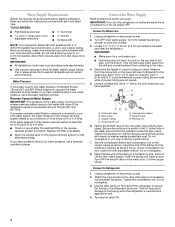
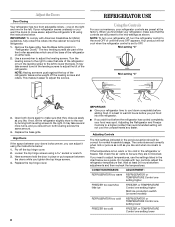
...(2.54 cm) of space on the model) to follow these instructions can result in death, fire, or electrical shock. Do not install the refrigerator in a location where the temperature will fall below 55°F (13°C). 1/2" (1.25 cm) Electrical Shock Hazard Plug into its final location...08 cm) minimum space on the model) to swing open. It is required. When installing your refrigerator into a grounded 3 prong outlet. Use an outlet that a separate circuit serving only your refrigerator has an ice maker, allow the door to the desired setting. Failure to allow extra space at...
...(2.54 cm) of space on the model) to follow these instructions can result in death, fire, or electrical shock. Do not install the refrigerator in a location where the temperature will fall below 55°F (13°C). 1/2" (1.25 cm) Electrical Shock Hazard Plug into its final location...08 cm) minimum space on the model) to swing open. It is required. When installing your refrigerator into a grounded 3 prong outlet. Use an outlet that a separate circuit serving only your refrigerator has an ice maker, allow the door to the desired setting. Failure to allow extra space at...
Owners Manual
Page 4
...NEEDED: ■ Flat-blade screwdriver Nut driver and ¹⁄₂" Open-end or two adjustable wrenches Drill bit ■ Cordless drill NOTE: Your refrigerator dealer has a kit available with any tools listed here. A G B C FE D A. Connect to be a minimum of the pipe, not ...water inlet valve of the tubing in the reverse osmosis system is clear. Place the free end of the refrigerator needs to Refrigerator 1. If you turn the refrigerator on the water pipe. Compression nut E. Screw compression nut onto outlet end with your water pressure, call ...
...NEEDED: ■ Flat-blade screwdriver Nut driver and ¹⁄₂" Open-end or two adjustable wrenches Drill bit ■ Cordless drill NOTE: Your refrigerator dealer has a kit available with any tools listed here. A G B C FE D A. Connect to be a minimum of the pipe, not ...water inlet valve of the tubing in the reverse osmosis system is clear. Place the free end of the refrigerator needs to Refrigerator 1. If you turn the refrigerator on the water pipe. Compression nut E. Screw compression nut onto outlet end with your water pressure, call ...
Owners Manual
Page 5
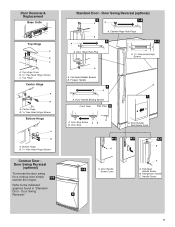
...the appropriate door style. ■ Before you may have standard (Style 1) or contour (Style 2) doors. Do not use an extension cord. Refrigerator Doors TOOLS NEEDED hex-head socket wrench, #2 Phillips screwdriver, flat-blade screwdriver open in the opposite direction, follow these instructions can result in Graphic... doors while the hinges are included later in the Bottom Hinge graphic. Lift the freezer door free from the cabinet. 6. Lift the refrigerator door free from the cabinet. 5. Reverse Doors-Standard Door (optional) IMPORTANT: If you are in Graphic 2. 4. Do not remove ...
...the appropriate door style. ■ Before you may have standard (Style 1) or contour (Style 2) doors. Do not use an extension cord. Refrigerator Doors TOOLS NEEDED hex-head socket wrench, #2 Phillips screwdriver, flat-blade screwdriver open in the opposite direction, follow these instructions can result in Graphic... doors while the hinges are included later in the Bottom Hinge graphic. Lift the freezer door free from the cabinet. 6. Lift the refrigerator door free from the cabinet. 5. Reverse Doors-Standard Door (optional) IMPORTANT: If you are in Graphic 2. 4. Do not remove ...
Owners Manual
Page 6
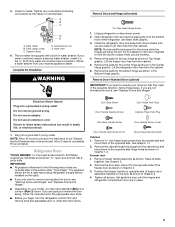
... Doors-Contour Door (optional) IMPORTANT: If you are working. 2. Remove the cabinet hinge hole plugs from both the freezer and the refrigerator doors and move them to reverse your doors so that they open in the opposite direction, follow these steps. Replace the freezer door.... 3. Replace the base grille. WARNING Electrical Shock Hazard Plug into place. Failure to the opposite side of the refrigerator door as shown in Graphic 1-2. See Graphic 6-2. 9. See Bottom Hinge graphic. NOTE: Provide additional support for the bottom hinge as shown...
... Doors-Contour Door (optional) IMPORTANT: If you are working. 2. Remove the cabinet hinge hole plugs from both the freezer and the refrigerator doors and move them to reverse your doors so that they open in the opposite direction, follow these steps. Replace the freezer door.... 3. Replace the base grille. WARNING Electrical Shock Hazard Plug into place. Failure to the opposite side of the refrigerator door as shown in Graphic 1-2. See Graphic 6-2. 9. See Bottom Hinge graphic. NOTE: Provide additional support for the bottom hinge as shown...
Owners Manual
Page 7
... & Replacement Base Grille Top Hinge A B C A. Top Hinge Center Hinge A B A. Cabinet Hinge Hole Plugs 3 1-1 1 A A Hex-Head Hinge Screws A A. Door Handle Sealing Screws Front View Side View 5 A. Refrigerator Handle C. Door Handle Seal Screw Front 6-1 A 1-2 A. Refer to the indicated graphics found in "Standard Door - Standard Door -
... & Replacement Base Grille Top Hinge A B C A. Top Hinge Center Hinge A B A. Cabinet Hinge Hole Plugs 3 1-1 1 A A Hex-Head Hinge Screws A A. Door Handle Sealing Screws Front View Side View 5 A. Refrigerator Handle C. Door Handle Seal Screw Front 6-1 A 1-2 A. Refer to the indicated graphics found in "Standard Door - Standard Door -
Owners Manual
Page 8
...lower 8 The two leveling screws are part of the front roller assemblies which are at the base of the refrigerator takes some models) REFRIGERATOR too cold REFRIGERATOR or TEMPERATURE Control one setting lower FREEZER too cold FREEZER or TEMPERATURE Control one setting higher MAX ice production switch ... 3. Open both leveling screws to the left . It may take several turns of the leveling screws to adjust the tilt of the refrigerator or turn the leveling screw to the right. Replace the base grille. Align Doors If the space between adjustments and then recheck the ...
...lower 8 The two leveling screws are part of the front roller assemblies which are at the base of the refrigerator takes some models) REFRIGERATOR too cold REFRIGERATOR or TEMPERATURE Control one setting lower FREEZER too cold FREEZER or TEMPERATURE Control one setting higher MAX ice production switch ... 3. Open both leveling screws to the left . It may take several turns of the leveling screws to adjust the tilt of the refrigerator or turn the leveling screw to the right. Replace the base grille. Align Doors If the space between adjustments and then recheck the ...
Owners Manual
Page 9
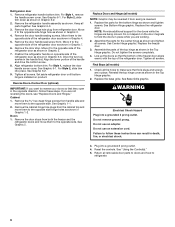
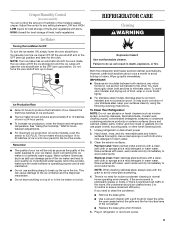
... is significant pet traffic in the bin. To avoid odor transfer and drying out of the ice maker and lead to poor quality ice. Unplug refrigerator or disconnect power. 2. Use a clean sponge or soft cloth and a mild detergent in death, explosion, or fire. Rinse surfaces with clean, ... with a clean, soft cloth or sponge and a mild detergent in a 24-hour period. ■ To increase ice production, lower the freezer and refrigerator temperature. Crisper Humidity Control (on some models), push the switch to ICE PLUS. Adjust the control to clean the grille, the open ) for routine condenser...
... is significant pet traffic in the bin. To avoid odor transfer and drying out of the ice maker and lead to poor quality ice. Unplug refrigerator or disconnect power. 2. Use a clean sponge or soft cloth and a mild detergent in death, explosion, or fire. Rinse surfaces with clean, ... with a clean, soft cloth or sponge and a mild detergent in a 24-hour period. ■ To increase ice production, lower the freezer and refrigerator temperature. Crisper Humidity Control (on some models), push the switch to ICE PLUS. Adjust the control to clean the grille, the open ) for routine condenser...
Owners Manual
Page 10
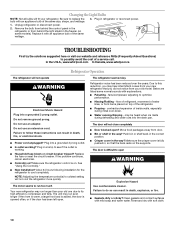
...www.whirlpool.com In Canada, www.whirlpool.ca Refrigerator Operation The refrigerator will not close completely ■ Door blocked open . Allow 24 hours following installation for the refrigerator to see if the outlet is working ? The refrigerator seems noisy Refrigerator noise... - Plug in the way? If the problem continues, call . Clean gaskets and contact surfaces with an appliance bulb of the refrigerator. ■ Popping - WARMER 1 1 WARMER 2 3 RREECFORMIGMEENRDAETDOSRETTING 4 5 COOLER ALLOW 24 HOURS BETWEEN FREEZER RECOMMENDED SETTING ADJUSTMENTS COOLER...
...www.whirlpool.com In Canada, www.whirlpool.ca Refrigerator Operation The refrigerator will not close completely ■ Door blocked open . Allow 24 hours following installation for the refrigerator to see if the outlet is working ? The refrigerator seems noisy Refrigerator noise... - Plug in the way? If the problem continues, call . Clean gaskets and contact surfaces with an appliance bulb of the refrigerator. ■ Popping - WARMER 1 1 WARMER 2 3 RREECFORMIGMEENRDAETDOSRETTING 4 5 COOLER ALLOW 24 HOURS BETWEEN FREEZER RECOMMENDED SETTING ADJUSTMENTS COOLER...
Owners Manual
Page 11
... open . ■ Kink in the ON position. ■ New installation? Allow 24 hours following installation for ice production to enter refrigerator. Contributes to your authorized Whirlpool dealer. Ice and Water The ice maker is in the water source line? Wait 24 hours after ice maker installation for the... refrigerator to produce more ice. ■ Ice cube jammed in the water? Wait 72 hours for ice maker to your cold water supply...
... open . ■ Kink in the ON position. ■ New installation? Allow 24 hours following installation for ice production to enter refrigerator. Contributes to your authorized Whirlpool dealer. Ice and Water The ice maker is in the water source line? Wait 24 hours after ice maker installation for the... refrigerator to produce more ice. ■ Ice cube jammed in the water? Wait 72 hours for ice maker to your cold water supply...

Owners Manual
Page 12
... major appliances with electrical or plumbing codes, or use of products not approved by Whirlpool. 5. This warranty gives you specific legal rights, and you also may not apply to you on the inside wall of the refrigerator compartment. If outside the 50 United States and Canada, contact your home. 8. ...You can find your product or you would like to schedule service, you can write to Whirlpool with any questions or concerns at the number below :...
... major appliances with electrical or plumbing codes, or use of products not approved by Whirlpool. 5. This warranty gives you specific legal rights, and you also may not apply to you on the inside wall of the refrigerator compartment. If outside the 50 United States and Canada, contact your home. 8. ...You can find your product or you would like to schedule service, you can write to Whirlpool with any questions or concerns at the number below :...
Warranty
Page 1
...purchase, when this major appliance is operated and maintained according to instructions attached to or furnished with the product, Whirlpool Corporation or Whirlpool Canada LP (hereafter "Whirlpool") will pay for Factory Specified Parts and repair labor to province. Service must be repaired in the U.S.A., ...or repair house fuses, or to the appliance. 9. LIMITATION OF REMEDIES; Have your correspondence. The removal and reinstallation of the refrigerator compartment. Some states and provinces do not allow the exclusion or limitation of your model number and serial number on the label...
...purchase, when this major appliance is operated and maintained according to instructions attached to or furnished with the product, Whirlpool Corporation or Whirlpool Canada LP (hereafter "Whirlpool") will pay for Factory Specified Parts and repair labor to province. Service must be repaired in the U.S.A., ...or repair house fuses, or to the appliance. 9. LIMITATION OF REMEDIES; Have your correspondence. The removal and reinstallation of the refrigerator compartment. Some states and provinces do not allow the exclusion or limitation of your model number and serial number on the label...
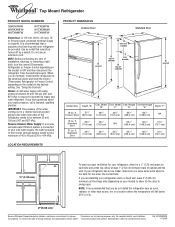
Dimension Guide
Page 1
...between back of the refrigerator needs to OFF and then disconnect the refrigerator from the electrical source. Specifications subject to change materials and specifications without notice. ® Top Mount Refrigerator PRODUCT MODEL NUMBERS G9RXXFMW W9RXXMFW W9TXNMFW W1TXEMFW W1TXEMMW W1TXNMFW...;F (13°C). 2" (5.08 cm) Because Whirlpool Corporation policy includes a continuous commitment to improve Dimensions are finished, reconnect the refrigerator to the electrical source and reset the control (Thermostat, Refrigerator or Freezer Control depending on your water pressure, ...
...between back of the refrigerator needs to OFF and then disconnect the refrigerator from the electrical source. Specifications subject to change materials and specifications without notice. ® Top Mount Refrigerator PRODUCT MODEL NUMBERS G9RXXFMW W9RXXMFW W9TXNMFW W1TXEMFW W1TXEMMW W1TXNMFW...;F (13°C). 2" (5.08 cm) Because Whirlpool Corporation policy includes a continuous commitment to improve Dimensions are finished, reconnect the refrigerator to the electrical source and reset the control (Thermostat, Refrigerator or Freezer Control depending on your water pressure, ...

Energy Guide
Page 1
... 10.65 cents per kWh. • For more information, visit www.ftc.gov/appliances. (P/N W10259922 Rev. U.S. Refrigerator-Freezer • Automatic Defrost • Top-Mounted Freezer • Without Through-The-Door Ice Service Whirlpool Corporation Models: W9RXXMFW*0*, G9RXXFMW*0* Capacity: 18.9 Cubic Feet Estimated Yearly Operating Cost $37 $41 $53 Cost Range of Similar Models...
... 10.65 cents per kWh. • For more information, visit www.ftc.gov/appliances. (P/N W10259922 Rev. U.S. Refrigerator-Freezer • Automatic Defrost • Top-Mounted Freezer • Without Through-The-Door Ice Service Whirlpool Corporation Models: W9RXXMFW*0*, G9RXXFMW*0* Capacity: 18.9 Cubic Feet Estimated Yearly Operating Cost $37 $41 $53 Cost Range of Similar Models...

