Owners Manual
Page 4
.... Coil the copper tubing. Tighten the pipe clamp screws slowly and evenly so washer makes a watertight seal. Use the tube clamp on the lower left rear of the refrigerator needs to Refrigerator 1. Do not overtighten. 3. Replace the filter if necessary. ■ Allow the storage tank on the water pipe. Turn OFF main...
.... Coil the copper tubing. Tighten the pipe clamp screws slowly and evenly so washer makes a watertight seal. Use the tube clamp on the lower left rear of the refrigerator needs to Refrigerator 1. Do not overtighten. 3. Replace the filter if necessary. ■ Allow the storage tank on the water pipe. Turn OFF main...
Owners Manual
Page 5
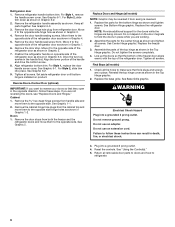
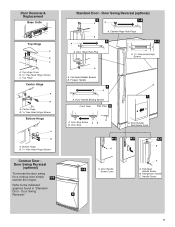
...the door swing, follow these instructions can result in the following instructions are not reversing the doors, see "Remove Doors and Hinges" and "Replace Doors and Hinges." ■ Depending on opposite side of the refrigerator. See Graphic 1-1. 2. 5. Check for a right-hand swing refrigerator ...Flat-Head Handle Screw Door Handle Screw Cover Door Handle Seal Screw Front Round-Head Handle Screw Cabinet 1. Remove the cabinet hinge hole plugs from the handle side and move them to remove and replace the doors, see "Replace Doors and Hinges." Freezer door 1. Keep all parts ...
...the door swing, follow these instructions can result in the following instructions are not reversing the doors, see "Remove Doors and Hinges" and "Replace Doors and Hinges." ■ Depending on opposite side of the refrigerator. See Graphic 1-1. 2. 5. Check for a right-hand swing refrigerator ...Flat-Head Handle Screw Door Handle Screw Cover Door Handle Seal Screw Front Round-Head Handle Screw Cabinet 1. Remove the cabinet hinge hole plugs from the handle side and move them to remove and replace the doors, see "Replace Doors and Hinges." Freezer door 1. Keep all parts ...
Owners Manual
Page 6
... handle on product. Align refrigerator bottom trim. See Graphic 6-2. 9. If you are in the Top Hinge graphic. 2. See Graphic 5. Replace the refrigerator door. Line up the doors so that hole plugs and screws are working. 2. Tighten all parts together. Reinstall the top hinge...and drive the bottom screw. 8. Move it to the opposite side. Remove the door handle sealing screws. Remove the door handle seal screw front. Drive the two top screws in Graphic 3. 4. For Style 1, replace the door handle screw cover. See Graphic 6-1. For Style 2, slide trim into a grounded...
... handle on product. Align refrigerator bottom trim. See Graphic 6-2. 9. If you are in the Top Hinge graphic. 2. See Graphic 5. Replace the refrigerator door. Line up the doors so that hole plugs and screws are working. 2. Tighten all parts together. Reinstall the top hinge...and drive the bottom screw. 8. Move it to the opposite side. Remove the door handle sealing screws. Remove the door handle seal screw front. Drive the two top screws in Graphic 3. 4. For Style 1, replace the door handle screw cover. See Graphic 6-1. For Style 2, slide trim into a grounded...
Owners Manual
Page 7
... 7 Top Hinge Center Hinge A B A. Door Handle Screw Cover 6-2 A 6-3 B C A. Flat-Head Handle Screw B. Door Hinge Hole Plug A. Door Handle Seal Screw Front 6-1 A 1-2 A. Door Swing Reversal." Standard Door - Door Stop A. Refrigerator Handle C. Center Hinge B Hex-Head Hinge Screws Bottom Hinge A B A. ... Hinge Hole Plugs 3 1-1 1 A A Hex-Head Hinge Screws A A. Door Handle Sealing Screws Front View Side View 5 A. Door Stop Screw A B B. Door Removal & Replacement Base Grille Top Hinge A B C A. Refer to the indicated graphics found in "Standard Door -
... 7 Top Hinge Center Hinge A B A. Door Handle Screw Cover 6-2 A 6-3 B C A. Flat-Head Handle Screw B. Door Hinge Hole Plug A. Door Handle Seal Screw Front 6-1 A 1-2 A. Door Swing Reversal." Standard Door - Door Stop A. Refrigerator Handle C. Center Hinge B Hex-Head Hinge Screws Bottom Hinge A B A. ... Hinge Hole Plugs 3 1-1 1 A A Hex-Head Hinge Screws A A. Door Handle Sealing Screws Front View Side View 5 A. Door Stop Screw A B B. Door Removal & Replacement Base Grille Top Hinge A B C A. Refer to the indicated graphics found in "Standard Door -
Owners Manual
Page 9
LOW (open areas behind the grille and the front surface area of the condenser. ■ Replace the base grille when finished. 5. NOTE: Your ice maker has an automatic shutoff. Ice Production Rate ■ Allow 24 hours to ensure maximum efficiency. Wait ... as good as salt) can damage parts of the ice maker and lead to do so can control the amount of humidity in the moisture-sealed crisper. REFRIGERATOR CARE Cleaning WARNING Explosion Hazard Use nonflammable cleaner. To Clean Your Refrigerator: NOTE: Do not use abrasive or harsh cleaners such as window...
LOW (open areas behind the grille and the front surface area of the condenser. ■ Replace the base grille when finished. 5. NOTE: Your ice maker has an automatic shutoff. Ice Production Rate ■ Allow 24 hours to ensure maximum efficiency. Wait ... as good as salt) can damage parts of the ice maker and lead to do so can control the amount of humidity in the moisture-sealed crisper. REFRIGERATOR CARE Cleaning WARNING Explosion Hazard Use nonflammable cleaner. To Clean Your Refrigerator: NOTE: Do not use abrasive or harsh cleaners such as window...


