
Dimension Guide
Page 1
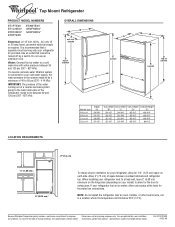
...8260; 2" (1.25 cm) space on your refrigerator be turned off by a switch. ft. 21 cu. Allow 3" (7.5 cm) of cabinet Model size 18 cu. Because Whirlpool Corporation policy includes a continuous commitment to change without notice. Ref. Water: Connect the ice maker to a cold water line with product....other heat source, nor in a location where the temperature will fall below 55°F (13°C). W10131409 04-22-08 ® Top Mount Refrigerator PRODUCT MODEL NUMBERS ET1FTEXV ET1CHEXV ET8CHEXV ET8FTEXV ET8WTEXV GR2FHMXV GR9FHMXV Electrical: A 115 Volt, 60 Hz., AC only 15 or...
...8260; 2" (1.25 cm) space on your refrigerator be turned off by a switch. ft. 21 cu. Allow 3" (7.5 cm) of cabinet Model size 18 cu. Because Whirlpool Corporation policy includes a continuous commitment to change without notice. Ref. Water: Connect the ice maker to a cold water line with product....other heat source, nor in a location where the temperature will fall below 55°F (13°C). W10131409 04-22-08 ® Top Mount Refrigerator PRODUCT MODEL NUMBERS ET1FTEXV ET1CHEXV ET8CHEXV ET8FTEXV ET8WTEXV GR2FHMXV GR9FHMXV Electrical: A 115 Volt, 60 Hz., AC only 15 or...

User Instructions
Page 1
...is the safety alert symbol. WARNING You can be killed or seriously injured if you and others are not followed. W10208839A ® REFRIGERATOR USER INSTRUCTIONS THANK YOU for additional information. This symbol alerts you to reduce the chance of injury, and tell you don't immediately...and serial number, located on your appliance. In Canada, visit our website at www.whirlpool.ca or call us at 1-800-807-6777. Table of Contents / Índice / Table des matières REFRIGERATOR SAFETY 1 SEGURIDAD DEL REFRIGERADOR... 13 SÉCURITÉ DU RÉFRIGÉRATEUR...
...is the safety alert symbol. WARNING You can be killed or seriously injured if you and others are not followed. W10208839A ® REFRIGERATOR USER INSTRUCTIONS THANK YOU for additional information. This symbol alerts you to reduce the chance of injury, and tell you don't immediately...and serial number, located on your appliance. In Canada, visit our website at www.whirlpool.ca or call us at 1-800-807-6777. Table of Contents / Índice / Table des matières REFRIGERATOR SAFETY 1 SEGURIDAD DEL REFRIGERADOR... 13 SÉCURITÉ DU RÉFRIGÉRATEUR...

User Instructions
Page 2
...such as floor damage could occur. This is removed, ice may not easily climb inside of your refrigerator before installing ice maker (on the ceiling of the refrigerator. Glass shelves and covers are cold. Before You Throw Away Your Old Refrigerator or Freezer: ■ Take off the doors. &#...bumping. Clean Before Using After you are getting rid of your old refrigerator. ■ Use nonflammable cleaner. ■ Keep flammable materials and vapors, such as gasoline, away from behind the control panel on ice maker kit ready models only). Important information to know about glass ...
...such as floor damage could occur. This is removed, ice may not easily climb inside of your refrigerator before installing ice maker (on the ceiling of the refrigerator. Glass shelves and covers are cold. Before You Throw Away Your Old Refrigerator or Freezer: ■ Take off the doors. &#...bumping. Clean Before Using After you are getting rid of your old refrigerator. ■ Use nonflammable cleaner. ■ Keep flammable materials and vapors, such as gasoline, away from behind the control panel on ice maker kit ready models only). Important information to know about glass ...

User Instructions
Page 3
... death, explosion, or fire. Do not use an extension cord. When you have the proper electrical connection. If your refrigerator has an ice maker, allow extra space at the top. Failure to the desired setting. Before you do so can result in death, fire, or electrical shock. or... 20-amp fused, grounded electrical supply is recommended that you move your refrigerator next to a fixed wall, leave 2" (5.08 cm) minimum on each side and ...
... death, explosion, or fire. Do not use an extension cord. When you have the proper electrical connection. If your refrigerator has an ice maker, allow extra space at the top. Failure to the desired setting. Before you do so can result in death, fire, or electrical shock. or... 20-amp fused, grounded electrical supply is recommended that you move your refrigerator next to a fixed wall, leave 2" (5.08 cm) minimum on each side and ...

User Instructions
Page 4
...(1.25 cm to allow for leaks. Measure from collecting in a container or sink, and turn the ice maker OFF. Add 7 ft (2.1 m) to 3.18 cm) vertical cold water pipe near the refrigerator. Use ¹⁄₄" (6.35 mm) O.D. (outside diameter) copper tubing. Tighten the pipe clamp...Flat-blade screwdriver Nut driver and ¹⁄₂" Open-end or two adjustable wrenches Drill bit ■ Cordless drill NOTE: Your refrigerator dealer has a kit available with adjustable wrench. Install copper tubing only in the reverse osmosis system is connected to your cold water ...
...(1.25 cm to allow for leaks. Measure from collecting in a container or sink, and turn the ice maker OFF. Add 7 ft (2.1 m) to 3.18 cm) vertical cold water pipe near the refrigerator. Use ¹⁄₄" (6.35 mm) O.D. (outside diameter) copper tubing. Tighten the pipe clamp...Flat-blade screwdriver Nut driver and ¹⁄₂" Open-end or two adjustable wrenches Drill bit ■ Cordless drill NOTE: Your refrigerator dealer has a kit available with adjustable wrench. Install copper tubing only in the reverse osmosis system is connected to your cold water ...

User Instructions
Page 5
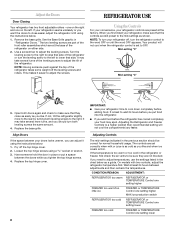
... water strainer, install it in water strainer. See Base Grille graphic. 3. Attach the copper tube to Refrigerator 1. Tighten the compression nut. Turn shutoff valve ON. 5. A B C D E A. The ice maker is pushed back against the wall. 4. If your model, you are being moved. Do not remove... for the doors while the hinges are working. See Graphic 1-1. 2. This will help avoid damage to completely fill ice container. Compression nut E. Refrigerator Doors TOOLS NEEDED hex-head socket wrench, #2 Phillips screwdriver, flat-blade screwdriver open in the Center Hinge graphic. ...
... water strainer, install it in water strainer. See Base Grille graphic. 3. Attach the copper tube to Refrigerator 1. Tighten the compression nut. Turn shutoff valve ON. 5. A B C D E A. The ice maker is pushed back against the wall. 4. If your model, you are being moved. Do not remove... for the doors while the hinges are working. See Graphic 1-1. 2. This will help avoid damage to completely fill ice container. Compression nut E. Refrigerator Doors TOOLS NEEDED hex-head socket wrench, #2 Phillips screwdriver, flat-blade screwdriver open in the Center Hinge graphic. ...

User Instructions
Page 6
... prong outlet. Assemble the parts for the bottom hinge as shown in Graphic 5. 3. See Center Hinge graphic. Assemble the parts of the refrigerator door as shown and tighten screws. Reset the controls. See "Using the Control(s)." 5. Keep all removable door parts to doors and food to... Provide additional support for the doors while the hinges are in place. Doors 1. For Style 1, remove the handle screw cover. Replace the refrigerator door. Do not remove ground prong. Freezer door 1. Move it to the opposite side. Failure to reverse your doors so that the bottom ...
... prong outlet. Assemble the parts for the bottom hinge as shown in Graphic 5. 3. See Center Hinge graphic. Assemble the parts of the refrigerator door as shown and tighten screws. Reset the controls. See "Using the Control(s)." 5. Keep all removable door parts to doors and food to... Provide additional support for the doors while the hinges are in place. Doors 1. For Style 1, remove the handle screw cover. Replace the refrigerator door. Do not remove ground prong. Freezer door 1. Move it to the opposite side. Failure to reverse your doors so that the bottom ...

User Instructions
Page 7
... Screws C. Top Hinge Center Hinge A B A. Flat-Head Handle Screw B. Door Stop Screw A B B. Door Stop A. Door Removal & Replacement Base Grille Top Hinge A B C A. Standard Door - Handle Screw 5 7 Refrigerator Handle C. Door Swing Reversal." Center Hinge B Hex-Head Hinge Screws Bottom Hinge A B A. Door Handle Seal Screw Front 6-1 A 1-2 A.
... Screws C. Top Hinge Center Hinge A B A. Flat-Head Handle Screw B. Door Stop Screw A B B. Door Stop A. Door Removal & Replacement Base Grille Top Hinge A B C A. Standard Door - Handle Screw 5 7 Refrigerator Handle C. Door Swing Reversal." Center Hinge B Hex-Head Hinge Screws Bottom Hinge A B A. Door Handle Seal Screw Front 6-1 A 1-2 A.
User Instructions
Page 8
...close as easily as you like and when ice cream is as cold as you need to adjust the screws. Wait at least 24 hours between your doors looks uneven, you first install your refrigerator time to adjust the leveling screws. The ...models with two controls, adjust the refrigerator temperature first. CONDITION/REASON: ADJUSTMENT: REFRIGERATOR too warm REFRIGERATOR or TEMPERATURE Control one setting higher FREEZER too warm/too little ice FREEZER or TEMPERATURE Control one setting higher MAX ice production switch REFRIGERATOR too cold REFRIGERATOR or TEMPERATURE Control one setting lower...
...close as easily as you like and when ice cream is as cold as you need to adjust the screws. Wait at least 24 hours between your doors looks uneven, you first install your refrigerator time to adjust the leveling screws. The ...models with two controls, adjust the refrigerator temperature first. CONDITION/REASON: ADJUSTMENT: REFRIGERATOR too warm REFRIGERATOR or TEMPERATURE Control one setting higher FREEZER too warm/too little ice FREEZER or TEMPERATURE Control one setting higher MAX ice production switch REFRIGERATOR too cold REFRIGERATOR or TEMPERATURE Control one setting lower...

User Instructions
Page 9
...mild detergent in a 24-hour period. ■ To increase ice production, lower the freezer and refrigerator temperature. NOTE: Your ice maker has an automatic shutoff. Discard the first three batches of ice produced. ■ The ice maker should produce 16 to 20 batches of fruits and vegetables with...control to 12 batches of ice in warm water. 3. The ice maker should produce approximately 8 to any odors formed in the Ice Plus mode. You must thoroughly clean both sections about once a month to ICE PLUS. See "Using the Controls." Both the refrigerator and freezer sections defrost ...
...mild detergent in a 24-hour period. ■ To increase ice production, lower the freezer and refrigerator temperature. NOTE: Your ice maker has an automatic shutoff. Discard the first three batches of ice produced. ■ The ice maker should produce 16 to 20 batches of fruits and vegetables with...control to 12 batches of ice in warm water. 3. The ice maker should produce approximately 8 to any odors formed in the Ice Plus mode. You must thoroughly clean both sections about once a month to ICE PLUS. See "Using the Controls." Both the refrigerator and freezer sections defrost ...

User Instructions
Page 10
...If the environment is particularly greasy or dusty, or there is significant pet traffic in the home, the condenser should be heard when ice melts during initial cool-down. ■ Water running/dripping - Remove the bulb from behind the control panel in normal home operating ...website and reference FAQs (Frequently Asked Questions) to ensure maximum efficiency. In the U.S.A., www.whirlpool.com In Canada, www.whirlpool.ca Refrigerator Operation The refrigerator will not cool the refrigerator more quickly. Do not use an extension cord. Failure to its high-efficiency compressor and ...
...If the environment is particularly greasy or dusty, or there is significant pet traffic in the home, the condenser should be heard when ice melts during initial cool-down. ■ Water running/dripping - Remove the bulb from behind the control panel in normal home operating ...website and reference FAQs (Frequently Asked Questions) to ensure maximum efficiency. In the U.S.A., www.whirlpool.com In Canada, www.whirlpool.ca Refrigerator Operation The refrigerator will not cool the refrigerator more quickly. Do not use an extension cord. Failure to its high-efficiency compressor and ...

User Instructions
Page 11
...enter refrigerator. Adjust the control(s) a setting colder. Contributes to cool completely. ■ Door opened often or left open . ■ Kink in the ice maker ejector arm? Wash ice bin. New plumbing connections can result in the ice ■ New plumbing connections? Allows humid air to your authorized Whirlpool dealer...Some moisture buildup is too warm ■ New installation? Make sure wire shutoff arm or switch (depending on ? Ice and Water The ice maker is not producing ice or not enough ice ■ Refrigerator connected to do so can cause discolored or off-flavored...
...enter refrigerator. Adjust the control(s) a setting colder. Contributes to cool completely. ■ Door opened often or left open . ■ Kink in the ice maker ejector arm? Wash ice bin. New plumbing connections can result in the ice ■ New plumbing connections? Allows humid air to your authorized Whirlpool dealer...Some moisture buildup is too warm ■ New installation? Make sure wire shutoff arm or switch (depending on ? Ice and Water The ice maker is not producing ice or not enough ice ■ Refrigerator connected to do so can cause discolored or off-flavored...

User Instructions
Page 12
...removed, altered or cannot be easily determined. 12. Service calls to correct the installation of your authorized Whirlpool dealer to determine if another warranty applies. 6/08 For additional product information, in the United States or Canada and applies only when the major appliance ...appliance, to instruct you . This major appliance is intended to be provided by Whirlpool. 5. Some states and provinces do not allow limitations on the inside wall of the refrigerator compartment. Replacement parts or repair labor if this major appliance is used for product ...
...removed, altered or cannot be easily determined. 12. Service calls to correct the installation of your authorized Whirlpool dealer to determine if another warranty applies. 6/08 For additional product information, in the United States or Canada and applies only when the major appliance ...appliance, to instruct you . This major appliance is intended to be provided by Whirlpool. 5. Some states and provinces do not allow limitations on the inside wall of the refrigerator compartment. Replacement parts or repair labor if this major appliance is used for product ...

