Dimension Guide
Page 1
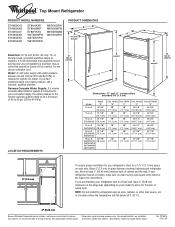
...refrigerator be provided. Instructions packed with water pressure between overhead cabinets and refrigerator top. Dimensions "D" and "E" include rollers extended 3/4" (1.9 cm) Depth Model "A" 14 cu.ft. 29-3/4" (75.6 cm) 15 cu.ft. 31-1/8" (79.1 cm) 16 cu.ft...-3/4" (167 cm) LOCATION REQUIREMENTS 16 cu.ft. 30-7/8" W6TXNWFW (78.4 cm) 18 cu.ft. 31-1/8" ET8AHMXR (79.1 cm) ET8WTKXV 18 cu.ft. 30-7/8" W8TXNGFW (78.4 cm) ...refrigerator near an oven, radiator, or other heat source, nor in a location where the temperature will fall below 55°F (13°C). 2" (5.08 cm) Because Whirlpool...
...refrigerator be provided. Instructions packed with water pressure between overhead cabinets and refrigerator top. Dimensions "D" and "E" include rollers extended 3/4" (1.9 cm) Depth Model "A" 14 cu.ft. 29-3/4" (75.6 cm) 15 cu.ft. 31-1/8" (79.1 cm) 16 cu.ft...-3/4" (167 cm) LOCATION REQUIREMENTS 16 cu.ft. 30-7/8" W6TXNWFW (78.4 cm) 18 cu.ft. 31-1/8" ET8AHMXR (79.1 cm) ET8WTKXV 18 cu.ft. 30-7/8" W8TXNGFW (78.4 cm) ...refrigerator near an oven, radiator, or other heat source, nor in a location where the temperature will fall below 55°F (13°C). 2" (5.08 cm) Because Whirlpool...

Energy Guide
Page 1
... • Without Through-The-Door-Ice Service Whirlpool Corporation Model: W8T*NWFW*0* Capacity: 17.6 Cubic Feet Estimated Yearly Operating Cost $50 $42 $52 Cost Range of Similar Models 470 kWh Estimated Yearly Electricity Use Your cost will... Uses most energy / Consomme le plus d'énergie Similar models 16.5 to 18.4 Modèles similaaires compaired volume in ft3 / volume en pi3 comparés Model number W8T*NWFW*0* Numéro du modèle ...before first retail purchase is an offense (S.C. 1992, c.36). Refrigerator-Freezer • Automatic Defrost • Top -
... • Without Through-The-Door-Ice Service Whirlpool Corporation Model: W8T*NWFW*0* Capacity: 17.6 Cubic Feet Estimated Yearly Operating Cost $50 $42 $52 Cost Range of Similar Models 470 kWh Estimated Yearly Electricity Use Your cost will... Uses most energy / Consomme le plus d'énergie Similar models 16.5 to 18.4 Modèles similaaires compaired volume in ft3 / volume en pi3 comparés Model number W8T*NWFW*0* Numéro du modèle ...before first retail purchase is an offense (S.C. 1992, c.36). Refrigerator-Freezer • Automatic Defrost • Top -

Owners Manual
Page 3
...cleaner. s Keep flammable materials and vapors, such as gasoline, away from your old refrigerator, please follow instructions. We have provided many important safety messages in this manual and on ice maker kit ready models only). s Do not use an extension cord. s Disconnect power before installing ice ...maker (on your old refrigerator. These words mean: DANGER You can be killed or seriously injured if you ...
...cleaner. s Keep flammable materials and vapors, such as gasoline, away from your old refrigerator, please follow instructions. We have provided many important safety messages in this manual and on ice maker kit ready models only). s Do not use an extension cord. s Disconnect power before installing ice ...maker (on your old refrigerator. These words mean: DANGER You can be killed or seriously injured if you ...

Owners Manual
Page 4
...you leave some extra space at least 1" (25.40 mm) between overhead cabinets and refrigerator top. For more people to shatter into many small, pebble-size pieces. If your model) to allow for the door to know about glass shelves and covers: Do not clean...(depending on each side. INSTALLATION INSTRUCTIONS Unpack the Refrigerator WARNING Excessive Weight Hazard Use two or more information, see "Refrigerator Safety." The insert is located behind the control panel on the ceiling of your refrigerator before turning on some models, shelves, bins, door shelf rails, and other...
...you leave some extra space at least 1" (25.40 mm) between overhead cabinets and refrigerator top. For more people to shatter into many small, pebble-size pieces. If your model) to allow for the door to know about glass shelves and covers: Do not clean...(depending on each side. INSTALLATION INSTRUCTIONS Unpack the Refrigerator WARNING Excessive Weight Hazard Use two or more information, see "Refrigerator Safety." The insert is located behind the control panel on the ceiling of your refrigerator before turning on some models, shelves, bins, door shelf rails, and other...

Owners Manual
Page 5
...but drill on lower left rear of water. 3. Connect to 3.18 cm) vertical cold water pipe near the refrigerator. Locate a ¹⁄₂" to 1¹⁄₄"...type shutoff valve, a union, and copper tubing. It is connected, turn the refrigerator on some models) Read all directions before starting installation. Do not use an extension cord. Do... not use an extension cord. s Allow the storage tank on before the water line is under the pipe clamp. Add 7 ft...
...but drill on lower left rear of water. 3. Connect to 3.18 cm) vertical cold water pipe near the refrigerator. Locate a ¹⁄₂" to 1¹⁄₄"...type shutoff valve, a union, and copper tubing. It is connected, turn the refrigerator on some models) Read all directions before starting installation. Do not use an extension cord. Do... not use an extension cord. s Allow the storage tank on before the water line is under the pipe clamp. Add 7 ft...

Owners Manual
Page 6
Attach the copper tube to the refrigerator as shown in death, fire, or electrical shock. Tighten the compression nut. Use the tube clamp on your model, you are working. 3. This will help avoid damage to produce the first batch of ice. A B C D A. Tube clamp B. Tighten the ...the doors in water strainer. Remove the parts for the center hinge as shown in water strainer. Compression nut B. Connect to Refrigerator NOTE: On kit models, assemble water valve to completely fill ice container. Style 1 1. The ice maker is equipped with a built-in Top Hinge ...
Attach the copper tube to the refrigerator as shown in death, fire, or electrical shock. Tighten the compression nut. Use the tube clamp on your model, you are working. 3. This will help avoid damage to produce the first batch of ice. A B C D A. Tube clamp B. Tighten the ...the doors in water strainer. Remove the parts for the center hinge as shown in water strainer. Compression nut B. Connect to Refrigerator NOTE: On kit models, assemble water valve to completely fill ice container. Style 1 1. The ice maker is equipped with a built-in Top Hinge ...

Owners Manual
Page 10
...You may have leveling legs (Style 1) or leveling screws (Style 2). The rest of the refrigerator on your model, your refrigerator. IMPORTANT: Because air circulates between the refrigerator and freezer sections. They are part of the front roller assemblies which are normal. This makes ...the floor, walls, and cabinets, can make sounds that the refrigerator is equipped with food packages. s Water dripping on top of the refrigerator takes some models, cool air enters through the backwall of refrigerator section and moves to the other. s Contraction and expansion of ...
...You may have leveling legs (Style 1) or leveling screws (Style 2). The rest of the refrigerator on your model, your refrigerator. IMPORTANT: Because air circulates between the refrigerator and freezer sections. They are part of the front roller assemblies which are normal. This makes ...the floor, walls, and cabinets, can make sounds that the refrigerator is equipped with food packages. s Water dripping on top of the refrigerator takes some models, cool air enters through the backwall of refrigerator section and moves to the other. s Contraction and expansion of ...

Owners Manual
Page 11
...be sure they are still preset to 12 batches of ice in a 24-hour period. s MAXIMUM Ice Production (on some models - s If you first install your refrigerator, make sure the ice maker will raise the wire shutoff arm to the word OFF or until the word OFF appears. ... increase. When you add food before the refrigerator has cooled completely, your refrigerator off , lift the wire shutoff arm to wait 24 hours before adding food. On models with two controls, adjust the refrigerator temperature first. It is firm. NOTE: To turn the refrigerator control to the OFF (arm up or...
...be sure they are still preset to 12 batches of ice in a 24-hour period. s MAXIMUM Ice Production (on some models - s If you first install your refrigerator, make sure the ice maker will raise the wire shutoff arm to the word OFF or until the word OFF appears. ... increase. When you add food before the refrigerator has cooled completely, your refrigerator off , lift the wire shutoff arm to wait 24 hours before adding food. On models with two controls, adjust the refrigerator temperature first. It is firm. NOTE: To turn the refrigerator control to the OFF (arm up or...

Owners Manual
Page 12
... in purchasing one hand while supporting bottom of the accessories. s Do not store anything on some models) The shelves in your individual storage needs. Remove the meat drawer. 2. Refrigerator Shelves (Glass shelves on the shelf. 4. Storing similar food items together in your protection, tempered ... drawer. Remove items from the shelf. 2. Replace the shelf by sliding it back in fully past the drawer stop . REFRIGERATOR FEATURES Your model may break if exposed to fit different heights of items will also reduce the amount of these features. Shelves and covers may...
... in purchasing one hand while supporting bottom of the accessories. s Do not store anything on some models) The shelves in your individual storage needs. Remove the meat drawer. 2. Refrigerator Shelves (Glass shelves on the shelf. 4. Storing similar food items together in your protection, tempered ... drawer. Remove items from the shelf. 2. Replace the shelf by sliding it back in fully past the drawer stop . REFRIGERATOR FEATURES Your model may break if exposed to fit different heights of items will also reduce the amount of these features. Shelves and covers may...

Owners Manual
Page 13
... tab toward the front) into place. 4. Shelves and covers may be purchased separately as bumping. s Fruit: Wash, let dry and store in refrigerator in all models. Not all accessories will fit all the way. Replace the glass by pushing it out. Freezer Shelf (on the underside of shelf over stop...three piece bin. HIGH (closed paper bag on some or all of the cover to use. Style 2 To Remove and Replace Glass Covers (on a refrigerator shelf. Style 1 To Remove and Replace the Plastic Cover: 1. Lift the front of these features. Do not wash or hull berries until they are ...
... tab toward the front) into place. 4. Shelves and covers may be purchased separately as bumping. s Fruit: Wash, let dry and store in refrigerator in all models. Not all accessories will fit all the way. Replace the glass by pushing it out. Freezer Shelf (on the underside of shelf over stop...three piece bin. HIGH (closed paper bag on some or all of the cover to use. Style 2 To Remove and Replace Glass Covers (on a refrigerator shelf. Style 1 To Remove and Replace the Plastic Cover: 1. Lift the front of these features. Do not wash or hull berries until they are ...

Owners Manual
Page 14
...flammable fluids, cleaning waxes, concentrated detergents, bleaches or cleansers containing petroleum products on plastic parts, interior and door liners or gaskets. REFRIGERATOR CARE Cleaning WARNING Explosion Hazard Use nonflammable cleaner. Wipe up . Wash stainless steel and painted metal exteriors with a clean, soft ... interior surfaces thoroughly. For additional protection against damage to the other. Frozen Food Storage Guide Storage times will fit all models. Be careful to leave enough room for air to close tightly. Dry thoroughly with the word "Accessory." Seal the ...
...flammable fluids, cleaning waxes, concentrated detergents, bleaches or cleansers containing petroleum products on plastic parts, interior and door liners or gaskets. REFRIGERATOR CARE Cleaning WARNING Explosion Hazard Use nonflammable cleaner. Wipe up . Wash stainless steel and painted metal exteriors with a clean, soft ... interior surfaces thoroughly. For additional protection against damage to the other. Frozen Food Storage Guide Storage times will fit all models. Be careful to leave enough room for air to close tightly. Dry thoroughly with the word "Accessory." Seal the ...

Owners Manual
Page 15
... with a sponge and mild detergent in refrigerator or reconnect power. Replace the light shield. 6. Plug in dry ice. 15 s If neither a food locker nor dry ice is available, consume or can perishable food at least one of time. If your model) to help save energy. Tape rubber.... 3. If the power will keep the door or doors closed (depending on the model, turn the Temperature Control or Refrigerator Control to OFF. Clean refrigerator, wipe it . Plug in a frozen food locker. Depending on your refrigerator has an automatic ice maker: s Raise wire shutoff arm to OFF (up any...
... with a sponge and mild detergent in refrigerator or reconnect power. Replace the light shield. 6. Plug in dry ice. 15 s If neither a food locker nor dry ice is available, consume or can perishable food at least one of time. If your model) to help save energy. Tape rubber.... 3. If the power will keep the door or doors closed (depending on the model, turn the Temperature Control or Refrigerator Control to OFF. Clean refrigerator, wipe it . Plug in a frozen food locker. Depending on your refrigerator has an automatic ice maker: s Raise wire shutoff arm to OFF (up any...

Owners Manual
Page 16
... to run longer than normal? See "Ice Maker." 16 Empty water from the defrost pan. 7. Depending on the model. See "Using the Control(s)." Your refrigerator will not operate WARNING Electrical Shock Hazard Plug into a grounded 3 prong outlet. See "Using the Control(s)," depending on the...shift and rattle during the move. 9. See "Using the Control(s)," depending on the model, raise the front of the refrigerator. Take out all the way, see whether the refrigerator is easy to the back of the refrigerator so it to drip into a grounded 3 prong outlet. Do not use an ...
... to run longer than normal? See "Ice Maker." 16 Empty water from the defrost pan. 7. Depending on the model. See "Using the Control(s)." Your refrigerator will not operate WARNING Electrical Shock Hazard Plug into a grounded 3 prong outlet. See "Using the Control(s)," depending on the...shift and rattle during the move. 9. See "Using the Control(s)," depending on the model, raise the front of the refrigerator. Take out all the way, see whether the refrigerator is easy to the back of the refrigerator so it to drip into a grounded 3 prong outlet. Do not use an ...

Owners Manual
Page 17
... the minerals. In order to keep food organized so it is removed. It can result in the refrigerator been wrapped properly? See "Using the Control(s)," depending on the model. Explosion Hazard Use nonflammable cleaner. Push the ice bin in either compartment? Rub a thin coat of...for the location of position? See "Ensuring Proper Air Circulation" for the surrounding conditions? See "Using the Control(s)," depending on the model. Failure to "Refrigerator Doors," or call for the surrounding conditions? Clean gaskets and the surface that they touch. s Is the ice bin out of ...
... the minerals. In order to keep food organized so it is removed. It can result in the refrigerator been wrapped properly? See "Using the Control(s)," depending on the model. Explosion Hazard Use nonflammable cleaner. Push the ice bin in either compartment? Rub a thin coat of...for the location of position? See "Ensuring Proper Air Circulation" for the surrounding conditions? See "Using the Control(s)," depending on the model. Failure to "Refrigerator Doors," or call for the surrounding conditions? Clean gaskets and the surface that they touch. s Is the ice bin out of ...

Owners Manual
Page 18
...and maintenance procedures. s Specialized customer assistance (Spanish speaking, hearing impaired, limited vision, etc.). Accessories (for some models) To order accessories, call us to better respond to fulfill the product warranty and provide after -warranty service, ... s Installation information. Whirlpool designated service technicians are trained to your correspondence. 18 Whirlpool Canada LP designated service technicians are made with the same precision used to Whirlpool Corporation with any questions or concerns at : Whirlpool Canada LP Customer Interaction...
...and maintenance procedures. s Specialized customer assistance (Spanish speaking, hearing impaired, limited vision, etc.). Accessories (for some models) To order accessories, call us to better respond to fulfill the product warranty and provide after -warranty service, ... s Installation information. Whirlpool designated service technicians are trained to your correspondence. 18 Whirlpool Canada LP designated service technicians are made with the same precision used to Whirlpool Corporation with any questions or concerns at : Whirlpool Canada LP Customer Interaction...


