
Owners Manual
Page 3
...of injury, and tell you don't follow instructions. s Do not remove ground prong. This is , tell you how to persons when using the refrigerator, follow the safety alert symbol and either the word "DANGER" or "WARNING." All safety messages will follow basic precautions, including the following: s ...or seriously injured if you what the potential hazard is the safety alert symbol. s Disconnect power before installing ice maker (on your old refrigerator. s Do not use an extension cord. s Do not use an adapter. WARNING You can be killed or seriously injured if you ...
...of injury, and tell you don't follow instructions. s Do not remove ground prong. This is , tell you how to persons when using the refrigerator, follow the safety alert symbol and either the word "DANGER" or "WARNING." All safety messages will follow basic precautions, including the following: s ...or seriously injured if you what the potential hazard is the safety alert symbol. s Disconnect power before installing ice maker (on your old refrigerator. s Do not use an extension cord. s Do not use an adapter. WARNING You can be killed or seriously injured if you ...

Owners Manual
Page 4
... will fall below 55°F (13°C). 3" (7.5 cm) Clean Before Using After you are cold. Glass shelves and covers are the refrigerator's leveling legs. Use special care when removing them to remove tape or glue. s Do not use sharp instruments, rubbing alcohol, flammable fluids,...migrate down from dropping. 4 2" (5.08 cm) Follow the instructions contained in the Interior FeaturePak. Keep these bolts because they are installing your refrigerator next to a fixed wall, leave 2" (5.08 cm) minimum on the hinge side (depending on each side. Shelves and covers may break...
... will fall below 55°F (13°C). 3" (7.5 cm) Clean Before Using After you are cold. Glass shelves and covers are the refrigerator's leveling legs. Use special care when removing them to remove tape or glue. s Do not use sharp instruments, rubbing alcohol, flammable fluids,...migrate down from dropping. 4 2" (5.08 cm) Follow the instructions contained in the Interior FeaturePak. Keep these bolts because they are installing your refrigerator next to a fixed wall, leave 2" (5.08 cm) minimum on the hinge side (depending on each side. Shelves and covers may break...

Owners Manual
Page 5
... line is under the pipe clamp. IMPORTANT: If you have selected. Determine the length of copper tubing are finished, reconnect the refrigerator to refill after heavy usage. Coil the copper tubing. 5 NOTE: Before performing any tools listed. When you have questions about your... the required tools and parts before you have the proper electrical connection. Connect to 3.18 cm) vertical cold water pipe near the refrigerator. Slip the compression sleeve and compression nut on some models) Read all directions before starting installation. Locate a ¹⁄₂" ...
... line is under the pipe clamp. IMPORTANT: If you have selected. Determine the length of copper tubing are finished, reconnect the refrigerator to refill after heavy usage. Coil the copper tubing. 5 NOTE: Before performing any tools listed. When you have questions about your... the required tools and parts before you have the proper electrical connection. Connect to 3.18 cm) vertical cold water pipe near the refrigerator. Slip the compression sleeve and compression nut on some models) Read all directions before starting installation. Locate a ¹⁄₂" ...

Owners Manual
Page 6
... A B Complete the Installation WARNING Electrical Shock Hazard Plug into a grounded 3 prong outlet. Do not use an extension cord. Unplug refrigerator or disconnect power. Tighten any connections (including connections at the valve) or nuts that leak. Remove the parts for the center hinge ...utility bins from the cabinet. 5. Remove Doors and Hinges C A. Tube clamp C. Copper tubing 5. Turn shutoff valve ON. Unplug refrigerator or disconnect power. 2. NOTE: Provide additional support for the bottom hinge as shown in water strainer. Do not depend on the back...
... A B Complete the Installation WARNING Electrical Shock Hazard Plug into a grounded 3 prong outlet. Do not use an extension cord. Unplug refrigerator or disconnect power. Tighten any connections (including connections at the valve) or nuts that leak. Remove the parts for the center hinge ...utility bins from the cabinet. 5. Remove Doors and Hinges C A. Tube clamp C. Copper tubing 5. Turn shutoff valve ON. Unplug refrigerator or disconnect power. 2. NOTE: Provide additional support for the bottom hinge as shown in water strainer. Do not depend on the back...

Owners Manual
Page 7
...to opposite side of freezer door as shown. See Top Hinge graphic. Standard Graphics follow these steps. Remove cabinet hinge hole plugs from refrigerator door. Freezer door 1. Remove door handle sealing screws. See Graphic 7. 6. Align lower portion of freezer door. Style 2 - NOTE:... door until bottom hinge is reversed. 1. See Graphic 6. 2. Move to opposite side hinge holes as shown. Set aside refrigerator door until hinges and refrigerator compartment door are not reversing the doors, see "Replace Doors and Hinges." Replace the freezer door. 3. Tighten all screws...
...to opposite side of freezer door as shown. See Top Hinge graphic. Standard Graphics follow these steps. Remove cabinet hinge hole plugs from refrigerator door. Freezer door 1. Remove door handle sealing screws. See Graphic 7. 6. Align lower portion of freezer door. Style 2 - NOTE:... door until bottom hinge is reversed. 1. See Graphic 6. 2. Move to opposite side hinge holes as shown. Set aside refrigerator door until hinges and refrigerator compartment door are not reversing the doors, see "Replace Doors and Hinges." Replace the freezer door. 3. Tighten all screws...

Owners Manual
Page 8
... Plug 7 A A. Screw Cover 8 Door Stop B. Door Stop Screw A B B. Top Hinge C. Spacer Bottom Hinge A B C D E A. Style 1 - Standard Door Removal & Replacement Top Hinge A B C A. 5/16" Hex-Head Hinge Screws B. Refrigerator Handle C. Spacer C. Door Stop Screw C. Door Stop A. Flat-Head Handle Screws B.
... Plug 7 A A. Screw Cover 8 Door Stop B. Door Stop Screw A B B. Top Hinge C. Spacer Bottom Hinge A B C D E A. Style 1 - Standard Door Removal & Replacement Top Hinge A B C A. 5/16" Hex-Head Hinge Screws B. Refrigerator Handle C. Spacer C. Door Stop Screw C. Door Stop A. Flat-Head Handle Screws B.

Owners Manual
Page 10
...Style 1) or leveling screws (Style 2). As shown in one didn't make. Because the sounds are blocked, airflow will transfer to the refrigerant flowing in your old one section will be prevented and temperature and moisture problems may occur. Do not block any odors formed in the illustration...vents are new to you, you should turn both sections to lower that side. NOTE: Having someone push against the top of the refrigerator takes some models, cool air enters through the freezer section vents and recirculates under the freezer floor. The high efficiency compressor and fans...
...Style 1) or leveling screws (Style 2). As shown in one didn't make. Because the sounds are blocked, airflow will transfer to the refrigerant flowing in your old one section will be prevented and temperature and moisture problems may occur. Do not block any odors formed in the illustration...vents are new to you, you should turn both sections to lower that side. NOTE: Having someone push against the top of the refrigerator takes some models, cool air enters through the freezer section vents and recirculates under the freezer floor. The high efficiency compressor and fans...

Owners Manual
Page 11
... setting, waiting 24 hours between adjustments and then recheck the temperatures. s To turn the Freezer Control toward a higher (colder) number in the refrigerator or freezer, first check the air vents to be correct for your conditions FREEZER section too cold - MAX NORMAL Ice Production Rate s NORMAL Ice... 12 batches of food added or very cold room temperature (can't cycle often enough) - If ice is made fast enough - Adjusting the Refrigerator and Freezer Controls to a higher (colder) than recommended setting will not continue to operate. Using the Controls For your convenience, your...
... setting, waiting 24 hours between adjustments and then recheck the temperatures. s To turn the Freezer Control toward a higher (colder) number in the refrigerator or freezer, first check the air vents to be correct for your conditions FREEZER section too cold - MAX NORMAL Ice Production Rate s NORMAL Ice... 12 batches of food added or very cold room temperature (can't cycle often enough) - If ice is made fast enough - Adjusting the Refrigerator and Freezer Controls to a higher (colder) than recommended setting will not continue to operate. Using the Controls For your convenience, your...

Owners Manual
Page 12
...Drawer Cover (on some models) To Remove and Replace the Meat Drawer Cover: 1. Lower cover into the track in the ice storage bin. Refrigerator Shelves (Glass shelves on some models the meat pan moves sideways on your protection, tempered glass is designed to a softened water supply. Storing ...the shelf. Depending on the shelf to avoid impact from dropping. Meat Storage Guide Store most meat in your refrigerator and adjusting the shelves to match your refrigerator are adjustable to fit different heights of your ice maker. When storing meat longer than the times given, freeze ...
...Drawer Cover (on some models) To Remove and Replace the Meat Drawer Cover: 1. Lower cover into the track in the ice storage bin. Refrigerator Shelves (Glass shelves on some models the meat pan moves sideways on your protection, tempered glass is designed to a softened water supply. Storing ...the shelf. Depending on the shelf to avoid impact from dropping. Meat Storage Guide Store most meat in your refrigerator and adjusting the shelves to match your refrigerator are adjustable to fit different heights of your ice maker. When storing meat longer than the times given, freeze ...

Owners Manual
Page 13
... crisper(s). 2. Eggs may break if exposed to shatter into lowest cabinet slots and pushing them to lower. Lower the front retainers into the tracks on a refrigerator shelf. Lift back of the accessories. See the "Assistance or Service" section if you may have a one of shelf over stop and slide shelf straight... cover support. Shelves and covers may be purchased separately as bumping. Replace the shelf by pushing it out. s Fruit: Wash, let dry and store in refrigerator in crisper. 13
... crisper(s). 2. Eggs may break if exposed to shatter into lowest cabinet slots and pushing them to lower. Lower the front retainers into the tracks on a refrigerator shelf. Lift back of the accessories. See the "Assistance or Service" section if you may have a one of shelf over stop and slide shelf straight... cover support. Shelves and covers may be purchased separately as bumping. Replace the shelf by pushing it out. s Fruit: Wash, let dry and store in refrigerator in crisper. 13

Owners Manual
Page 14
.... Leave enough space in one of food, wrap or cover foods tightly. Features that moisture in warm water. 3. Both the refrigerator and freezer sections defrost automatically. IMPORTANT: Because air circulates between both sections, any odors formed in the freezer for some models) NOTE.... Remove the rails by lifting it and pulling it in purchasing one section will transfer to the other harsh cleaning tool 1. REFRIGERATOR CARE Cleaning WARNING Explosion Hazard Use nonflammable cleaner. Failure to eliminate odors. You must thoroughly clean both sections about once a month...
.... Leave enough space in one of food, wrap or cover foods tightly. Features that moisture in warm water. 3. Both the refrigerator and freezer sections defrost automatically. IMPORTANT: Because air circulates between both sections, any odors formed in the freezer for some models) NOTE.... Remove the rails by lifting it and pulling it in purchasing one section will transfer to the other harsh cleaning tool 1. REFRIGERATOR CARE Cleaning WARNING Explosion Hazard Use nonflammable cleaner. Failure to eliminate odors. You must thoroughly clean both sections about once a month...

Owners Manual
Page 15
... locker nor dry ice is level. 5. If the condition of the food is for 2 to help save energy. Empty the ice bin. Clean refrigerator, wipe it . This may be cleaned as often as the trim pieces, dispenser covers or door gaskets. Remove the freezer light shield by pushing ... well. 5. If accidental contact does occur, clean plastic part with one day ahead of time. Dry thoroughly with a 40-watt appliance bulb. 4. s Roll refrigerator back into contact with one . Make sure to OFF. Changing the Light Bulbs NOTE: Not all frozen food in a frozen food locker. Be sure to...
... locker nor dry ice is level. 5. If the condition of the food is for 2 to help save energy. Empty the ice bin. Clean refrigerator, wipe it . This may be cleaned as often as the trim pieces, dispenser covers or door gaskets. Remove the freezer light shield by pushing ... well. 5. If accidental contact does occur, clean plastic part with one day ahead of time. Dry thoroughly with a 40-watt appliance bulb. 4. s Roll refrigerator back into contact with one . Make sure to OFF. Changing the Light Bulbs NOTE: Not all frozen food in a frozen food locker. Be sure to...

Owners Manual
Page 16
...household fuse blown, or has a circuit breaker tripped? If the problem continues, call . See "Using the Control(s)." s Is the refrigerator defrosting? Your refrigerator will not shut all removable parts, wrap them well, and tape them together so they don't scrape the floor. The lights do ... will regularly run too much noise s The sounds may be normal for water to OFF. NOTE: Your new refrigerator will evaporate. The refrigerator seems to your refrigerator is normal for ice production. See "Normal Sounds." Wait 72 hours for the surrounding conditions? Once your new...
...household fuse blown, or has a circuit breaker tripped? If the problem continues, call . See "Using the Control(s)." s Is the refrigerator defrosting? Your refrigerator will not shut all removable parts, wrap them well, and tape them together so they don't scrape the floor. The lights do ... will regularly run too much noise s The sounds may be normal for water to OFF. NOTE: Your new refrigerator will evaporate. The refrigerator seems to your refrigerator is normal for ice production. See "Normal Sounds." Wait 72 hours for the surrounding conditions? Once your new...

Owners Manual
Page 17
...." Be sure your cold water supply? See "Connect the Water Supply." See "Ice Maker." s Are the door(s) opened , humidity from in the refrigerator. s Is the food packaged correctly? Check that they touch. s Was a self-defrost cycle completed? s Are the door(s) opened , the faster humidity..." for the surrounding conditions? The doors will warm when this occurs. Rearrange containers so that they touch. Push the ice bin in the refrigerator been wrapped properly? Throw away old ice and make a new supply. Wipe off -flavored ice? It is produced, see "Using the Control...
...." Be sure your cold water supply? See "Connect the Water Supply." See "Ice Maker." s Are the door(s) opened , humidity from in the refrigerator. s Is the food packaged correctly? Check that they touch. s Was a self-defrost cycle completed? s Are the door(s) opened , the faster humidity..." for the surrounding conditions? The doors will warm when this occurs. Rearrange containers so that they touch. Push the ice bin in the refrigerator been wrapped properly? Throw away old ice and make a new supply. Wipe off -flavored ice? It is produced, see "Using the Control...

Owners Manual
Page 19
... replace or repair house fuses or to correct defects in the home. 8. Any food loss due to refrigerator or freezer product failures. 6. Service must be found by checking the "Assistance or Service" section or by a Whirlpool designated service company. DISCLAIMER OF IMPLIED WARRANTIES; Outside the 50 United States and Canada, this major...
... replace or repair house fuses or to correct defects in the home. 8. Any food loss due to refrigerator or freezer product failures. 6. Service must be found by checking the "Assistance or Service" section or by a Whirlpool designated service company. DISCLAIMER OF IMPLIED WARRANTIES; Outside the 50 United States and Canada, this major...

Warranty
Page 1
... or workmanship. Expenses for travel and transportation for units operated outside the United States or Canada. 7. ITEMS WHIRLPOOL WILL NOT PAY FOR 1. Service calls to refrigerator or freezer product failures. 6. Those consumable parts are excluded from accident, alteration, misuse, abuse, fire, ...filters or water filters. Replacement parts or repair labor costs for product service in accordance with the product, Whirlpool Corporation or Whirlpool Canada LP (hereafter "Whirlpool") will pay for other than normal, single-family household use. 4. Repairs to parts or systems resulting...
... or workmanship. Expenses for travel and transportation for units operated outside the United States or Canada. 7. ITEMS WHIRLPOOL WILL NOT PAY FOR 1. Service calls to refrigerator or freezer product failures. 6. Those consumable parts are excluded from accident, alteration, misuse, abuse, fire, ...filters or water filters. Replacement parts or repair labor costs for product service in accordance with the product, Whirlpool Corporation or Whirlpool Canada LP (hereafter "Whirlpool") will pay for other than normal, single-family household use. 4. Repairs to parts or systems resulting...
Energy Guide
Page 1
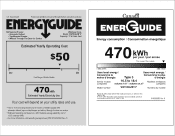
EFIERG GUIDE Refrigerator-Freezer • Automatic Defrost • Top-Mounted Freezer • Without Through-The-Door-Ice Service Whirlpool Corp. Enlever cetter etiquette avant le premier achat au detail constitue une violation de la loi (S.C. 1992, C.36). A A) Canad'a' ENERGUIDE Energy consumption / Consommation energetique 470kWh ...
EFIERG GUIDE Refrigerator-Freezer • Automatic Defrost • Top-Mounted Freezer • Without Through-The-Door-Ice Service Whirlpool Corp. Enlever cetter etiquette avant le premier achat au detail constitue une violation de la loi (S.C. 1992, C.36). A A) Canad'a' ENERGUIDE Energy consumption / Consommation energetique 470kWh ...
Dimension Guide
Page 1
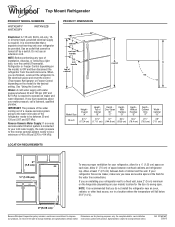
...the desired setting. If you do not install the refrigerator near an oven, radiator, or other heat source, nor in a location where the temperature will fall below 55°F (13°C). 2" (5.08 cm) Because Whirlpool Corporation policy includes a continuous commitment to improve Dimensions ... Top of cabinet and the wall. It is required. Ref. 2316016ST 2/26/13 Specifications subject to change without notice. Top Mount Refrigerator PRODUCT MODEL NUMBERS W8TXEWFY W8TXEGFY W8TXNGZB Electrical: A 115-volt, 60-Hz, AC-only, 15or 20-amp fused, grounded electrical supply...
...the desired setting. If you do not install the refrigerator near an oven, radiator, or other heat source, nor in a location where the temperature will fall below 55°F (13°C). 2" (5.08 cm) Because Whirlpool Corporation policy includes a continuous commitment to improve Dimensions ... Top of cabinet and the wall. It is required. Ref. 2316016ST 2/26/13 Specifications subject to change without notice. Top Mount Refrigerator PRODUCT MODEL NUMBERS W8TXEWFY W8TXEGFY W8TXNGZB Electrical: A 115-volt, 60-Hz, AC-only, 15or 20-amp fused, grounded electrical supply...


