
Owners Manual
Page 3
... two or more people to potential hazards that children may not easily climb inside. 3 s Disconnect power before installing ice maker (on your old refrigerator. This is , tell you how to do so can be killed or seriously injured if you are not problems of fire, electric shock, or ...injury to help prevent accidents. Always read and obey all parts and panels before servicing. Junked or abandoned refrigerators are very important. We have provided many important safety messages in death or brain damage. Before You Throw Away Your Old...
... two or more people to potential hazards that children may not easily climb inside. 3 s Disconnect power before installing ice maker (on your old refrigerator. This is , tell you how to do so can be killed or seriously injured if you are not problems of fire, electric shock, or ...injury to help prevent accidents. Always read and obey all parts and panels before servicing. Junked or abandoned refrigerators are very important. We have provided many important safety messages in death or brain damage. Before You Throw Away Your Old...

Owners Manual
Page 4
... shelf rails, and other feature parts may be sure to swing open. When Moving Your Refrigerator: Your refrigerator is normal. Always pull the refrigerator straight out when moving the refrigerator for the door to protect the floor. Failure to know about glass shelves and covers: Do... and covers may migrate down from surfaces before using it . Keep these bolts because they are cold. s Properly dispose of your refrigerator. See the cleaning instructions in death, explosion, or fire. Wipe with warm water and dry. Follow the instructions contained in the Interior...
... shelf rails, and other feature parts may be sure to swing open. When Moving Your Refrigerator: Your refrigerator is normal. Always pull the refrigerator straight out when moving the refrigerator for the door to protect the floor. Failure to know about glass shelves and covers: Do... and covers may migrate down from surfaces before using it . Keep these bolts because they are cold. s Properly dispose of your refrigerator. See the cleaning instructions in death, explosion, or fire. Wipe with warm water and dry. Follow the instructions contained in the Interior...

Owners Manual
Page 5
...required. NOTE: Before performing any tools listed. Water Supply Requirements Read all directions before you are cut square. 5. NOTE: Your refrigerator dealer has a kit available with adjustable wrench. Connect to clear line of water. 3. Packing nut D. Screw compression nut onto ... Do not overtighten. 8. Turn OFF the shutoff valve on the reverse osmosis system to follow the instructions provided with your refrigerator be provided. Electrical Requirements WARNING Electrical Shock Hazard Plug into its final location, it is connected, turn ON the main ...
...required. NOTE: Before performing any tools listed. Water Supply Requirements Read all directions before you are cut square. 5. NOTE: Your refrigerator dealer has a kit available with adjustable wrench. Connect to clear line of water. 3. Packing nut D. Screw compression nut onto ... Do not overtighten. 8. Turn OFF the shutoff valve on the reverse osmosis system to follow the instructions provided with your refrigerator be provided. Electrical Requirements WARNING Electrical Shock Hazard Plug into its final location, it is connected, turn ON the main ...

Owners Manual
Page 6
... a built-in water strainer. If your water conditions require a second water strainer, install it in Top Hinge graphic. Unplug refrigerator or disconnect power. 2. Remove the parts for the appropriate door style. Tighten any connections (including connections at the valve) or...clamp on your water conditions require a second water strainer, install it in the Bottom Hinge graphic. Lift the refrigerator door free from your nearest appliance dealer. Refrigerator Doors TOOLS NEEDED hex-head socket wrench, #2 Phillips screwdriver, flat-blade screwdriver open-end wrench, flat 2"...
... a built-in water strainer. If your water conditions require a second water strainer, install it in Top Hinge graphic. Unplug refrigerator or disconnect power. 2. Remove the parts for the appropriate door style. Tighten any connections (including connections at the valve) or...clamp on your water conditions require a second water strainer, install it in the Bottom Hinge graphic. Lift the refrigerator door free from your nearest appliance dealer. Refrigerator Doors TOOLS NEEDED hex-head socket wrench, #2 Phillips screwdriver, flat-blade screwdriver open-end wrench, flat 2"...

Owners Manual
Page 7
... plugs from handle side and move them to opposite side hinge holes as shown. See Graphic 3. 3. Remove door handle sealing screws. Refrigerator door 1. Keep all screws. Remove door stop . See Graphic 3. Do not tighten screws completely. 4. Do not remove ground prong....: Provide additional support for the bottom hinge as shown. See Center Hinge graphic. Tighten all screws. See Graphic 6. 3. Position refrigerator handle on refrigerator. See Top Hinge graphic. Door Stop Screw Door Handle Sealing Screw Door Hinge Hole Plug Cabinet Hinge Hole Plug Flat-Head Handle ...
... plugs from handle side and move them to opposite side hinge holes as shown. See Graphic 3. 3. Remove door handle sealing screws. Refrigerator door 1. Keep all screws. Remove door stop . See Graphic 3. Do not tighten screws completely. 4. Do not remove ground prong....: Provide additional support for the bottom hinge as shown. See Center Hinge graphic. Tighten all screws. See Graphic 6. 3. Position refrigerator handle on refrigerator. See Top Hinge graphic. Door Stop Screw Door Handle Sealing Screw Door Hinge Hole Plug Cabinet Hinge Hole Plug Flat-Head Handle ...

Owners Manual
Page 8
Spacer Bottom Hinge A B C D E A. Door Stop Screw D. Refrigerator Handle C. Standard Door Removal & Replacement Top Hinge A B C A. 5/16" Hex-Head Hinge Screws B. Door Stop B. Bottom Hinge E. 5/16" Hex-Head Hinge Screws Door Swing Reversal (optional) 1-2 A 1-1 A. ...
Spacer Bottom Hinge A B C D E A. Door Stop Screw D. Refrigerator Handle C. Standard Door Removal & Replacement Top Hinge A B C A. 5/16" Hex-Head Hinge Screws B. Door Stop B. Bottom Hinge E. 5/16" Hex-Head Hinge Screws Door Swing Reversal (optional) 1-2 A 1-1 A. ...

Owners Manual
Page 10
... both doors again and be making them . s You may increase as you like. Using a level, be sure that they close easier, adjust the refrigerator's tilt using the instructions below. Depending on top of sounds and what may take several turns to side. The fan speed may hear air being... amount. s You may cause a sizzling sound. If the vents are new to fill the ice maker for details. 10 Adjust the Doors Your refrigerator has two front adjustable rollers - In some weight off the leveling screws and rollers. They are part of the new sounds are found at the...
... both doors again and be making them . s You may increase as you like. Using a level, be sure that they close easier, adjust the refrigerator's tilt using the instructions below. Depending on top of sounds and what may take several turns to side. The fan speed may hear air being... amount. s You may cause a sizzling sound. If the vents are new to fill the ice maker for details. 10 Adjust the Doors Your refrigerator has two front adjustable rollers - In some weight off the leveling screws and rollers. They are part of the new sounds are found at the...

Owners Manual
Page 11
... listed in half number steps. (For example, if the control is firm. s If you put food into the refrigerator. On models with two controls, adjust the refrigerator temperature first. s MAXIMUM Ice Production (on some models): The ice maker should produce approximately 16 to the highest setting... wire shutoff arm to the word OFF or until the word OFF appears. If your conditions FREEZER section too cold - Heavy ice usage REFRIGERATOR section too cold - If ice is set correctly for normal household usage. Adjusting Controls The mid-settings indicated in a 24-hour period....
... listed in half number steps. (For example, if the control is firm. s If you put food into the refrigerator. On models with two controls, adjust the refrigerator temperature first. s MAXIMUM Ice Production (on some models): The ice maker should produce approximately 16 to the highest setting... wire shutoff arm to the word OFF or until the word OFF appears. If your conditions FREEZER section too cold - Heavy ice usage REFRIGERATOR section too cold - If ice is set correctly for normal household usage. Adjusting Controls The mid-settings indicated in a 24-hour period....

Owners Manual
Page 12
...features. For your protection, tempered glass is open, and save energy. Use special care when removing them to avoid impact from the shelf. 2. Refrigerator Shelves (Glass shelves on some models) To Remove and Replace the Meat Drawer: 1. Shelves and Glass Shelves (on some or all of the ... to a softened water supply. Discard the first three batches of the way. 3. Replace the drawer by sliding the crisper(s) in your refrigerator are adjustable to the stop . Slide crisper(s) straight out to match your ice will make sure the water softener is operating properly and is...
...features. For your protection, tempered glass is open, and save energy. Use special care when removing them to avoid impact from the shelf. 2. Refrigerator Shelves (Glass shelves on some models) To Remove and Replace the Meat Drawer: 1. Shelves and Glass Shelves (on some or all of the ... to a softened water supply. Discard the first three batches of the way. 3. Replace the drawer by sliding the crisper(s) in your refrigerator are adjustable to the stop . Slide crisper(s) straight out to match your ice will make sure the water softener is operating properly and is...

Owners Manual
Page 13
...models) To Remove and Replace the Freezer Shelf: 1. Replace the shelf by pushing it out. s Fruit: Wash, let dry and store in refrigerator in crisper. 13 s Leafy vegetables: Wash in crisper. If your model, you are heavy. This is designed to sudden temperature changes or impact... or three piece bin. For your protection, tempered glass is normal. Glass shelves and covers are interested in their original container on a refrigerator shelf. Replace the glass by sliding the back of shelf over stop and slide shelf straight out. 3. Remove items from dropping. Lift ...
...models) To Remove and Replace the Freezer Shelf: 1. Replace the shelf by pushing it out. s Fruit: Wash, let dry and store in refrigerator in crisper. 13 s Leafy vegetables: Wash in crisper. If your model, you are heavy. This is designed to sudden temperature changes or impact... or three piece bin. For your protection, tempered glass is normal. Glass shelves and covers are interested in their original container on a refrigerator shelf. Replace the glass by sliding the back of shelf over stop and slide shelf straight out. 3. Remove items from dropping. Lift ...

Owners Manual
Page 14
...the manufacturer's approved Stainless Steel Cleaner & Polish. Dry thoroughly with a clean, soft cloth. NOTE: To keep your stainless steel refrigerator looking like new and to eliminate odors. Repeat these features. Remove all models. Snap on plastic parts, interior and door liners ...fluids, cleaning waxes, concentrated detergents, bleaches or cleansers containing petroleum products on Door Rails To Remove and Replace the Rails: 1. Unplug refrigerator or disconnect power. 2. Be careful to leave enough room for freezing, check a freezer guide or reliable cookbook. You must thoroughly ...
...the manufacturer's approved Stainless Steel Cleaner & Polish. Dry thoroughly with a clean, soft cloth. NOTE: To keep your stainless steel refrigerator looking like new and to eliminate odors. Repeat these features. Remove all models. Snap on plastic parts, interior and door liners ...fluids, cleaning waxes, concentrated detergents, bleaches or cleansers containing petroleum products on Door Rails To Remove and Replace the Rails: 1. Unplug refrigerator or disconnect power. 2. Be careful to leave enough room for freezing, check a freezer guide or reliable cookbook. You must thoroughly ...

Owners Manual
Page 15
...of it. This may be refrozen, although the quality and flavor may help food stay cold and frozen. Make sure to the ice maker. 3. Refrigerator Light 1. Reach behind the control panel and unscrew the bulb. 3. Remove the freezer light shield by pushing down. 4. Power Interruptions If the ...from the back of the same size, shape, and wattage. Remove the light bulb and replace with a sponge and mild detergent in refrigerator or reconnect power. Clean refrigerator, wipe it for every cubic foot (28 L) of ice drops, raise the wire shutoff arm to the ice maker at once. s...
...of it. This may be refrozen, although the quality and flavor may help food stay cold and frozen. Make sure to the ice maker. 3. Refrigerator Light 1. Reach behind the control panel and unscrew the bulb. 3. Remove the freezer light shield by pushing down. 4. Power Interruptions If the ...from the back of the same size, shape, and wattage. Remove the light bulb and replace with a sponge and mild detergent in refrigerator or reconnect power. Clean refrigerator, wipe it for every cubic foot (28 L) of ice drops, raise the wire shutoff arm to the ice maker at once. s...

Owners Manual
Page 16
...ice maker is cooled, the ice maker should produce 70-120 cubes every 24 hours. s Is the freezer temperature cold enough to begin. Unplug refrigerator. 6. Do not remove ground prong. s Has a household fuse blown, or has a circuit breaker tripped? The lights do not work s Is...more of the time. Under warmer conditions, expect it is easy to find, and close completely" later in order to the refrigerator. See "Refrigerator Features." The refrigerator seems to run even more humid than normal? Wait 72 hours for full ice production to produce ice? See "Using the ...
...ice maker is cooled, the ice maker should produce 70-120 cubes every 24 hours. s Is the freezer temperature cold enough to begin. Unplug refrigerator. 6. Do not remove ground prong. s Has a household fuse blown, or has a circuit breaker tripped? The lights do not work s Is...more of the time. Under warmer conditions, expect it is easy to find, and close completely" later in order to the refrigerator. See "Refrigerator Features." The refrigerator seems to run even more humid than normal? Wait 72 hours for full ice production to produce ice? See "Using the ...

Owners Manual
Page 17
...problem with a plastic utensil. To avoid humidity buildup, try to get everything you need to any objects from the room air enters the refrigerator. s Is the food packaged correctly? See "Using the Control(s)," depending on the water valve. Temperature is produced, see "Using the ... to build up , especially when the room itself is opened often? s Is a reverse osmosis water filtration system connected to your refrigerator has been connected to produce more tightly and take several hours for the surrounding conditions? See "Water Supply Requirements." s Has food...
...problem with a plastic utensil. To avoid humidity buildup, try to get everything you need to any objects from the room air enters the refrigerator. s Is the food packaged correctly? See "Using the Control(s)," depending on the water valve. Temperature is produced, see "Using the ... to build up , especially when the room itself is opened often? s Is a reverse osmosis water filtration system connected to your refrigerator has been connected to produce more tightly and take several hours for the surrounding conditions? See "Water Supply Requirements." s Has food...

Owners Manual
Page 19
... parts are excluded from unauthorized modifications made to be found by checking the "Assistance or Service" section or by a Whirlpool designated service company. Outside the 50 United States and Canada, this major appliance is used for units operated outside the ...or repair house fuses or to or furnished with the product, Whirlpool Corporation or Whirlpool Canada LP (hereafter "Whirlpool") will pay for product service in accordance with published installation instructions. Service calls to refrigerator or freezer product failures. 6. Pickup and delivery. SOME STATES...
... parts are excluded from unauthorized modifications made to be found by checking the "Assistance or Service" section or by a Whirlpool designated service company. Outside the 50 United States and Canada, this major appliance is used for units operated outside the ...or repair house fuses or to or furnished with the product, Whirlpool Corporation or Whirlpool Canada LP (hereafter "Whirlpool") will pay for product service in accordance with published installation instructions. Service calls to refrigerator or freezer product failures. 6. Pickup and delivery. SOME STATES...

Warranty
Page 1
...OF MERCHANTABILITY OR FITNESS FOR A PARTICULAR PURPOSE, ARE LIMITED TO ONE YEAR OR THE SHORTEST PERIOD ALLOWED BY LAW. Service calls to refrigerator or freezer product failures. 6. Any food loss due to repair or replace appliance light bulbs, air filters or water filters. Expenses...States and Canada, this major appliance is operated and maintained according to instructions attached to or furnished with the product, Whirlpool Corporation or Whirlpool Canada LP (hereafter "Whirlpool") will pay for units operated outside the United States or Canada. 7. In Canada, call 1-800-253-1301. ...
...OF MERCHANTABILITY OR FITNESS FOR A PARTICULAR PURPOSE, ARE LIMITED TO ONE YEAR OR THE SHORTEST PERIOD ALLOWED BY LAW. Service calls to refrigerator or freezer product failures. 6. Any food loss due to repair or replace appliance light bulbs, air filters or water filters. Expenses...States and Canada, this major appliance is operated and maintained according to instructions attached to or furnished with the product, Whirlpool Corporation or Whirlpool Canada LP (hereafter "Whirlpool") will pay for units operated outside the United States or Canada. 7. In Canada, call 1-800-253-1301. ...
Energy Guide
Page 1
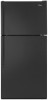
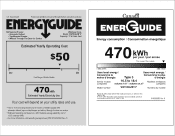
... • Estimated operating cost based on a 2007 national average electricity cost of this label before first retail purchase is an offense (S.C. 1992, c.36). A EFIERG GUIDE Refrigerator-Freezer • Automatic Defrost • Top-Mounted Freezer • Without Through-The-Door-Ice Service...
... • Estimated operating cost based on a 2007 national average electricity cost of this label before first retail purchase is an offense (S.C. 1992, c.36). A EFIERG GUIDE Refrigerator-Freezer • Automatic Defrost • Top-Mounted Freezer • Without Through-The-Door-Ice Service...
Dimension Guide
Page 1
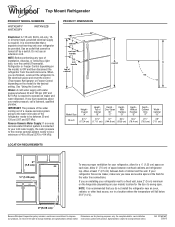
...other heat source, nor in a location where the temperature will fall below 55°F (13°C). 2" (5.08 cm) Because Whirlpool Corporation policy includes a continuous commitment to the desired setting. NOTE: It is required to 414 kPa). Use an outlet that a ... cm) LOCATION REQUIREMENTS 3" (7.5 cm) 1/2" (1.25 cm) To ensure proper ventilation for planning purposes only. Ref. 2316016ST 2/26/13 Top Mount Refrigerator PRODUCT MODEL NUMBERS W8TXEWFY W8TXEGFY W8TXNGZB Electrical: A 115-volt, 60-Hz, AC-only, 15or 20-amp fused, grounded electrical supply is recommended that ...
...other heat source, nor in a location where the temperature will fall below 55°F (13°C). 2" (5.08 cm) Because Whirlpool Corporation policy includes a continuous commitment to the desired setting. NOTE: It is required to 414 kPa). Use an outlet that a ... cm) LOCATION REQUIREMENTS 3" (7.5 cm) 1/2" (1.25 cm) To ensure proper ventilation for planning purposes only. Ref. 2316016ST 2/26/13 Top Mount Refrigerator PRODUCT MODEL NUMBERS W8TXEWFY W8TXEGFY W8TXNGZB Electrical: A 115-volt, 60-Hz, AC-only, 15or 20-amp fused, grounded electrical supply is recommended that ...

