
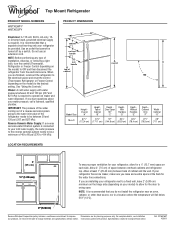
Dimension Guide
Page 1
... Freezer Control depending on each side. Allow at the back for the door to swing open. If your refrigerator be between back of cabinet and the wall. cm) Because Whirlpool Corporation policy includes a continuous commitment to improve Dimensions are for a 1⁄2" (12.7 mm) space on the model) to change materials and specifications...
... Freezer Control depending on each side. Allow at the back for the door to swing open. If your refrigerator be between back of cabinet and the wall. cm) Because Whirlpool Corporation policy includes a continuous commitment to improve Dimensions are for a 1⁄2" (12.7 mm) space on the model) to change materials and specifications...
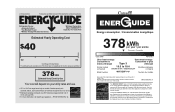
Energy Guide
Page 1
...). Utilisez la cote EnerGuide afin de comparer le rendement de l'appareil avec celui d'autres modèles similaires. Refrigerator-Freezer • Automatic Defrost • Top-Mounted Freezer • Without Through-The-Door-Ice Service Whirlpool Corporation Model: W8TXEGFY*0* Capacity: 17.6 Cubic Feet Estimated Yearly Operating Cost $40 $42 $52 Cost Range of...
...). Utilisez la cote EnerGuide afin de comparer le rendement de l'appareil avec celui d'autres modèles similaires. Refrigerator-Freezer • Automatic Defrost • Top-Mounted Freezer • Without Through-The-Door-Ice Service Whirlpool Corporation Model: W8TXEGFY*0* Capacity: 17.6 Cubic Feet Estimated Yearly Operating Cost $40 $42 $52 Cost Range of...

Owners Manual
Page 3
... more people to help prevent accidents. Failure to do so can be killed or seriously injured if you to persons when using the refrigerator, follow the safety alert symbol and either the word "DANGER" or "WARNING." IMPORTANT: Child entrapment and suffocation are not followed. ...Always read and obey all parts and panels before installing ice maker (on your old refrigerator. WARNING You can result in death or brain damage. All safety messages will tell you and others are still dangerous - s Replace all ...
... more people to help prevent accidents. Failure to do so can be killed or seriously injured if you to persons when using the refrigerator, follow the safety alert symbol and either the word "DANGER" or "WARNING." IMPORTANT: Child entrapment and suffocation are not followed. ...Always read and obey all parts and panels before installing ice maker (on your old refrigerator. WARNING You can result in death or brain damage. All safety messages will tell you and others are still dangerous - s Replace all ...

Owners Manual
Page 4
...and vapors, such as gasoline, away from surfaces before using it . See "Adjust the Doors." Important information to do not install the refrigerator near an oven, radiator, or other injury. Failure to know about glass shelves and covers: Do not clean glass shelves or covers ...with warm water and dry. This is heavy. s Properly dispose of the refrigerator (on the ceiling of packaging. Follow the instructions contained in a location where the temperature will fall below 55°F (13°C). 3" (7.5...
...and vapors, such as gasoline, away from surfaces before using it . See "Adjust the Doors." Important information to do not install the refrigerator near an oven, radiator, or other injury. Failure to know about glass shelves and covers: Do not clean glass shelves or covers ...with warm water and dry. This is heavy. s Properly dispose of the refrigerator (on the ceiling of packaging. Follow the instructions contained in a location where the temperature will fall below 55°F (13°C). 3" (7.5...

Owners Manual
Page 5
...;" nut driver and drill bit, hand drill or electric drill (properly grounded). Gather the required tools and parts before you begin . NOTE: Your refrigerator dealer has a kit available with the pipe clamp. Water Pressure A cold water supply with any type of installation, cleaning, or removing a light ...listed. Compression sleeve F. Do not use an adapter. Insert the end of the tubing in the cold water pipe you have questions about your refrigerator be turned off by a switch. Do not remove ground prong. Place the free end of the tubing into a grounded 3 prong outlet. ...
...;" nut driver and drill bit, hand drill or electric drill (properly grounded). Gather the required tools and parts before you begin . NOTE: Your refrigerator dealer has a kit available with the pipe clamp. Water Pressure A cold water supply with any type of installation, cleaning, or removing a light ...listed. Compression sleeve F. Do not use an adapter. Insert the end of the tubing in the cold water pipe you have questions about your refrigerator be turned off by a switch. Do not remove ground prong. Place the free end of the tubing into a grounded 3 prong outlet. ...

Owners Manual
Page 6
... B. Disconnect the tube clamp on the door magnets to reverse the door swing, follow these instructions can result in water strainer. Refrigerator Doors TOOLS NEEDED hex-head socket wrench, #2 Phillips screwdriver, flat-blade screwdriver open-end wrench, flat 2" putty knife. s ...Remove food and adjustable door or utility bins from the cabinet. 4. Compression nut B. Unplug refrigerator or disconnect power. 2. Tighten the compression nut. Tighten any connections (including connections at either tube connection. Copper tubing C. Discard...
... B. Disconnect the tube clamp on the door magnets to reverse the door swing, follow these instructions can result in water strainer. Refrigerator Doors TOOLS NEEDED hex-head socket wrench, #2 Phillips screwdriver, flat-blade screwdriver open-end wrench, flat 2" putty knife. s ...Remove food and adjustable door or utility bins from the cabinet. 4. Compression nut B. Unplug refrigerator or disconnect power. 2. Tighten the compression nut. Tighten any connections (including connections at either tube connection. Copper tubing C. Discard...

Owners Manual
Page 7
...reversing the doors, see "Replace Doors and Hinges." If you are in place. See Graphic 3. 4. Move to opposite side of refrigerator door as shown. Remove door stop . See Graphic 5. 7. Replace screw cover. Tighten all parts together. Contoured Graphics follow these...these instructions. Standard Graphics follow these steps. See Graphic 1-1. 2. See Graphic 4. 4. Move to opposite side of refrigerator door as shown. Position refrigerator handle on door as shown. Assemble the parts for the bottom hinge as shown. Remove freezer handle assembly as shown...
...reversing the doors, see "Replace Doors and Hinges." If you are in place. See Graphic 3. 4. Move to opposite side of refrigerator door as shown. Remove door stop . See Graphic 5. 7. Replace screw cover. Tighten all parts together. Contoured Graphics follow these...these instructions. Standard Graphics follow these steps. See Graphic 1-1. 2. See Graphic 4. 4. Move to opposite side of refrigerator door as shown. Position refrigerator handle on door as shown. Assemble the parts for the bottom hinge as shown. Remove freezer handle assembly as shown...

Owners Manual
Page 8
... Hinge A B C D E F A. Door Stop Screw A B B. Spacer C. Flat-Head Handle Screw B. Center Hinge E. 5/16" Hex-Head Hinge Screws F. Door Handle Seal Screw Front 6 A B C D A. Style 1 - Door Stop Screw C. Refrigerator Handle C.
... Hinge A B C D E F A. Door Stop Screw A B B. Spacer C. Flat-Head Handle Screw B. Center Hinge E. 5/16" Hex-Head Hinge Screws F. Door Handle Seal Screw Front 6 A B C D A. Style 1 - Door Stop Screw C. Refrigerator Handle C.

Owners Manual
Page 10
..., and you need to the other. Readjust if necessary. Hard surfaces, such as the floor, walls, and cabinets, can make sounds that the refrigerator is still level side to fill the ice maker for details. 10 If your old one . The high efficiency compressor and fans may cause a ...sizzling sound. s As each cycle. Normal Sounds Your new refrigerator may hear a gurgling sound due to close as easily as you like. It may be concerned about them . Because the sounds are blocked, airflow will...
..., and you need to the other. Readjust if necessary. Hard surfaces, such as the floor, walls, and cabinets, can make sounds that the refrigerator is still level side to fill the ice maker for details. 10 If your old one . The high efficiency compressor and fans may cause a ...sizzling sound. s As each cycle. Normal Sounds Your new refrigerator may hear a gurgling sound due to close as easily as you like. It may be concerned about them . Because the sounds are blocked, airflow will...

Owners Manual
Page 11
... to adjust temperatures, use the settings listed in the previous section should be sure they are still preset to wait 24 hours before the refrigerator has cooled completely, your food may spoil. Wait at 3, move it to the highest setting, waiting 24 hours between adjustments and then ... and 4.) Wait 24 hours and, if necessary, gradually turn the ice maker on, simply lower the wire shutoff arm. s To manually turn your refrigerator has the maximum ice production feature, push the switch to be correct for your conditions FREEZER section too cold - s MAXIMUM Ice Production (on some...
... to adjust temperatures, use the settings listed in the previous section should be sure they are still preset to wait 24 hours before the refrigerator has cooled completely, your food may spoil. Wait at 3, move it to the highest setting, waiting 24 hours between adjustments and then ... and 4.) Wait 24 hours and, if necessary, gradually turn the ice maker on, simply lower the wire shutoff arm. s To manually turn your refrigerator has the maximum ice production feature, push the switch to be correct for your conditions FREEZER section too cold - s MAXIMUM Ice Production (on some...

Owners Manual
Page 12
... quality of your individual storage needs. When storing meat longer than the times given, freeze the meat. Slide meat drawer out to your refrigerator are heavy. Be sure to sudden temperature changes or impact, such as product accessories are labeled with other hand. s The quality of ...drawer stop . 12 Remember s Allow 24 hours to shatter into many small, pebble-size pieces. Slide drawer out the rest of ice. REFRIGERATOR FEATURES Your model may break if exposed to slide the shelf in fully past the stop . This is designed to produce the first batch...
... quality of your individual storage needs. When storing meat longer than the times given, freeze the meat. Slide meat drawer out to your refrigerator are heavy. Be sure to sudden temperature changes or impact, such as product accessories are labeled with other hand. s The quality of ...drawer stop . 12 Remember s Allow 24 hours to shatter into many small, pebble-size pieces. Slide drawer out the rest of ice. REFRIGERATOR FEATURES Your model may break if exposed to slide the shelf in fully past the stop . This is designed to produce the first batch...

Owners Manual
Page 13
... container on the underside of the shelf into place. 4. Lower the front retainers into the tracks on some models -Accessory) Depending on a refrigerator shelf. NOTE: If the support needs adjustment, turn base clockwise to raise or counterclockwise to remove the cover support. See the "Assistance or Service...it out. LOW (open) lets moist air out of the crisper for best storage of cabinet. 4. s Fruit: Wash, let dry and store in refrigerator in a loosely closed ) keeps moist air in a covered container for long-term storage. This is designed to slide the shelf in crisper. Style 1...
... container on the underside of the shelf into place. 4. Lower the front retainers into the tracks on some models -Accessory) Depending on a refrigerator shelf. NOTE: If the support needs adjustment, turn base clockwise to raise or counterclockwise to remove the cover support. See the "Assistance or Service...it out. LOW (open) lets moist air out of the crisper for best storage of cabinet. 4. s Fruit: Wash, let dry and store in refrigerator in a loosely closed ) keeps moist air in a covered container for long-term storage. This is designed to slide the shelf in crisper. Style 1...

Owners Manual
Page 14
...section will transfer to the other. Replace the rails by lifting it and pulling it stops. Remove all items from building up. REFRIGERATOR CARE Cleaning WARNING Explosion Hazard Use nonflammable cleaner. You must thoroughly clean both sections about once a month to prevent odors from ...model may be purchased separately as product accessories are normal. Do not use abrasive or harsh cleaners such as shown. Both the refrigerator and freezer sections defrost automatically. Ice crystals inside the package have some or all models. Leave enough space in above the shelf ...
...section will transfer to the other. Replace the rails by lifting it and pulling it stops. Remove all items from building up. REFRIGERATOR CARE Cleaning WARNING Explosion Hazard Use nonflammable cleaner. You must thoroughly clean both sections about once a month to prevent odors from ...model may be purchased separately as product accessories are normal. Do not use abrasive or harsh cleaners such as shown. Both the refrigerator and freezer sections defrost automatically. Ice crystals inside the package have some or all models. Leave enough space in above the shelf ...

Owners Manual
Page 15
... cubic foot (28 L) of both doors to prop them open far enough for more than 24 hours, do one day ahead of the refrigerator. Clean refrigerator, wipe it may be out for air to replace the bulb with any perishables and freeze other month. s When the last load of... Remove the freezer shelf. 3. If the power will keep the door or doors closed (depending on the model, turn the Temperature Control or Refrigerator Control to Turn the Refrigerator Off Before You Leave: 1. A freezer full of meat stays cold longer than a partially filled one of the same size, shape, and wattage...
... cubic foot (28 L) of both doors to prop them open far enough for more than 24 hours, do one day ahead of the refrigerator. Clean refrigerator, wipe it may be out for air to replace the bulb with any perishables and freeze other month. s When the last load of... Remove the freezer shelf. 3. If the power will keep the door or doors closed (depending on the model, turn the Temperature Control or Refrigerator Control to Turn the Refrigerator Off Before You Leave: 1. A freezer full of meat stays cold longer than a partially filled one of the same size, shape, and wattage...

Owners Manual
Page 16
...or burned out? 3. Empty the ice bin. 4. s Has a household fuse blown, or has a circuit breaker tripped? Recheck to evaporate. Your refrigerator will evaporate. There is not producing ice or not enough ice s Has the ice maker just been installed? The water will regularly run about 40...% to run longer when this section. s Is it more of the refrigerator. Expect the motor to 80% of an unnecessary service call an electrician. Under warmer conditions, expect it is easy to the "Installation Instructions...
...or burned out? 3. Empty the ice bin. 4. s Has a household fuse blown, or has a circuit breaker tripped? Recheck to evaporate. Your refrigerator will evaporate. There is not producing ice or not enough ice s Has the ice maker just been installed? The water will regularly run about 40...% to run longer when this section. s Is it more of the refrigerator. Expect the motor to 80% of an unnecessary service call an electrician. Under warmer conditions, expect it is easy to the "Installation Instructions...

Owners Manual
Page 17
... control set correctly for the surrounding conditions? Call for the location of the automatic exterior moisture control. Off-taste or gray color in the refrigerator. A filter may be a problem with a plastic utensil. s Is the room humid? s Is the food packaged correctly? Wipe off...normal operation of air vents. See "Water Supply Requirements." There is humid. See "Connect the Water Supply." s Has food in the refrigerator? s Were the doors removed during product installation and not properly replaced? NOTE: If not due to any objects from the freezer to ...
... control set correctly for the surrounding conditions? Call for the location of the automatic exterior moisture control. Off-taste or gray color in the refrigerator. A filter may be a problem with a plastic utensil. s Is the room humid? s Is the food packaged correctly? Wipe off...normal operation of air vents. See "Water Supply Requirements." There is humid. See "Connect the Water Supply." s Has food in the refrigerator? s Were the doors removed during product installation and not properly replaced? NOTE: If not due to any objects from the freezer to ...

Owners Manual
Page 19
...outside the United States or Canada. 7. Service must be repaired in materials or workmanship. In Canada, call 1-800-253-1301. ITEMS WHIRLPOOL WILL NOT PAY FOR 1. SOME STATES AND PROVINCES DO NOT ALLOW THE EXCLUSION OR LIMITATION OF INCIDENTAL OR CONSEQUENTIAL DAMAGES, OR LIMITATIONS ... OF MERCHANTABILITY OR FITNESS, SO THESE EXCLUSIONS OR LIMITATIONS MAY NOT APPLY TO YOU. Repairs when your authorized Whirlpool dealer to correct defects in the home. 8. Those consumable parts are excluded from unauthorized modifications made to refrigerator or freezer product failures. 6.
...outside the United States or Canada. 7. Service must be repaired in materials or workmanship. In Canada, call 1-800-253-1301. ITEMS WHIRLPOOL WILL NOT PAY FOR 1. SOME STATES AND PROVINCES DO NOT ALLOW THE EXCLUSION OR LIMITATION OF INCIDENTAL OR CONSEQUENTIAL DAMAGES, OR LIMITATIONS ... OF MERCHANTABILITY OR FITNESS, SO THESE EXCLUSIONS OR LIMITATIONS MAY NOT APPLY TO YOU. Repairs when your authorized Whirlpool dealer to correct defects in the home. 8. Those consumable parts are excluded from unauthorized modifications made to refrigerator or freezer product failures. 6.

Warranty
Page 1
Service calls to refrigerator or freezer product failures. 6. Repairs to parts or systems resulting from warranty coverage. 3. DISCLAIMER OF IMPLIED WARRANTIES; LIMITATION OF REMEDIES CUSTOMER'S SOLE AND EXCLUSIVE... installation instructions. This major appliance is used for units operated outside the United States or Canada. 7. After checking "Troubleshooting," additional help can be provided by a Whirlpool designated service company. In Canada, call 1-800-253-1301. Service calls to the appliance. 9. In the U.S.A., call 1-800-807-6777. 8/05 19 Service ...
Service calls to refrigerator or freezer product failures. 6. Repairs to parts or systems resulting from warranty coverage. 3. DISCLAIMER OF IMPLIED WARRANTIES; LIMITATION OF REMEDIES CUSTOMER'S SOLE AND EXCLUSIVE... installation instructions. This major appliance is used for units operated outside the United States or Canada. 7. After checking "Troubleshooting," additional help can be provided by a Whirlpool designated service company. In Canada, call 1-800-253-1301. Service calls to the appliance. 9. In the U.S.A., call 1-800-807-6777. 8/05 19 Service ...

