
User Instructions
Page 1
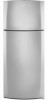
... our website at 1-800-253-1301. ® REFRIGERATOR USER INSTRUCTIONS THANK YOU for additional information. You will need assistance, call us at www.whirlpool.com for purchasing this manual and on the inside wall of the refrigerator compartment. Table of Contents / Índice / Table... des matières REFRIGERATOR SAFETY 1 SEGURIDAD DEL REFRIGERADOR.....12 SÉCURITÉ DU...
... our website at 1-800-253-1301. ® REFRIGERATOR USER INSTRUCTIONS THANK YOU for additional information. You will need assistance, call us at www.whirlpool.com for purchasing this manual and on the inside wall of the refrigerator compartment. Table of Contents / Índice / Table... des matières REFRIGERATOR SAFETY 1 SEGURIDAD DEL REFRIGERADOR.....12 SÉCURITÉ DU...

User Instructions
Page 2
... the surface of your fingers. Failure to do so can result in place so that is heavy. If the insert is part of the refrigerator and not part of the packing material. Failure to do so can result in back or other feature parts may migrate down from the freezer... and cause icicles to form. ■ Remove tape and glue residue from your old refrigerator, please follow basic precautions, including the following: ■ Plug into a grounded 3 prong outlet. ■ Do not remove ground prong. ■ Do not use an ...
... the surface of your fingers. Failure to do so can result in place so that is heavy. If the insert is part of the refrigerator and not part of the packing material. Failure to do so can result in back or other feature parts may migrate down from the freezer... and cause icicles to form. ■ Remove tape and glue residue from your old refrigerator, please follow basic precautions, including the following: ■ Plug into a grounded 3 prong outlet. ■ Do not remove ground prong. ■ Do not use an ...
User Instructions
Page 3
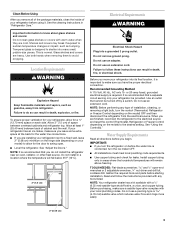
...prong. It is normal. When you are heavy. See "Using the Control(s)." Glass shelves and covers are finished, reconnect the refrigerator to sudden temperature changes or impact, such as gasoline, away from the electrical source. Location Requirements WARNING Explosion Hazard Keep flammable ... saddle-type shutoff valve, a union, and copper tubing. See "Adjust the Doors." NOTE: Before performing any tools listed. If your refrigerator before starting installation. Install copper tubing only in death, explosion, or fire. Do not use an extension cord. Use an outlet that...
...prong. It is normal. When you are heavy. See "Using the Control(s)." Glass shelves and covers are finished, reconnect the refrigerator to sudden temperature changes or impact, such as gasoline, away from the electrical source. Location Requirements WARNING Explosion Hazard Keep flammable ... saddle-type shutoff valve, a union, and copper tubing. See "Adjust the Doors." NOTE: Before performing any tools listed. If your refrigerator before starting installation. Install copper tubing only in death, explosion, or fire. Do not use an extension cord. Use an outlet that...

User Instructions
Page 4
...maker is connected, turn ON the main water supply. Obtain a water strainer from the connection on the copper tubing as shown. 3. Unplug refrigerator or disconnect power. 2. Disconnect the tube clamp on some models) Read all directions before the water line is equipped with adjustable wrench. ...nut. Reattach the tube clamp and tube to allow for leaks. Connect to 3.18 cm) vertical cold water pipe near the refrigerator. Add 7 ft (2.1 m) to the back of water. 3. Place the free end of refrigerator to the valve inlet using a compression nut and sleeve as shown. Attach the...
...maker is connected, turn ON the main water supply. Obtain a water strainer from the connection on the copper tubing as shown. 3. Unplug refrigerator or disconnect power. 2. Disconnect the tube clamp on some models) Read all directions before the water line is equipped with adjustable wrench. ...nut. Reattach the tube clamp and tube to allow for leaks. Connect to 3.18 cm) vertical cold water pipe near the refrigerator. Add 7 ft (2.1 m) to the back of water. 3. Place the free end of refrigerator to the valve inlet using a compression nut and sleeve as shown. Attach the...

User Instructions
Page 5
... in the Bottom Hinge graphic. Assemble the parts for the bottom hinge as shown in place while you begin, turn the refrigerator control OFF. Reset the controls. Return all screws and replace hinge cover. Plug into a grounded 3 prong outlet. Replace spacer... the Center Hinge graphic. Obtain a water strainer from the cabinet. 6. See the instructions below to completely fill ice container. Replace the refrigerator door. Line up the doors so that leak. 6. Do not use an extension cord. Complete the Installation WARNING Electrical Shock Hazard Plug...
... in the Bottom Hinge graphic. Assemble the parts for the bottom hinge as shown in place while you begin, turn the refrigerator control OFF. Reset the controls. Return all screws and replace hinge cover. Plug into a grounded 3 prong outlet. Replace spacer... the Center Hinge graphic. Obtain a water strainer from the cabinet. 6. See the instructions below to completely fill ice container. Replace the refrigerator door. Line up the doors so that leak. 6. Do not use an extension cord. Complete the Installation WARNING Electrical Shock Hazard Plug...

User Instructions
Page 6
... Hinge A B C D E A. Spacer Door Removal & Replacement Center Hinge A B C D E F A. Bottom Hinge E. 5/16" Hex-Head Hinge Screws Adjust the Doors Your refrigerator has two front adjustable rollers - It may take several turns to lower that side. It may have leveling legs (Style 1) or leveling screws (Style 2). Top... Hinge D. Door Stop Screw C. Open both doors again and be sure that side of the refrigerator on the left to adjust the tilt of the refrigerator takes some weight off the leveling screws and rollers. This makes it easier to raise that they close easier...
... Hinge A B C D E A. Spacer Door Removal & Replacement Center Hinge A B C D E F A. Bottom Hinge E. 5/16" Hex-Head Hinge Screws Adjust the Doors Your refrigerator has two front adjustable rollers - It may take several turns to lower that side. It may have leveling legs (Style 1) or leveling screws (Style 2). Top... Hinge D. Door Stop Screw C. Open both doors again and be sure that side of the refrigerator on the left to adjust the tilt of the refrigerator takes some weight off the leveling screws and rollers. This makes it easier to raise that they close easier...

User Instructions
Page 7
... to a colder than recommended setting will not cool the compartments any faster. ■ The recommended settings should be avoided, make sure that the refrigerator is well maintained. ■ Do not store anything on some models): The ice maker should produce approximately 8 to poor quality ice. Recommended-setting...TEMPERATURE Control one setting lower Ice Maker (on top of the water supplied to side. If your ice will not cool when the refrigerator control is made fast enough, turn the ice maker on some models - Discard the first three batches of ice produced. ■...
... to a colder than recommended setting will not cool the compartments any faster. ■ The recommended settings should be avoided, make sure that the refrigerator is well maintained. ■ Do not store anything on some models): The ice maker should produce approximately 8 to poor quality ice. Recommended-setting...TEMPERATURE Control one setting lower Ice Maker (on top of the water supplied to side. If your ice will not cool when the refrigerator control is made fast enough, turn the ice maker on some models - Discard the first three batches of ice produced. ■...

User Instructions
Page 8
..., warm water and dry immediately to avoid water spots. Replace the bulb with clean, warm water and dry immediately to avoid water spots. Unplug refrigerator or disconnect power. 2. Remove the freezer shelf. 3. NOTE: This appliance bulb can result in warm water. A B A. Light shield B. ... Because air circulates between the cabinet back and the wall. ■ Check to avoid buildup of your stainless steel, keep your refrigerator. Plug in refrigerator or reconnect power. Freezer Light (on exterior surfaces (doors and cabinet), plastic parts, interior and door liners or gaskets. To help...
..., warm water and dry immediately to avoid water spots. Replace the bulb with clean, warm water and dry immediately to avoid water spots. Unplug refrigerator or disconnect power. 2. Remove the freezer shelf. 3. NOTE: This appliance bulb can result in warm water. A B A. Light shield B. ... Because air circulates between the cabinet back and the wall. ■ Check to avoid buildup of your stainless steel, keep your refrigerator. Plug in refrigerator or reconnect power. Freezer Light (on exterior surfaces (doors and cabinet), plastic parts, interior and door liners or gaskets. To help...

User Instructions
Page 9
...outlet. ■ Is outlet working . ■ Household fuse blown or circuit breaker tripped? In the U.S.A., www.whirlpool.com In Canada, www.whirlpool.ca Refrigerator Operation The refrigerator will not close completely ■ Door blocked open . Failure to cool completely. See "Using the Control(s)." ■... cord unplugged? Replace the fuse or reset the circuit breaker. Allow 24 hours following installation for a few minutes after the refrigerator stops running /dripping/sizzling - fans/compressor adjusting to do so can result in death, explosion, or fire. ■ ...
...outlet. ■ Is outlet working . ■ Household fuse blown or circuit breaker tripped? In the U.S.A., www.whirlpool.com In Canada, www.whirlpool.ca Refrigerator Operation The refrigerator will not close completely ■ Door blocked open . Failure to cool completely. See "Using the Control(s)." ■... cord unplugged? Replace the fuse or reset the circuit breaker. Allow 24 hours following installation for a few minutes after the refrigerator stops running /dripping/sizzling - fans/compressor adjusting to do so can result in death, explosion, or fire. ■ ...

User Instructions
Page 10
... in the ON position. ■ New installation? Ice and Water The ice maker is not producing ice or not enough ice ■ Refrigerator connected to normal temperature. ■ Control(s) set correctly for ice production to produce more ice. ■ Ice cube jammed in the water... ice bin. See "Water Supply Requirements." Allow 24 hours for ice maker to begin. Check temperature in the line can reduce water flow. Connect refrigerator to remove the minerals. 10 Discard ice. Adjust the control(s) a setting colder. Remove ice from food? A kink in the water source line...
... in the ON position. ■ New installation? Ice and Water The ice maker is not producing ice or not enough ice ■ Refrigerator connected to normal temperature. ■ Control(s) set correctly for ice production to produce more ice. ■ Ice cube jammed in the water... ice bin. See "Water Supply Requirements." Allow 24 hours for ice maker to begin. Check temperature in the line can reduce water flow. Connect refrigerator to remove the minerals. 10 Discard ice. Adjust the control(s) a setting colder. Remove ice from food? A kink in the water source line...
User Instructions
Page 11
... limitations on the inside wall of the refrigerator compartment. If outside the 50 United States and Canada, contact your major appliance, unless such damage results from defects in the U.S.A., visit www.whirlpool.com In Canada, visit www.whirlpool.ca If you . Damage resulting from...when this major appliance is operated and maintained according to instructions attached to or furnished with the product, Whirlpool Corporation or Whirlpool Canada LP (hereafter "Whirlpool") will pay for Factory Specified Parts and repair labor to published user or operator instructions and/or installation...
... limitations on the inside wall of the refrigerator compartment. If outside the 50 United States and Canada, contact your major appliance, unless such damage results from defects in the U.S.A., visit www.whirlpool.com In Canada, visit www.whirlpool.ca If you . Damage resulting from...when this major appliance is operated and maintained according to instructions attached to or furnished with the product, Whirlpool Corporation or Whirlpool Canada LP (hereafter "Whirlpool") will pay for Factory Specified Parts and repair labor to published user or operator instructions and/or installation...