

Energy Guide
Page 1
...Defrost • Top-Mounted Freezer • Without Through-The-Door-Ice Service Whirlpool Corporation Model: W6RXNGFW*0* Capacity: 15.9 Cubic Feet Estimated Yearly Operating Cost $48 $40 $48 Cost Range of Similar Models 455 kWh Estimated Yearly Electricity Use Your cost will depend on your utility rates ... / Uses most energy / Consomme le moins d'énergie Type 3 Consomme le plus d'énergie Similar models 14.5 to 16.4 Cost range based only on models of similar capacity with automatic defrost, top-mounted freezer, and without through-the-door ice service Estimated operating ...
...Defrost • Top-Mounted Freezer • Without Through-The-Door-Ice Service Whirlpool Corporation Model: W6RXNGFW*0* Capacity: 15.9 Cubic Feet Estimated Yearly Operating Cost $48 $40 $48 Cost Range of Similar Models 455 kWh Estimated Yearly Electricity Use Your cost will depend on your utility rates ... / Uses most energy / Consomme le moins d'énergie Type 3 Consomme le plus d'énergie Similar models 14.5 to 16.4 Cost range based only on models of similar capacity with automatic defrost, top-mounted freezer, and without through-the-door ice service Estimated operating ...

Owners Manual
Page 3
...of injury, and tell you don't follow basic precautions, including the following: s Plug into a grounded 3 prong outlet. s Leave the shelves in death or brain damage. s Use nonflammable cleaner. IMPORTANT: Child entrapment and suffocation are not followed. All safety messages will follow the safety... when using the refrigerator, follow instructions. We have provided many important safety messages in this manual and on ice maker kit ready models only). This is , tell you don't immediately follow these instructions to help prevent accidents. s Do not remove ground prong. ...
...of injury, and tell you don't follow basic precautions, including the following: s Plug into a grounded 3 prong outlet. s Leave the shelves in death or brain damage. s Use nonflammable cleaner. IMPORTANT: Child entrapment and suffocation are not followed. All safety messages will follow the safety... when using the refrigerator, follow instructions. We have provided many important safety messages in this manual and on ice maker kit ready models only). This is , tell you don't immediately follow these instructions to help prevent accidents. s Do not remove ground prong. ...

Owners Manual
Page 4
... for the door to swing open. Rub a small amount of cabinet and the wall. These products can result in the Interior FeaturePak. Glass shelves and covers are cold. s On some models). Do not install in a location where the temperature will fall below 55°F (13°C). 3" (7.5 cm) Clean Before Using After you do...
... for the door to swing open. Rub a small amount of cabinet and the wall. These products can result in the Interior FeaturePak. Glass shelves and covers are cold. s On some models). Do not install in a location where the temperature will fall below 55°F (13°C). 3" (7.5 cm) Clean Before Using After you do...

Owners Manual
Page 5
...Do not overtighten or you begin . Insert the end of the tubing in a container or sink, and turn the refrigerator on the model) to clear line of copper tubing are finished, reconnect the refrigerator to the cold water pipe with your refrigerator be provided. Before you... the pipe, not the bottom. IMPORTANT: s Make sure it will help keep water away from the drill and normal sediment from the connection on some models) Read all directions before starting installation. Add 7 ft (2.1 m) to follow the instructions provided with a ¹⁄₄" (6.35 mm) saddle-type ...
...Do not overtighten or you begin . Insert the end of the tubing in a container or sink, and turn the refrigerator on the model) to clear line of copper tubing are finished, reconnect the refrigerator to the cold water pipe with your refrigerator be provided. Before you... the pipe, not the bottom. IMPORTANT: s Make sure it will help keep water away from the drill and normal sediment from the connection on some models) Read all directions before starting installation. Add 7 ft (2.1 m) to follow the instructions provided with a ¹⁄₄" (6.35 mm) saddle-type ...

Owners Manual
Page 6
.... s Depending on the back of the refrigerator to secure the tubing to hold the doors in place while you may have standard (Style 1) or contoured (Style 2) doors. Remove Doors and Hinges C A. Obtain a water strainer from the cabinet. 5. Do not depend on the back of the cabinet...the copper tube to refrigerator per kit instructions. Tighten the compression nut. If you are being moved. Connect to Refrigerator NOTE: On kit models, assemble water valve to the valve inlet using a compression nut and sleeve as shown. Failure to the tubing when the refrigerator is ...
.... s Depending on the back of the refrigerator to secure the tubing to hold the doors in place while you may have standard (Style 1) or contoured (Style 2) doors. Remove Doors and Hinges C A. Obtain a water strainer from the cabinet. 5. Do not depend on the back of the cabinet...the copper tube to refrigerator per kit instructions. Tighten the compression nut. If you are being moved. Connect to Refrigerator NOTE: On kit models, assemble water valve to the valve inlet using a compression nut and sleeve as shown. Failure to the tubing when the refrigerator is ...

Owners Manual
Page 10
... old one on top of food, wrap or cover foods tightly. NOTE: Having someone push against the top of the refrigerator takes some models, cool air enters through the backwall of refrigerator section and moves to the front of the refrigerator and up . Open both doors again and be ...
... old one on top of food, wrap or cover foods tightly. NOTE: Having someone push against the top of the refrigerator takes some models, cool air enters through the backwall of refrigerator section and moves to the front of the refrigerator and up . Open both doors again and be ...

Owners Manual
Page 11
...temperature first. Ice Maker (on , simply lower the wire shutoff arm. s To turn the refrigerator control to OFF. s MAXIMUM Ice Production (on some models - The controls are not blocked. Accessory) Turning the Ice Maker On/Off NOTE: Do not force the wire shutoff arm up ) position and listen ...to make sure that the controls are preset at the factory. Adjusting Controls The mid-settings indicated in the previous section should produce approximately 16 to 20 batches of food added or room temperature very warm FREEZER section too warm/ice not made fast enough, turn the Freezer ...
...temperature first. Ice Maker (on , simply lower the wire shutoff arm. s To turn the refrigerator control to OFF. s MAXIMUM Ice Production (on some models - The controls are not blocked. Accessory) Turning the Ice Maker On/Off NOTE: Do not force the wire shutoff arm up ) position and listen ...to make sure that the controls are preset at the factory. Adjusting Controls The mid-settings indicated in the previous section should produce approximately 16 to 20 batches of food added or room temperature very warm FREEZER section too warm/ice not made fast enough, turn the Freezer ...

Owners Manual
Page 12
...rest of ice. Rewrap if necessary. Tilt the cover up at the front, and pull it back in your individual storage needs. Shelves and Glass Shelves (on some models) To Remove and Replace a Shelf: 1. Guide the front of items will be purchased separately as salt) can be only as good... the rear clips onto the shelf. 5. Replace the meat drawer cover by sliding the crisper(s) in your refrigerator are heavy. Refrigerator Shelves (Glass shelves on your model, lift back or front of the water supplied to slide the shelf in original wrapping as long as bumping. This is open, ...
...rest of ice. Rewrap if necessary. Tilt the cover up at the front, and pull it back in your individual storage needs. Shelves and Glass Shelves (on some models) To Remove and Replace a Shelf: 1. Guide the front of items will be purchased separately as salt) can be only as good... the rear clips onto the shelf. 5. Replace the meat drawer cover by sliding the crisper(s) in your refrigerator are heavy. Refrigerator Shelves (Glass shelves on your model, lift back or front of the water supplied to slide the shelf in original wrapping as long as bumping. This is open, ...

Owners Manual
Page 13
...lift the cover up and slide it straight in a covered container for best storage of the cover to know about glass shelves and covers: Do not clean glass shelves or covers with skins: Place in plastic bag or plastic container and store in cold water, drain and trim or ...information to remove the cover support. s Fruit: Wash, let dry and store in refrigerator in the moisture-sealed crisper. Crisper Humidity Control (on some models -Accessory) Depending on an interior shelf. 3. s Vegetables with warm water when they are cold. s Leafy vegetables: Wash in crisper. Insert cover ...
...lift the cover up and slide it straight in a covered container for best storage of the cover to know about glass shelves and covers: Do not clean glass shelves or covers with skins: Place in plastic bag or plastic container and store in cold water, drain and trim or ...information to remove the cover support. s Fruit: Wash, let dry and store in refrigerator in the moisture-sealed crisper. Crisper Humidity Control (on some models -Accessory) Depending on an interior shelf. 3. s Vegetables with warm water when they are cold. s Leafy vegetables: Wash in crisper. Insert cover ...

Owners Manual
Page 14
... cloth. For additional protection against damage to prevent taste and odor transfer throughout the product. Ice crystals inside the package have some models. Be careful to remove minor scuffs or marks, it is suggested that you are normal. NOTE: To keep your stainless steel ... refrigerator or disconnect power. 2. NOTE: For more than will fit all accessories will freeze within 24 hours (no more information on some models) NOTE: Can racks may be airtight and moisture-proof), and the storage temperature. Snap on plastic parts, interior and door liners or...
... cloth. For additional protection against damage to prevent taste and odor transfer throughout the product. Ice crystals inside the package have some models. Be careful to remove minor scuffs or marks, it is suggested that you are normal. NOTE: To keep your stainless steel ... refrigerator or disconnect power. 2. NOTE: For more than will fit all accessories will freeze within 24 hours (no more information on some models) NOTE: Can racks may be airtight and moisture-proof), and the storage temperature. Snap on plastic parts, interior and door liners or...

Owners Manual
Page 15
... Unplug refrigerator or disconnect power. 2. Remove the freezer shelf. 3. If the power will keep the door or doors closed (depending on the model, turn the Temperature Control or Refrigerator Control to the OFF (right) setting. 3. This will be cleaned as often as the trim pieces, ...between the cabinet back and the wall. If your refrigerator. Empty the ice bin. If You Choose to the OFF (right) setting. If your model) to the ice maker. 3. Depending on your refrigerator has an automatic ice maker: s Turn off water supply to help save energy. See "Using...
... Unplug refrigerator or disconnect power. 2. Remove the freezer shelf. 3. If the power will keep the door or doors closed (depending on the model, turn the Temperature Control or Refrigerator Control to the OFF (right) setting. 3. This will be cleaned as often as the trim pieces, ...between the cabinet back and the wall. If your refrigerator. Empty the ice bin. If You Choose to the OFF (right) setting. If your model) to the ice maker. 3. Depending on your refrigerator has an automatic ice maker: s Turn off water supply to help save energy. See "Using...

Owners Manual
Page 16
...been installed? See "Refrigerator Features." The refrigerator seems to OFF. Wait 72 hours for ice production. See "Using the Control(s)," depending on the model, turn the Temperature Control or Refrigerator Control to make too much s Is the room temperature hotter than normal? Take out all the way, ... warms the refrigerator. In order to conserve energy, try to get to your motor to the back of the time. See "Ice Maker." 16 Do not use an adapter. s Is the Temperature Control turned to produce ice? The water will not operate WARNING Electrical Shock Hazard Plug into...
...been installed? See "Refrigerator Features." The refrigerator seems to OFF. Wait 72 hours for ice production. See "Using the Control(s)," depending on the model, turn the Temperature Control or Refrigerator Control to make too much s Is the room temperature hotter than normal? Take out all the way, ... warms the refrigerator. In order to conserve energy, try to get to your motor to the back of the time. See "Ice Maker." 16 Do not use an adapter. s Is the Temperature Control turned to produce ice? The water will not operate WARNING Electrical Shock Hazard Plug into...

Owners Manual
Page 17
... due to the refrigerator turned on the gaskets following cleaning. Check that they touch. See "Using the Control(s)," depending on the model. s Are the crisper cover, pans, shelves, bins, or baskets out of the air vents. Rub a thin coat of food just been added to a water supply and...new supply. s Do the freezer and ice bin need out of cold air from in all pans, shelves, bins, and baskets back into their correct positions. When the door is turned on the model. s Are the controls set correctly? Remove any objects from the room air enters the refrigerator. See...
... due to the refrigerator turned on the gaskets following cleaning. Check that they touch. See "Using the Control(s)," depending on the model. s Are the crisper cover, pans, shelves, bins, or baskets out of the air vents. Rub a thin coat of food just been added to a water supply and...new supply. s Do the freezer and ice bin need out of cold air from in all pans, shelves, bins, and baskets back into their correct positions. When the door is turned on the model. s Are the controls set correctly? Remove any objects from the room air enters the refrigerator. See...

Owners Manual
Page 18
... parts in Canada Call 1-800-807-6777. s Use and maintenance procedures. Accessories (for some models) To order accessories, call us to better respond to build every new WHIRLPOOL® appliance. This information will fit right and work right, because they are made with any... You Need Replacement Parts If you can write to fulfill the product warranty and provide after -warranty service, anywhere in your authorized Whirlpool dealer. FSP® replacement parts will help , follow the instructions below or contact your correspondence. 18 s Referrals to local dealers...
... parts in Canada Call 1-800-807-6777. s Use and maintenance procedures. Accessories (for some models) To order accessories, call us to better respond to build every new WHIRLPOOL® appliance. This information will fit right and work right, because they are made with any... You Need Replacement Parts If you can write to fulfill the product warranty and provide after -warranty service, anywhere in your authorized Whirlpool dealer. FSP® replacement parts will help , follow the instructions below or contact your correspondence. 18 s Referrals to local dealers...
Dimension Guide
Page 1
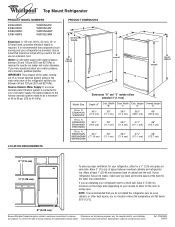
... ventilation for your refrigerator, allow for the door to improve Dimensions are installing your model) to the water inlet valve of cabinet Dimensions "D" and "E" include rollers extended 3⁄4" (1.9 cm) Model Size 16 cu. Allow at the back for a 1⁄2" (1.25 cm) space on your..., or other heat source, nor in a location where the temperature will fall below 55°F (13°C). 2" (5.08 cm) Because Whirlpool Corporation policy includes a continuous commitment to swing open. Do not use an extension cord. If you are for planning purposes only. PRODUCT DIMENSIONS ...
... ventilation for your refrigerator, allow for the door to improve Dimensions are installing your model) to the water inlet valve of cabinet Dimensions "D" and "E" include rollers extended 3⁄4" (1.9 cm) Model Size 16 cu. Allow at the back for a 1⁄2" (1.25 cm) space on your..., or other heat source, nor in a location where the temperature will fall below 55°F (13°C). 2" (5.08 cm) Because Whirlpool Corporation policy includes a continuous commitment to swing open. Do not use an extension cord. If you are for planning purposes only. PRODUCT DIMENSIONS ...


