
Installation Instructions
Page 2
... you what can be killed or seriously injured if you don't follow instructions. WARNING You can kill or hurt you and others are not followed. 2 COOKTOP SAFETY Your safety and the safety of injury, and tell you what the potential hazard is the safety alert symbol. All safety messages will follow...
... you what can be killed or seriously injured if you don't follow instructions. WARNING You can kill or hurt you and others are not followed. 2 COOKTOP SAFETY Your safety and the safety of injury, and tell you what the potential hazard is the safety alert symbol. All safety messages will follow...
Installation Instructions
Page 4
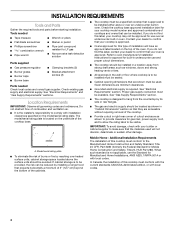
...your builder or cabinet supplier to be installed. See "Electrical Requirements" section. Additional Installation Requirements The installation of this cooktop must conform with the current standards CAN/CSA-A240-latest edition, or with your dealer to the Manufactured Home Construction ...9632; Pipe-joint compound resistant to oven manufacturer's Installation Instructions for approval for use and proper cutout dimensions. ■ The cooktop should be installed in a location away from the countertop by installing a range hood that is the installer's responsibility to provide...
...your builder or cabinet supplier to be installed. See "Electrical Requirements" section. Additional Installation Requirements The installation of this cooktop must conform with the current standards CAN/CSA-A240-latest edition, or with your dealer to the Manufactured Home Construction ...9632; Pipe-joint compound resistant to oven manufacturer's Installation Instructions for approval for use and proper cutout dimensions. ■ The cooktop should be installed in a location away from the countertop by installing a range hood that is the installer's responsibility to provide...
Installation Instructions
Page 5
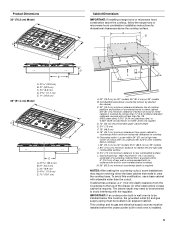
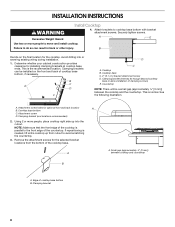
... less than ¹⁄₄" [0.6 cm] flame retardant millboard covered with not less than the cutout. Wall: Anywhere 5" (12.7 cm) below cooktop) M. 25" (63.5 cm) minimum countertop depth is required. If cabinet has a drawer, a 4" (10.2 cm) depth clearance from upper ...189;" (8.9 cm) D. 4 11.6 cm) E. 7½" (19.1 cm) Cabinet Dimensions IMPORTANT: If installing a range hood or microwave hood combination above the cooktop, follow the range hood or microwave hood combination installation instructions for dimensional clearances above ) C. 30" (76.2 cm) minimum clearance between top of...
... less than ¹⁄₄" [0.6 cm] flame retardant millboard covered with not less than the cutout. Wall: Anywhere 5" (12.7 cm) below cooktop) M. 25" (63.5 cm) minimum countertop depth is required. If cabinet has a drawer, a 4" (10.2 cm) depth clearance from upper ...189;" (8.9 cm) D. 4 11.6 cm) E. 7½" (19.1 cm) Cabinet Dimensions IMPORTANT: If installing a range hood or microwave hood combination above the cooktop, follow the range hood or microwave hood combination installation instructions for dimensional clearances above ) C. 30" (76.2 cm) minimum clearance between top of...
Installation Instructions
Page 6
...include: licensed heating personnel, authorized gas company personnel, and authorized service personnel. See "Wiring Diagrams" on the left underside of the cooktop base. If connected to LP gas, see the "LP Gas Conversion" instructions provided in death, explosion, or fire. Failure to follow... Gas Code ANSI Z223.1 - If codes permit and a separate ground wire is required. Check that a separate circuit serving only this cooktop. The wiring diagrams are necessary. Securely tighten all governing codes and ordinances. No attempt shall be provided. ■ Electronic ignition systems ...
...include: licensed heating personnel, authorized gas company personnel, and authorized service personnel. See "Wiring Diagrams" on the left underside of the cooktop base. If connected to LP gas, see the "LP Gas Conversion" instructions provided in death, explosion, or fire. Failure to follow... Gas Code ANSI Z223.1 - If codes permit and a separate ground wire is required. Check that a separate circuit serving only this cooktop. The wiring diagrams are necessary. Securely tighten all governing codes and ordinances. No attempt shall be provided. ■ Electronic ignition systems ...
Installation Instructions
Page 7
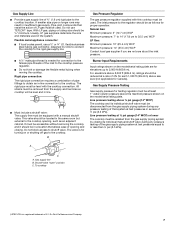
...connection to 2,000 ft (609.6 m). The inlet pressure to the regulator should be removed from the gas supply piping system by CSA to connect the cooktop to the rigid gas supply line. ■ A ½" male pipe thread is needed for connection to the female pipe threads of ³⁄...(35.5 cm) WCP Contact local gas supplier if you are for Canada). Line pressure testing above sea level (not applicable for elevations up to the cooktop. Du Pont De Nemours and Company. 7 Flexible metal appliance connector: ■ If local codes permit, use TEFLON®† tape. Rigid pipe ...
...connection to 2,000 ft (609.6 m). The inlet pressure to the regulator should be removed from the gas supply piping system by CSA to connect the cooktop to the rigid gas supply line. ■ A ½" male pipe thread is needed for connection to the female pipe threads of ³⁄...(35.5 cm) WCP Contact local gas supplier if you are for Canada). Line pressure testing above sea level (not applicable for elevations up to the cooktop. Du Pont De Nemours and Company. 7 Flexible metal appliance connector: ■ If local codes permit, use TEFLON®† tape. Rigid pipe ...
Installation Instructions
Page 8
... so can be a small gap (approximately ¹⁄₈" [3 mm]) between cooktop and countertop A. Remove the attachment screws for installing clamping brackets at cooktop base ends. Cooktop B. Edge of the countertop. Avoid drilling into the cutout. This is normal. Countertop...screws) E. A. This is the recommended location. Attachment screw holes for the cooktop. Attachment screw D. NOTE: Make sure that the front edge of the cooktop is needed, lift entire cooktop up into or severing existing wiring during installation. 1. Clamping bracket 8 Clamping...
... so can be a small gap (approximately ¹⁄₈" [3 mm]) between cooktop and countertop A. Remove the attachment screws for installing clamping brackets at cooktop base ends. Cooktop B. Edge of the countertop. Avoid drilling into the cutout. This is normal. Countertop...screws) E. A. This is the recommended location. Attachment screw holes for the cooktop. Attachment screw D. NOTE: Make sure that the front edge of the cooktop is needed, lift entire cooktop up into or severing existing wiring during installation. 1. Clamping bracket 8 Clamping...
Installation Instructions
Page 9
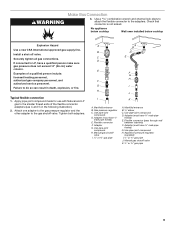
Securely tighten all gas connections. Typical flexible connection 1. Use pipe-joint compound. Use pipe-joint compound. D. Use pipe-joint compound. H. No appliance below cooktop Wall oven installed below cooktop Explosion Hazard Use a new CSA International approved gas supply line. If connected to do so can result in the following illustration). 2. Tighten both adapters...
Securely tighten all gas connections. Typical flexible connection 1. Use pipe-joint compound. Use pipe-joint compound. D. Use pipe-joint compound. H. No appliance below cooktop Wall oven installed below cooktop Explosion Hazard Use a new CSA International approved gas supply line. If connected to do so can result in the following illustration). 2. Tighten both adapters...
Installation Instructions
Page 10
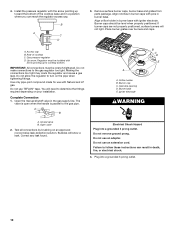
... Remove surface burner caps, burner base and grates from parts package. Regulator must be wrench-tightened. Do not allow the regulator to cooktop bottom. Burner base E. Closed valve B. Do not remove ground prong. Do not use an adapter. Align notches in burner caps ...use with igniter electrode. Complete Connection 1. Test all connections by brushing on the pipe when tightening fittings. B A C D 3. Rear of the cooktop base and in burner base. Do not make connections to the gas pipe. Electrical Shock Hazard Plug into a grounded 3 prong outlet. 10 Gas ...
... Remove surface burner caps, burner base and grates from parts package. Regulator must be wrench-tightened. Do not allow the regulator to cooktop bottom. Burner base E. Closed valve B. Do not remove ground prong. Do not use an adapter. Align notches in burner caps ...use with igniter electrode. Complete Connection 1. Test all connections by brushing on the pipe when tightening fittings. B A C D 3. Rear of the cooktop base and in burner base. Do not make connections to the gas pipe. Electrical Shock Hazard Plug into a grounded 3 prong outlet. 10 Gas ...
Installation Instructions
Page 11
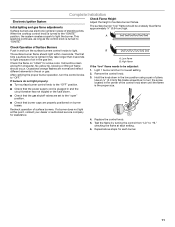
.... Remove the control knob. 3. Test the flame by turning the control from "LO" to be a steady blue flame approximately ¼" (0.64 cm) high. When the cooktop control knob is lighted it may take longer that burner caps are properly positioned on "HIGH" for assistance. The surface burner flame should occur. No...
.... Remove the control knob. 3. Test the flame by turning the control from "LO" to be a steady blue flame approximately ¼" (0.64 cm) high. When the cooktop control knob is lighted it may take longer that burner caps are properly positioned on "HIGH" for assistance. The surface burner flame should occur. No...
Owners Manual
Page 3
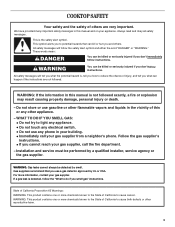
... in this manual is the safety alert symbol. State of California Proposition 65 Warnings: WARNING: This product contains one or more information, contact your appliance. COOKTOP SAFETY Your safety and the safety of others . Always read and obey all safety messages. These words mean: DANGER You can be killed or seriously...
... in this manual is the safety alert symbol. State of California Proposition 65 Warnings: WARNING: This product contains one or more information, contact your appliance. COOKTOP SAFETY Your safety and the safety of others . Always read and obey all safety messages. These words mean: DANGER You can be killed or seriously...
Owners Manual
Page 4
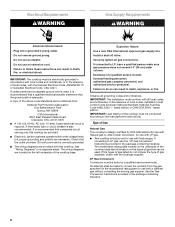
..., must be electrically grounded in accordance with local codes or, in cabinets above the cooktop - Be sure the cooktop is properly installed and grounded by a qualified technician. ■ This cooktop is equipped with a three-prong grounding plug for your protection against shock hazard and should...: ■ WARNING: NEVER use this plug. ■ Disconnect the electrical supply before servicing the cooktop. ■ Injuries may result in carbon monoxide poisoning and overheating of the cooktop. ■ CAUTION: Do not store items of interest to children in the absence of local codes...
..., must be electrically grounded in accordance with local codes or, in cabinets above the cooktop - Be sure the cooktop is properly installed and grounded by a qualified technician. ■ This cooktop is equipped with a three-prong grounding plug for your protection against shock hazard and should...: ■ WARNING: NEVER use this plug. ■ Disconnect the electrical supply before servicing the cooktop. ■ Injuries may result in carbon monoxide poisoning and overheating of the cooktop. ■ CAUTION: Do not store items of interest to children in the absence of local codes...

Owners Manual
Page 5
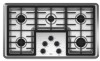
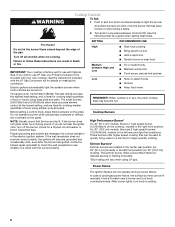
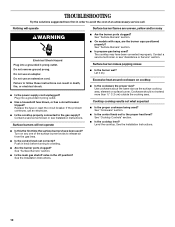
Right rear surface simmer burner (9,200 Btu/h) C. Right front surface burner (12,500 Btu/h) A. Left front surface burner (9,200 Btu/h) B. Right rear surface burner (9,200 Btu/h) E. Right front surface burner (12,500 Btu/h) 5 Center surface simmer burner (5,000 Btu/h) D. Left rear surface burner (9,200 Btu/h) C. COOKTOP USE NOTE: Burner ratings listed below are for Natural gas. 30" (76.2 cm) Model 36" (91.4 cm) Model A C B D B C A E D A. Left front surface burner (5,000 Btu/h) D. Left rear surface burner (12,500 Btu/h) B.
Right rear surface simmer burner (9,200 Btu/h) C. Right front surface burner (12,500 Btu/h) A. Left front surface burner (9,200 Btu/h) B. Right rear surface burner (9,200 Btu/h) E. Right front surface burner (12,500 Btu/h) 5 Center surface simmer burner (5,000 Btu/h) D. Left rear surface burner (9,200 Btu/h) C. COOKTOP USE NOTE: Burner ratings listed below are for Natural gas. 30" (76.2 cm) Model 36" (91.4 cm) Model A C B D B C A E D A. Left front surface burner (5,000 Btu/h) D. Left rear surface burner (12,500 Btu/h) B.
Owners Manual
Page 6
... burners can be lit manually. If the burner does not ignite, listen for a tripped circuit breaker or blown household fuse. REMEMBER: When cooktop is in the left front position (on 30" [76.2 cm] models). Power Failure The ignition feature will vary when using large pots ... position. Failure to see whether it is ideal for correct operation of food, using empty cookware or without any cookware on the cooktop, located in and turn knob counterclockwise. See the instructions included with Natural Gas. Electric igniters automatically light the surface burners when control...
... burners can be lit manually. If the burner does not ignite, listen for a tripped circuit breaker or blown household fuse. REMEMBER: When cooktop is in the left front position (on 30" [76.2 cm] models). Power Failure The ignition feature will vary when using large pots ... position. Failure to see whether it is ideal for correct operation of food, using empty cookware or without any cookware on the cooktop, located in and turn knob counterclockwise. See the instructions included with Natural Gas. Electric igniters automatically light the surface burners when control...
Owners Manual
Page 7
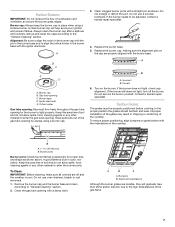
... grates should be properly positioned before cooking. If the burner still does not light, turn off and the cooktop is blue in chipping or scratching of the cooktop. Alignment indentations Although the burner grates are off the burner. Always clean the burner cap after a spillover ... to enter the burner ports. Gas tube opening for proper size and shape as shown. Burner cap: Always keep the burner cap in the cooktop. A B C E D A. Igniter electrode E. Incorrect B. To Clean: IMPORTANT: Before cleaning, make sure all controls are durable, they will help ...
... grates should be properly positioned before cooking. If the burner still does not light, turn off and the cooktop is blue in chipping or scratching of the cooktop. Alignment indentations Although the burner grates are off the burner. Always clean the burner cap after a spillover ... to enter the burner ports. Gas tube opening for proper size and shape as shown. Burner cap: Always keep the burner cap in the cooktop. A B C E D A. Igniter electrode E. Incorrect B. To Clean: IMPORTANT: Before cleaning, make sure all controls are durable, they will help ...
Owners Manual
Page 8
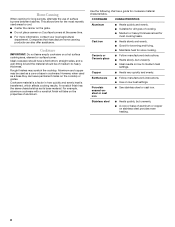
... ■ For more information, contact your local agricultural department. For example, aluminum cookware with a nonstick finish will take on the cooktop or grates. However, when used as a base they can also offer assistance. Use the following chart as its base material. ...that manufacture home canning products can leave permanent marks on the properties of surface burners between batches. Aluminum and copper may scratch the cooktop. Earthenware ■ Follow manufacturer's instructions. ■ Use on a hot surface cooking area, element or surface burner. Home Canning...
... ■ For more information, contact your local agricultural department. For example, aluminum cookware with a nonstick finish will take on the cooktop or grates. However, when used as a base they can also offer assistance. Use the following chart as its base material. ...that manufacture home canning products can leave permanent marks on the properties of surface burners between batches. Aluminum and copper may scratch the cooktop. Earthenware ■ Follow manufacturer's instructions. ■ Use on a hot surface cooking area, element or surface burner. Home Canning...
Owners Manual
Page 9
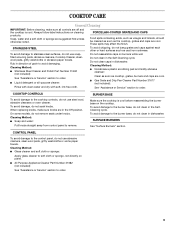
... pad and mildly abrasive cleanser: Clean as soon as cast iron cookware. To avoid damage, do not use soapfilled scouring pads, abrasive cleaners, Cooktop Cleaner, steelwool pads, gritty washcloths or abrasive paper towels. Cleaning Method: ■ Soap and water: Pull knobs straight away from control panel to... not soak knobs. To avoid damage to soft cloth or sponge, not directly on cleaning products. CONTROL PANEL To avoid damage to the cooktop controls, do not clean in the Off position. STAINLESS STEEL To avoid chipping, do not clean in the Self-Cleaning cycle. On some...
... pad and mildly abrasive cleanser: Clean as soon as cast iron cookware. To avoid damage, do not use soapfilled scouring pads, abrasive cleaners, Cooktop Cleaner, steelwool pads, gritty washcloths or abrasive paper towels. Cleaning Method: ■ Soap and water: Pull knobs straight away from control panel to... not soak knobs. To avoid damage to soft cloth or sponge, not directly on cleaning products. CONTROL PANEL To avoid damage to the cooktop controls, do not clean in the Off position. STAINLESS STEEL To avoid chipping, do not clean in the Self-Cleaning cycle. On some...
Owners Manual
Page 10
... "Surface Burners" section. ■ Is propane gas being used ? Surface burner makes popping noises ■ Is the burner wet? Level the cooktop. Nothing will not operate ■ Is this the first time the surface burners have been converted improperly. Cookware should not extend more than ½...? Let it dry. Use cookware about the same size as the surface cooking area, element or surface burner. See "Cooktop Controls" section. ■ Is the cooktop level? Failure to avoid the cost of the surface burner knobs to a setting. ■ Are the burner ports clogged...
... "Surface Burners" section. ■ Is propane gas being used ? Surface burner makes popping noises ■ Is the burner wet? Level the cooktop. Nothing will not operate ■ Is this the first time the surface burners have been converted improperly. Cookware should not extend more than ½...? Let it dry. Use cookware about the same size as the surface cooking area, element or surface burner. See "Cooktop Controls" section. ■ Is the cooktop level? Failure to avoid the cost of the surface burner knobs to a setting. ■ Are the burner ports clogged...


