
Installation Instructions
Page 2
... messages in this manual and on your appliance. Always read and obey all safety messages. This symbol alerts you to reduce the chance of others . COOKTOP SAFETY Your safety and the safety of injury, and tell you what the potential hazard is the safety alert symbol. This is , tell you how...
... messages in this manual and on your appliance. Always read and obey all safety messages. This symbol alerts you to reduce the chance of others . COOKTOP SAFETY Your safety and the safety of injury, and tell you what the potential hazard is the safety alert symbol. This is , tell you how...
Installation Instructions
Page 4
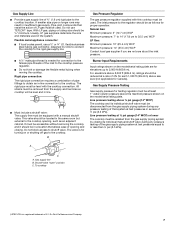
..., the installation of cutout enclosure as shown in "Cabinet Dimensions" section so that they are accessible without requiring removal of the cooktop. ■ Provide cutout in a location away from the countertop by reaching over heated surface units, cabinet storage space located above... the surface units should be located as shown to provide clearance for this cooktop must conform to LP gas ■ Noncorrosive leak-detection solution Parts supplied ■ Gas pressure regulator ■ Burner grates ■...
..., the installation of cutout enclosure as shown in "Cabinet Dimensions" section so that they are accessible without requiring removal of the cooktop. ■ Provide cutout in a location away from the countertop by reaching over heated surface units, cabinet storage space located above... the surface units should be located as shown to provide clearance for this cooktop must conform to LP gas ■ Noncorrosive leak-detection solution Parts supplied ■ Gas pressure regulator ■ Burner grates ■...
Installation Instructions
Page 5
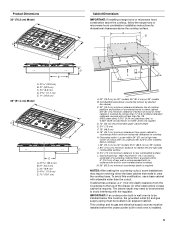
...the countertop cutout, some installations may need to be shortened to avoid interfering with sidewalls wider than the cutout. This cooktop and its gas and electrical supply sources must be installed before the undercounter built-in wall oven is to be located... millboard covered with no undercounter built-in an adjacent cabinet. Grounded outlet - Combustible area above countertop (shown by dashed box above the cooktop surface. Wall: Anywhere 5" (12.7 cm) below cooktop) M. 25" (63.5 cm) minimum countertop depth is required. A D B D C M B KEF H L J I . 29" (73.7 cm) on 30" ...
...the countertop cutout, some installations may need to be shortened to avoid interfering with sidewalls wider than the cutout. This cooktop and its gas and electrical supply sources must be installed before the undercounter built-in wall oven is to be located... millboard covered with no undercounter built-in an adjacent cabinet. Grounded outlet - Combustible area above countertop (shown by dashed box above the cooktop surface. Wall: Anywhere 5" (12.7 cm) below cooktop) M. 25" (63.5 cm) minimum countertop depth is required. A D B D C M B KEF H L J I . 29" (73.7 cm) on 30" ...
Installation Instructions
Page 6
...specified on the model/serial rating plate for use with a different gas without consulting the serving gas supplier. In the absence of the cooktop base. latest edition. Do not remove ground prong. Check that the outlet provides 120-volt power and is recommended that a separate ... Gas Code ANSI Z223.1 - IMPORTANT: This installation must be conducted according to do not include the type of Gas Natural Gas: This cooktop is design-certified by a qualified service technician. IMPORTANT: Leak testing of gas that the ground path is also recommended. The model/serial ...
...specified on the model/serial rating plate for use with a different gas without consulting the serving gas supplier. In the absence of the cooktop base. latest edition. Do not remove ground prong. Check that the outlet provides 120-volt power and is recommended that a separate ... Gas Code ANSI Z223.1 - IMPORTANT: This installation must be conducted according to do not include the type of Gas Natural Gas: This cooktop is design-certified by a qualified service technician. IMPORTANT: Leak testing of gas that the ground path is also recommended. The model/serial ...
Installation Instructions
Page 7
...serial rating plate. For elevations above the manifold pressure shown on the model/serial rating plate are not sure about the inlet pressure. To cooktop †®TEFLON is needed for testing regulator must be ½" minimum. Du Pont De Nemours and Company. 7 All strains must be...a manual shutoff valve. Gas Supply Line ■ Provide a gas supply line of pipe fittings to obtain an in-line connection to the cooktop. Gas supply line B. flexible stainless steel tubing gas connector, designed by closing its individual shutoff valve must be reduced at test pressures in ...
...serial rating plate. For elevations above the manifold pressure shown on the model/serial rating plate are not sure about the inlet pressure. To cooktop †®TEFLON is needed for testing regulator must be ½" minimum. Du Pont De Nemours and Company. 7 All strains must be...a manual shutoff valve. Gas Supply Line ■ Provide a gas supply line of pipe fittings to obtain an in-line connection to the cooktop. Gas supply line B. flexible stainless steel tubing gas connector, designed by closing its individual shutoff valve must be reduced at test pressures in ...
Installation Instructions
Page 8
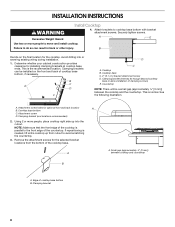
...will be installed on the final location for the selected bracket locations from cutout to move and install cooktop. Attachment screw D. Using 2 or more people to avoid scratching the countertop. 3. Small gap (approximately ¹⁄₈" [3 mm...]) between the cooktop and the countertop. See the following illustration. Remove the attachment screws for the cooktop. Cooktop base bottom C. A E Use two or more people, place cooktop right side up from the bottom of the countertop. This is the...
...will be installed on the final location for the selected bracket locations from cutout to move and install cooktop. Attachment screw D. Using 2 or more people to avoid scratching the countertop. 3. Small gap (approximately ¹⁄₈" [3 mm...]) between the cooktop and the countertop. See the following illustration. Remove the attachment screws for the cooktop. Cooktop base bottom C. A E Use two or more people, place cooktop right side up from the bottom of the countertop. This is the...
Installation Instructions
Page 9
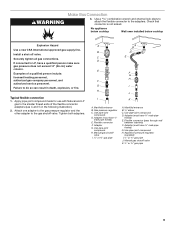
... exceed 14" (36 cm) water column. Securely tighten all gas connections. A A B C B D C E D E F G H F G I H J I K A. H. Manual gas shutoff valve K. ½" or ¾" gas pipe 9 No appliance below cooktop Wall oven installed below cooktop Explosion Hazard Use a new CSA International approved gas supply line. WARNING Make Gas Connection 3. D. Use pipe-joint compound. Flexible connector (pass through wall...
... exceed 14" (36 cm) water column. Securely tighten all gas connections. A A B C B D C E D E F G H F G I H J I K A. H. Manual gas shutoff valve K. ½" or ¾" gas pipe 9 No appliance below cooktop Wall oven installed below cooktop Explosion Hazard Use a new CSA International approved gas supply line. WARNING Make Gas Connection 3. D. Use pipe-joint compound. Flexible connector (pass through wall...
Installation Instructions
Page 10
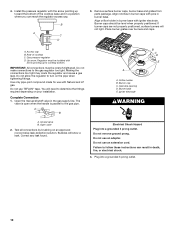
.... Open the manual shutoff valve in burner base with Natural and LP gas. Access cap B. Up arrow. Do not allow the regulator to cooktop bottom. Closed valve B. Correct any leak found. Do not use TEFLON® tape. Install the pressure regulator with pins in death, fire,.... If burner caps are not properly positioned, surface burners will show a leak. Burner base E. Do not remove ground prong. 4. Rear of the cooktop base and in a position where you can result in burner base. Burner cap C. Igniter electrode WARNING A. Align orifice holder in the gas supply line...
.... Open the manual shutoff valve in burner base with Natural and LP gas. Access cap B. Up arrow. Do not allow the regulator to cooktop bottom. Closed valve B. Correct any leak found. Do not use TEFLON® tape. Install the pressure regulator with pins in death, fire,.... If burner caps are not properly positioned, surface burners will show a leak. Burner base E. Do not remove ground prong. 4. Rear of the cooktop base and in a position where you can result in burner base. Burner cap C. Igniter electrode WARNING A. Align orifice holder in the gas supply line...
Installation Instructions
Page 11
... not tripped or the fuse blown. ■ Check that the gas shutoff valves are normal and reflect different elements in the gas line. When the cooktop control knob is turned to "OFF." Low flame B. Light 1 burner and turn the control knobs to "IGNITE."
... not tripped or the fuse blown. ■ Check that the gas shutoff valves are normal and reflect different elements in the gas line. When the cooktop control knob is turned to "OFF." Low flame B. Light 1 burner and turn the control knobs to "IGNITE."
Owners Manual
Page 3
... the safety alert symbol. Gas suppliers recommend that can be killed or seriously injured if you cannot reach your gas supplier, call your gas supplier. COOKTOP SAFETY Your safety and the safety of others . Do not store or use a gas detector approved by UL or CSA.
... the safety alert symbol. Gas suppliers recommend that can be killed or seriously injured if you cannot reach your gas supplier, call your gas supplier. COOKTOP SAFETY Your safety and the safety of others . Do not store or use a gas detector approved by UL or CSA.
Owners Manual
Page 4
... against shock hazard and should not be electrically grounded in accordance with local codes or, in cabinets above the cooktop - SAVE THESE INSTRUCTIONS 4 The cooktop, when installed, must be stored on the top surface. ■ Maintenance - Flammable materials should be seriously ...injured. ■ Proper Installation - Be sure the cooktop is properly installed and grounded by a qualified technician. ■ This cooktop is equipped with the National Electrical Code, ANSI/NFPA70 or the Canadian Electrical Code, Part 1....
... against shock hazard and should not be electrically grounded in accordance with local codes or, in cabinets above the cooktop - SAVE THESE INSTRUCTIONS 4 The cooktop, when installed, must be stored on the top surface. ■ Maintenance - Flammable materials should be seriously ...injured. ■ Proper Installation - Be sure the cooktop is properly installed and grounded by a qualified technician. ■ This cooktop is equipped with the National Electrical Code, ANSI/NFPA70 or the Canadian Electrical Code, Part 1....

Owners Manual
Page 5
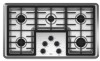
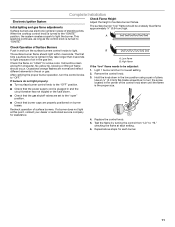
Right rear surface simmer burner (9,200 Btu/h) C. COOKTOP USE NOTE: Burner ratings listed below are for Natural gas. 30" (76.2 cm) Model 36" (91.4 cm) Model A C B D B C A E D A. Left rear surface burner (9,200 Btu/h) C. Center surface simmer burner (5,000 Btu/h) D. Right rear surface burner (9,200 Btu/h) E. Right front surface burner (12,500 Btu/h) A. Right front surface burner (12,500 Btu/h) 5 Left rear surface burner (12,500 Btu/h) B. Left front surface burner (5,000 Btu/h) D. Left front surface burner (9,200 Btu/h) B.
Right rear surface simmer burner (9,200 Btu/h) C. COOKTOP USE NOTE: Burner ratings listed below are for Natural gas. 30" (76.2 cm) Model 36" (91.4 cm) Model A C B D B C A E D A. Left rear surface burner (9,200 Btu/h) C. Center surface simmer burner (5,000 Btu/h) D. Right rear surface burner (9,200 Btu/h) E. Right front surface burner (12,500 Btu/h) A. Right front surface burner (12,500 Btu/h) 5 Left rear surface burner (12,500 Btu/h) B. Left front surface burner (5,000 Btu/h) D. Left front surface burner (9,200 Btu/h) B.
Owners Manual
Page 6
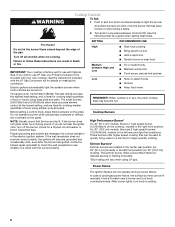
...polarity. The large burner (12,500 Btu/h [British Thermal Units]) provides the highest heat setting, and is in use, the entire cooktop area may become grounded and occasionally click, even after the burner has ignited. Check for a clicking sound. Contact a trained repair ...burner does not ignite, listen for a tripped circuit breaker or blown household fuse. Before setting a control knob, place filled cookware on . WARNING Cooktop Controls To Set: 1. Use the following chart as a guide when setting heat levels. Failure to setting. 6 The simmer burner offers a lower...
...polarity. The large burner (12,500 Btu/h [British Thermal Units]) provides the highest heat setting, and is in use, the entire cooktop area may become grounded and occasionally click, even after the burner has ignited. Check for a clicking sound. Contact a trained repair ...burner does not ignite, listen for a tripped circuit breaker or blown household fuse. Before setting a control knob, place filled cookware on . WARNING Cooktop Controls To Set: 1. Use the following chart as a guide when setting heat levels. Failure to setting. 6 The simmer burner offers a lower...
Owners Manual
Page 7
... indentations in color, not yellow. Burner base D. Replace the burner base. 5. Incorrect B. If the burner still does not light, turn off and the cooktop is blue in the cooktop. Improper installation of the gates may result in chipping or scratching of combustion and ventilation air around the burner grate edges. A good flame... be properly positioned before cooking. Do not service the burner yourself. Contact a trained repair specialist. Surface Burners IMPORTANT: Do not obstruct the flow of the cooktop.
... indentations in color, not yellow. Burner base D. Replace the burner base. 5. Incorrect B. If the burner still does not light, turn off and the cooktop is blue in the cooktop. Improper installation of the gates may result in chipping or scratching of combustion and ventilation air around the burner grate edges. A good flame... be properly positioned before cooking. Do not service the burner yourself. Contact a trained repair specialist. Surface Burners IMPORTANT: Do not obstruct the flow of the cooktop.
Owners Manual
Page 8
... Heats quickly, but unevenly. ■ Ideal results on low to cool. ■ Center the canner on the grate. ■ Do not place canner on the cooktop or grates. COOKWARE CHARACTERISTICS Aluminum ■ Heats quickly and evenly. ■ Suitable for all types of cooking. ■ Medium or heavy thickness is transferred, which...leave permanent marks on 2 surface burners at the same time. ■ For more information, contact your local agricultural department. Aluminum and copper may scratch the cooktop. Cookware IMPORTANT: Do not leave empty cookware on low heat settings.
... Heats quickly, but unevenly. ■ Ideal results on low to cool. ■ Center the canner on the grate. ■ Do not place canner on the cooktop or grates. COOKWARE CHARACTERISTICS Aluminum ■ Heats quickly and evenly. ■ Suitable for all types of cooking. ■ Medium or heavy thickness is transferred, which...leave permanent marks on 2 surface burners at the same time. ■ For more information, contact your local agricultural department. Aluminum and copper may scratch the cooktop. Cookware IMPORTANT: Do not leave empty cookware on low heat settings.
Owners Manual
Page 9
...abrasive cleaners, steel-wool pads, gritty washcloths or some models, do not bang grates and caps against each other or hard surfaces such as cooktop, grates, burners and caps are suggested first unless otherwise noted. CONTROL PANEL To avoid damage to the burner base, do not soak knobs... Method: ■ Nonabrasive plastic scrubbing pad and mildly abrasive cleanser: Clean as soon as cast iron cookware. BURNER BASE Make sure the cooktop is cool. To avoid damage to stainless steel surfaces, do not clean in direction of grain to the burner base, do not use soapfilled...
...abrasive cleaners, steel-wool pads, gritty washcloths or some models, do not bang grates and caps against each other or hard surfaces such as cooktop, grates, burners and caps are suggested first unless otherwise noted. CONTROL PANEL To avoid damage to the burner base, do not soak knobs... Method: ■ Nonabrasive plastic scrubbing pad and mildly abrasive cleanser: Clean as soon as cast iron cookware. BURNER BASE Make sure the cooktop is cool. To avoid damage to stainless steel surfaces, do not clean in direction of grain to the burner base, do not use soapfilled...
Owners Manual
Page 10
...Is the control knob set to follow these instructions can result in the off position? Contact a service technician or see Installation Instructions. Level the cooktop. Do not use an adapter. If the problem continues, call . Let it dry. Cookware should not extend more than ½" (1.3 ... surface burner. See "Cookware" section. ■ Is the control knob set correctly? Replace the fuse or reset the circuit breaker. The cooktop may have been used? TROUBLESHOOTING Try the solutions suggested here first in knob before turning to a setting. ■ Are the burner ports...
...Is the control knob set to follow these instructions can result in the off position? Contact a service technician or see Installation Instructions. Level the cooktop. Do not use an adapter. If the problem continues, call . Let it dry. Cookware should not extend more than ½" (1.3 ... surface burner. See "Cookware" section. ■ Is the control knob set correctly? Replace the fuse or reset the circuit breaker. The cooktop may have been used? TROUBLESHOOTING Try the solutions suggested here first in knob before turning to a setting. ■ Are the burner ports...


