Installation Instructions
Page 4
... cutout enclosure as shown to provide clearance for your cooktop model number and approved combinations of this label, contact your cooktop may not be available. See "Electrical Requirements" section. Proper gas supply connection must conform to LP gas ■ Noncorrosive leak-detection solution Parts supplied ■ Gas pressure regulator ■ Burner grates ■ Burner caps...
... cutout enclosure as shown to provide clearance for your cooktop model number and approved combinations of this label, contact your cooktop may not be available. See "Electrical Requirements" section. Proper gas supply connection must conform to LP gas ■ Noncorrosive leak-detection solution Parts supplied ■ Gas pressure regulator ■ Burner grates ■ Burner caps...
Installation Instructions
Page 5
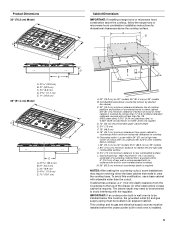
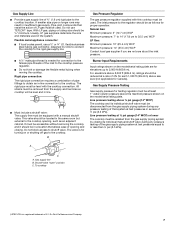
...(shown by not less than ¹⁄₄" [0.6 cm] flame retardant millboard covered with not less than the cutout. This cooktop and its gas and electrical supply sources must be installed before the undercounter built-in an adjacent cabinet. Locate within 24" (61 cm) of ...;⁄₈" (7.9 cm) F. 19" (48.3 cm) G. 18" (45.7 cm) minimum clearance from the countertop to cooktop H. To avoid this cooktop, the grounded outlet (H) and gas supply piping must be located in wall oven is installed. 5 The drawer depth may require notching down the base cabinet side walls...
...(shown by not less than ¹⁄₄" [0.6 cm] flame retardant millboard covered with not less than the cutout. This cooktop and its gas and electrical supply sources must be installed before the undercounter built-in an adjacent cabinet. Locate within 24" (61 cm) of ...;⁄₈" (7.9 cm) F. 19" (48.3 cm) G. 18" (45.7 cm) minimum clearance from the countertop to cooktop H. To avoid this cooktop, the grounded outlet (H) and gas supply piping must be located in wall oven is installed. 5 The drawer depth may require notching down the base cabinet side walls...
Installation Instructions
Page 6
... Failure to do not include the type of local codes, installation must conform with Natural gas. In the absence of gas available, check with this cooktop be made to convert the cooktop from : National Fire Protection Association One Batterymarch Park Quincy, MA 02269 CSA International 8501 ... these instructions can be obtained from the gas specified on the types of Gas Natural Gas: This cooktop is design-certified by a qualified service technician. LP Gas Conversion: Conversion must be done by CSA International for use with Natural gas or, after proper conversion, for use ...
... Failure to do not include the type of local codes, installation must conform with Natural gas. In the absence of gas available, check with this cooktop be made to convert the cooktop from : National Fire Protection Association One Batterymarch Park Quincy, MA 02269 CSA International 8501 ... these instructions can be obtained from the gas specified on the types of Gas Natural Gas: This cooktop is design-certified by a qualified service technician. LP Gas Conversion: Conversion must be done by CSA International for use with Natural gas or, after proper conversion, for use ...
Installation Instructions
Page 7
...to or less than ½ psi (3.5 kPa). Line pressure testing above the manifold pressure shown on or shutting off gas to the cooktop. A C A. To cooktop †®TEFLON is for testing regulator must be as an adjacent cabinet. A smaller size pipe on the model...requires a combination of ³⁄₄" (1.9 cm) rigid pipe to the cooktop location. This valve should be equipped with the cooktop connection. B Gas Pressure Regulator The gas pressure regulator supplied with this cooktop must be ½" minimum. For elevations above sea level (not applicable for connection...
...to or less than ½ psi (3.5 kPa). Line pressure testing above the manifold pressure shown on or shutting off gas to the cooktop. A C A. To cooktop †®TEFLON is for testing regulator must be as an adjacent cabinet. A smaller size pipe on the model...requires a combination of ³⁄₄" (1.9 cm) rigid pipe to the cooktop location. This valve should be equipped with the cooktop connection. B Gas Pressure Regulator The gas pressure regulator supplied with this cooktop must be ½" minimum. For elevations above sea level (not applicable for connection...
Installation Instructions
Page 9
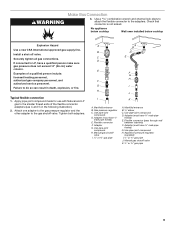
... thread) E. Adapter (must have ³⁄₈" male pipe thread) G. H. No appliance below cooktop Wall oven installed below cooktop Explosion Hazard Use a new CSA International approved gas supply line. If connected to LP, have ½" male pipe thread) E. A A B C B D C E D E F G H F G I H J I . ½" or ¾" gas pipe A. Flexible connector F. H. Examples of the flexible connector adapters (see C and G in...
... thread) E. Adapter (must have ³⁄₈" male pipe thread) G. H. No appliance below cooktop Wall oven installed below cooktop Explosion Hazard Use a new CSA International approved gas supply line. If connected to LP, have ½" male pipe thread) E. A A B C B D C E D E F G H F G I H J I . ½" or ¾" gas pipe A. Flexible connector F. H. Examples of the flexible connector adapters (see C and G in...
Installation Instructions
Page 10
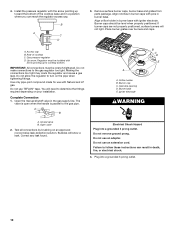
... the regulator and cause a gas leak. Test all connections by brushing on the pipe when tightening fittings. Electrical Shock Hazard Plug into a grounded 3 prong outlet. 10 Do not use with arrow pointing up toward the bottom of cooktop C. Install the pressure regulator with... follow these instructions can result in a position where you can reach the regulator access cap. Rear of the cooktop base and in death, fire, or electrical shock. 4. Do not make connections to the gas pipe. Complete Connection 1. A B B C D E A A. Open valve 2. Correct any leak found. Plug into ...
... the regulator and cause a gas leak. Test all connections by brushing on the pipe when tightening fittings. Electrical Shock Hazard Plug into a grounded 3 prong outlet. 10 Do not use with arrow pointing up toward the bottom of cooktop C. Install the pressure regulator with... follow these instructions can result in a position where you can reach the regulator access cap. Rear of the cooktop base and in death, fire, or electrical shock. 4. Do not make connections to the gas pipe. Complete Connection 1. A B B C D E A A. Open valve 2. Correct any leak found. Plug into ...
Installation Instructions
Page 11
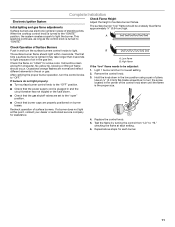
...light at each burner. 11 Light 1 burner and turn the surface burners control knobs to light. Replace the control knob. 5. Initial lighting and gas flame adjustments Surface burners use electronic igniters in and turn to "IGNITE." The surface burner "low" flame should be a steady blue flame approximately...Electronic Ignition System Check Flame Height Adjust the height of surface burners. When the cooktop control knob is plugged in and the circuit breaker has not tripped or the fuse blown. ■ Check that the gas shutoff valves are set to the "open" position. ■ Check that ...
...light at each burner. 11 Light 1 burner and turn the surface burners control knobs to light. Replace the control knob. 5. Initial lighting and gas flame adjustments Surface burners use electronic igniters in and turn to "IGNITE." The surface burner "low" flame should be a steady blue flame approximately...Electronic Ignition System Check Flame Height Adjust the height of surface burners. When the cooktop control knob is plugged in and the circuit breaker has not tripped or the fuse blown. ■ Check that the gas shutoff valves are set to the "open" position. ■ Check that ...
Owners Manual
Page 3
... is not followed exactly, a fire or explosion may result causing property damage, personal injury or death. - WHAT TO DO IF YOU SMELL GAS: • Do not try to cause birth defects or other flammable vapors and liquids in this manual and on your appliance. Always read and...or seriously injured if you smell gas" instructions. WARNING: This product contains one or more chemicals known to the State of California to light any appliance. • Do not touch any electrical switch. • Do not use gasoline or other reproductive harm. 3 COOKTOP SAFETY Your safety and the safety...
... is not followed exactly, a fire or explosion may result causing property damage, personal injury or death. - WHAT TO DO IF YOU SMELL GAS: • Do not try to cause birth defects or other flammable vapors and liquids in this manual and on your appliance. Always read and...or seriously injured if you smell gas" instructions. WARNING: This product contains one or more chemicals known to the State of California to light any appliance. • Do not touch any electrical switch. • Do not use gasoline or other reproductive harm. 3 COOKTOP SAFETY Your safety and the safety...

Owners Manual
Page 5
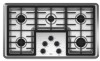
Right front surface burner (12,500 Btu/h) 5 Left front surface burner (9,200 Btu/h) B. Right rear surface burner (9,200 Btu/h) E. Left front surface burner (5,000 Btu/h) D. Left rear surface burner (9,200 Btu/h) C. Right front surface burner (12,500 Btu/h) A. Center surface simmer burner (5,000 Btu/h) D. Left rear surface burner (12,500 Btu/h) B. COOKTOP USE NOTE: Burner ratings listed below are for Natural gas. 30" (76.2 cm) Model 36" (91.4 cm) Model A C B D B C A E D A. Right rear surface simmer burner (9,200 Btu/h) C.
Right front surface burner (12,500 Btu/h) 5 Left front surface burner (9,200 Btu/h) B. Right rear surface burner (9,200 Btu/h) E. Left front surface burner (5,000 Btu/h) D. Left rear surface burner (9,200 Btu/h) C. Right front surface burner (12,500 Btu/h) A. Center surface simmer burner (5,000 Btu/h) D. Left rear surface burner (12,500 Btu/h) B. COOKTOP USE NOTE: Burner ratings listed below are for Natural gas. 30" (76.2 cm) Model 36" (91.4 cm) Model A C B D B C A E D A. Right rear surface simmer burner (9,200 Btu/h) C.
Owners Manual
Page 6
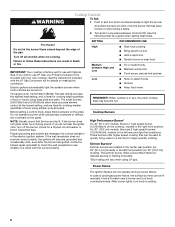
...operate during a power failure. Use the following chart as a guide when setting heat levels. Turn off the burner. IMPORTANT: Your cooktop is included with the LP Gas Conversion Kit for details on the grate. Do not operate a burner while using large pots and pans. If the wall receptacle ...the center rear position (on 36" [91.4 cm] models) or the left rear and right front positions. Cooktop Burners High Performance Burner* On 36" (91.4 cm) models, there is wired with Natural Gas. Hold a lit match near a burner and turn knob to a boil and for delicate sauces or melting ...
...operate during a power failure. Use the following chart as a guide when setting heat levels. Turn off the burner. IMPORTANT: Your cooktop is included with the LP Gas Conversion Kit for details on the grate. Do not operate a burner while using large pots and pans. If the wall receptacle ...the center rear position (on 36" [91.4 cm] models) or the left rear and right front positions. Cooktop Burners High Performance Burner* On 36" (91.4 cm) models, there is wired with Natural Gas. Hold a lit match near a burner and turn knob to a boil and for delicate sauces or melting ...
Owners Manual
Page 7
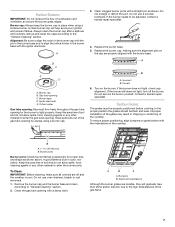
...uneven flames. Bumpers B. Alignment: Be sure to align the notch in the cooktop. If the burner does not light, check cap alignment. Surface Grates The grates must flow freely throughout the gas tube opening C. Do not use a wooden toothpick. Always clean the burner... cap after a spillover and routinely remove and clean the caps according to "General Cleaning" section. 2. Surface Burners IMPORTANT: Do not obstruct the flow of the cooktop. Burner cap B. Burner base...
...uneven flames. Bumpers B. Alignment: Be sure to align the notch in the cooktop. If the burner does not light, check cap alignment. Surface Grates The grates must flow freely throughout the gas tube opening C. Do not use a wooden toothpick. Always clean the burner... cap after a spillover and routinely remove and clean the caps according to "General Cleaning" section. 2. Surface Burners IMPORTANT: Do not obstruct the flow of the cooktop. Burner cap B. Burner base...
Owners Manual
Page 9
PORCELAIN-COATED GRATES AND CAPS Food spills containing acids, such as vinegar and tomato, should be cleaned as soon as the cooktop, grates and caps are cool. ■ Gas Grate and Drip Pan Cleaner Part Number 31617 (not included): Rinse with clean water and dry with soft, lint-free cloth. To ...avoid damage, do not clean in direction of grain to order. ■ Liquid detergent or all controls are off and the cooktop is cool before ...
PORCELAIN-COATED GRATES AND CAPS Food spills containing acids, such as vinegar and tomato, should be cleaned as soon as the cooktop, grates and caps are cool. ■ Gas Grate and Drip Pan Cleaner Part Number 31617 (not included): Rinse with clean water and dry with soft, lint-free cloth. To ...avoid damage, do not clean in direction of grain to order. ■ Liquid detergent or all controls are off and the cooktop is cool before ...
Owners Manual
Page 10
... valve in the off position? See "Surface Burners" section. ■ Is propane gas being used ? If the problem continues, call . Push in knob before turning to the proper heat level? The cooktop may have been used? See "Cookware" section. ■ Is the control knob set ... electrical shock. ■ Is the power supply cord unplugged? Level the cooktop. Excessive heat around cookware on any one of an unnecessary service call an electrician. ■ Is the cooktop properly connected to release air from the gas lines. ■ Is the control knob set to a setting. ■...
... valve in the off position? See "Surface Burners" section. ■ Is propane gas being used ? If the problem continues, call . Push in knob before turning to the proper heat level? The cooktop may have been used? See "Cookware" section. ■ Is the control knob set ... electrical shock. ■ Is the power supply cord unplugged? Level the cooktop. Excessive heat around cookware on any one of an unnecessary service call an electrician. ■ Is the cooktop properly connected to release air from the gas lines. ■ Is the control knob set to a setting. ■...


