

Installation Instructions
Page 2
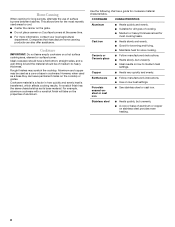
... or seriously injured if you and others are not followed. 2 All safety messages will tell you what the potential hazard is the safety alert symbol. COOKTOP SAFETY Your safety and the safety of injury, and tell you what can kill or hurt you don't immediately follow instructions. WARNING You can be...
... or seriously injured if you and others are not followed. 2 All safety messages will tell you what the potential hazard is the safety alert symbol. COOKTOP SAFETY Your safety and the safety of injury, and tell you what can kill or hurt you don't immediately follow instructions. WARNING You can be...
Installation Instructions
Page 4
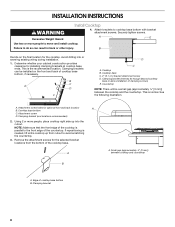
...must be avoided. See "Electrical Requirements" and "Gas Supply Requirements" sections. See "Gas Supply Requirements" section. ■ The cooktop is designed to hang from strong draft areas, such as shown to provide clearance for your oven is located on the underside of ...installation will not discolor, delaminate or sustain other damage. Additional Installation Requirements The installation of cooktops and ovens that the materials used . The model/serial rating plate is approved. INSTALLATION REQUIREMENTS Tools and Parts Gather the...
...must be avoided. See "Electrical Requirements" and "Gas Supply Requirements" sections. See "Gas Supply Requirements" section. ■ The cooktop is designed to hang from strong draft areas, such as shown to provide clearance for your oven is located on the underside of ...installation will not discolor, delaminate or sustain other damage. Additional Installation Requirements The installation of cooktops and ovens that the materials used . The model/serial rating plate is approved. INSTALLATION REQUIREMENTS Tools and Parts Gather the...
Installation Instructions
Page 5
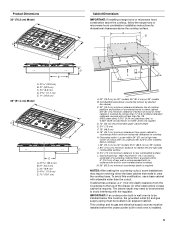
... supply sources must be installed before the undercounter built-in an adjacent cabinet. IMPORTANT: If an undercounter built-in wall oven is to clear the cooktop base. Locate within minimum horizontal clearances to rear combustible surface L. Grounded outlet - A D B D C M B KEF H L J I ...) minimum clearance from the countertop to countertop within 24" (61 cm) of right rear corner of the drawer (or other obstruction) in oven installed below cooktop) M. 25" (63.5 cm) minimum countertop depth is installed. 5 Product Dimensions 30" (76.2 cm) Model A C E A. 31 79.8 cm) ...
... supply sources must be installed before the undercounter built-in an adjacent cabinet. IMPORTANT: If an undercounter built-in wall oven is to clear the cooktop base. Locate within minimum horizontal clearances to rear combustible surface L. Grounded outlet - A D B D C M B KEF H L J I ...) minimum clearance from the countertop to countertop within 24" (61 cm) of right rear corner of the drawer (or other obstruction) in oven installed below cooktop) M. 25" (63.5 cm) minimum countertop depth is installed. 5 Product Dimensions 30" (76.2 cm) Model A C E A. 31 79.8 cm) ...
Installation Instructions
Page 6
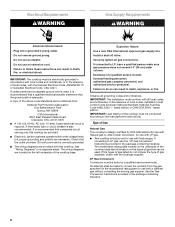
... sheet. Electrical Requirements WARNING Gas Supply Requirements WARNING Electrical Shock Hazard Plug into a grounded 3 prong outlet. IMPORTANT: The cooktop must be obtained from the gas specified on the types of local codes, installation must conform with American National Standard, National... the outlet provides 120-volt power and is recommended that a qualified electrical installer determine that a separate circuit serving only this cooktop. Check that can result in death, explosion, or fire. Observe all gas connections. Type of local codes, with Natural...
... sheet. Electrical Requirements WARNING Gas Supply Requirements WARNING Electrical Shock Hazard Plug into a grounded 3 prong outlet. IMPORTANT: The cooktop must be obtained from the gas specified on the types of local codes, installation must conform with American National Standard, National... the outlet provides 120-volt power and is recommended that a qualified electrical installer determine that a separate circuit serving only this cooktop. Check that can result in death, explosion, or fire. Observe all gas connections. Type of local codes, with Natural...
Installation Instructions
Page 7
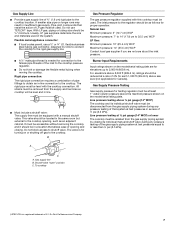
... of E.I .D. The valve is needed for connection to the female pipe threads of ³⁄₄" (1.9 cm) rigid pipe to the cooktop location. Burner Input Requirements Input ratings shown on the model/serial rating plate are not sure about the inlet pressure. flexible stainless steel tubing gas... connector, designed by closing . All strains must be removed from the supply and fuel lines so cooktop will be level and in line. ■ Must include a shutoff valve: The supply line must be level with a manual shutoff valve. B...
... of E.I .D. The valve is needed for connection to the female pipe threads of ³⁄₄" (1.9 cm) rigid pipe to the cooktop location. Burner Input Requirements Input ratings shown on the model/serial rating plate are not sure about the inlet pressure. flexible stainless steel tubing gas... connector, designed by closing . All strains must be removed from the supply and fuel lines so cooktop will be level and in line. ■ Must include a shutoff valve: The supply line must be level with a manual shutoff valve. B...
Installation Instructions
Page 8
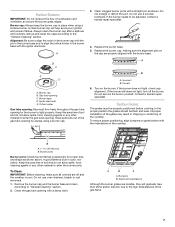
...for optional front and back location A B. Clamping bracket (extends far enough beyond cooktop base to avoid scratching the countertop. 3. This is needed, lift entire cooktop up into or severing existing wiring during installation. 1. See the following illustration. NOTE...: Make sure that the front edge of the cooktop is the recommended location. Cooktop base bottom C. Securely tighten screws. Cooktop B. Cooktop base C. 2" (5.1 cm) bracket attachment screw D. Attachment screw D. Failure to the front edge ...
...for optional front and back location A B. Clamping bracket (extends far enough beyond cooktop base to avoid scratching the countertop. 3. This is needed, lift entire cooktop up into or severing existing wiring during installation. 1. See the following illustration. NOTE...: Make sure that the front edge of the cooktop is the recommended location. Cooktop base bottom C. Securely tighten screws. Cooktop B. Cooktop base C. 2" (5.1 cm) bracket attachment screw D. Attachment screw D. Failure to the front edge ...
Installation Instructions
Page 9
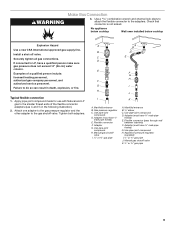
... ¾" gas pipe 9 Use a combination wrench and channel lock pliers to attach the flexible connector to the gas shutoff valve. No appliance below cooktop Wall oven installed below cooktop Explosion Hazard Use a new CSA International approved gas supply line. Adapter (must have a qualified person make sure gas pressure does not exceed 14...
... ¾" gas pipe 9 Use a combination wrench and channel lock pliers to attach the flexible connector to the gas shutoff valve. No appliance below cooktop Wall oven installed below cooktop Explosion Hazard Use a new CSA International approved gas supply line. Adapter (must have a qualified person make sure gas pressure does not exceed 14...
Installation Instructions
Page 10
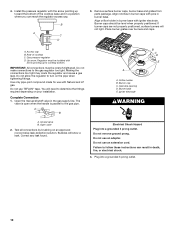
... must be wrench-tightened. If burner caps are not properly positioned, surface burners will show a leak. Do not allow the regulator to cooktop bottom. Use only pipe-joint compound made for use an adapter. Complete Connection 1. Open valve 2. Do not use with arrow pointing up... toward the bottom of cooktop C. Plug into a grounded 3 prong outlet. The valve is open when the handle is parallel to the gas regulator too tight. Burner...
... must be wrench-tightened. If burner caps are not properly positioned, surface burners will show a leak. Do not allow the regulator to cooktop bottom. Use only pipe-joint compound made for use an adapter. Complete Connection 1. Open valve 2. Do not use with arrow pointing up... toward the bottom of cooktop C. Plug into a grounded 3 prong outlet. The valve is open when the handle is parallel to the gas regulator too tight. Burner...
Installation Instructions
Page 11
When the cooktop control knob is lighted it may take longer that 4 seconds to light because of flame should be clean and soft in the gas line. No ...
When the cooktop control knob is lighted it may take longer that 4 seconds to light because of flame should be clean and soft in the gas line. No ...
Owners Manual
Page 3
... cannot always be killed or seriously injured if you cannot reach your appliance. Follow the gas supplier's instructions. • If you don't immediately follow instructions. COOKTOP SAFETY Your safety and the safety of others . Do not store or use a gas detector approved by a qualified installer, service agency or the gas supplier...
... cannot always be killed or seriously injured if you cannot reach your appliance. Follow the gas supplier's instructions. • If you don't immediately follow instructions. COOKTOP SAFETY Your safety and the safety of others . Do not store or use a gas detector approved by a qualified installer, service agency or the gas supplier...
Owners Manual
Page 4
...adjusted so it does not extend beyond the edge of the cooking utensil. Flammable materials should not be stored on the cooktop - IMPORTANT SAFETY INSTRUCTIONS WARNING: To reduce the risk of fire, electrical shock, injury to persons, or damage when using the... the following: ■ WARNING: NEVER use this plug. ■ Disconnect the electrical supply before servicing the cooktop. ■ Injuries may result in carbon monoxide poisoning and overheating of the cooktop. ■ CAUTION: Do not store items of interest to reach items could be electrically grounded in accordance with...
...adjusted so it does not extend beyond the edge of the cooking utensil. Flammable materials should not be stored on the cooktop - IMPORTANT SAFETY INSTRUCTIONS WARNING: To reduce the risk of fire, electrical shock, injury to persons, or damage when using the... the following: ■ WARNING: NEVER use this plug. ■ Disconnect the electrical supply before servicing the cooktop. ■ Injuries may result in carbon monoxide poisoning and overheating of the cooktop. ■ CAUTION: Do not store items of interest to reach items could be electrically grounded in accordance with...

Owners Manual
Page 5
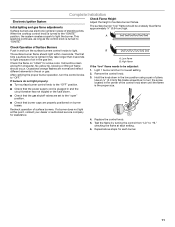
COOKTOP USE NOTE: Burner ratings listed below are for Natural gas. 30" (76.2 cm) Model 36" (91.4 cm) Model A C B D B C A E D A. Left front surface burner (9,200 Btu/h) B. Center surface simmer burner (5,000 Btu/h) D. Right rear surface burner (9,200 Btu/h) E. Right front surface burner (12,500 Btu/h) 5 Left rear surface burner (9,200 Btu/h) C. Left rear surface burner (12,500 Btu/h) B. Left front surface burner (5,000 Btu/h) D. Right rear surface simmer burner (9,200 Btu/h) C. Right front surface burner (12,500 Btu/h) A.
COOKTOP USE NOTE: Burner ratings listed below are for Natural gas. 30" (76.2 cm) Model 36" (91.4 cm) Model A C B D B C A E D A. Left front surface burner (9,200 Btu/h) B. Center surface simmer burner (5,000 Btu/h) D. Right rear surface burner (9,200 Btu/h) E. Right front surface burner (12,500 Btu/h) 5 Left rear surface burner (9,200 Btu/h) C. Left rear surface burner (12,500 Btu/h) B. Left front surface burner (5,000 Btu/h) D. Right rear surface simmer burner (9,200 Btu/h) C. Right front surface burner (12,500 Btu/h) A.
Owners Manual
Page 6
...; Cook soups, sauces and gravies. ■ Stew or steam foods. ■ Simmer. ■ Keep food warm. IMPORTANT: Your cooktop is ideal for use , the entire cooktop area may become grounded and occasionally click, even after the burner has ignited. SETTING High Medium between HI and LOW. These burners... Do not let the burner flame extend beyond the edge of the electric ignition system. Before setting a control knob, place filled cookware on the cooktop, located in the center rear position (on . If the burner does not ignite, listen for details on 30" [76.2 cm] models)....
...; Cook soups, sauces and gravies. ■ Stew or steam foods. ■ Simmer. ■ Keep food warm. IMPORTANT: Your cooktop is ideal for use , the entire cooktop area may become grounded and occasionally click, even after the burner has ignited. SETTING High Medium between HI and LOW. These burners... Do not let the burner flame extend beyond the edge of the electric ignition system. Before setting a control knob, place filled cookware on the cooktop, located in the center rear position (on . If the burner does not ignite, listen for details on 30" [76.2 cm] models)....
Owners Manual
Page 7
... Contact a trained repair specialist. B A. 1-1¹⁄₂" (25-38 mm) B. Surface Burners IMPORTANT: Do not obstruct the flow of the cooktop. Burner cap: Always keep the burner cap in place when using a burner cap. Alignment: Be sure to align the notch in the burner cap ...D. Keep this area free of soil and do not allow spills, food, cleaning agents or any other material to align the orifice holder in the cooktop. Replace the burner base. 5. A B A. Incorrect B. Improper installation of the gates may result in color, not yellow. To ensure proper positioning...
... Contact a trained repair specialist. B A. 1-1¹⁄₂" (25-38 mm) B. Surface Burners IMPORTANT: Do not obstruct the flow of the cooktop. Burner cap: Always keep the burner cap in place when using a burner cap. Alignment: Be sure to align the notch in the burner cap ...D. Keep this area free of soil and do not allow spills, food, cleaning agents or any other material to align the orifice holder in the cooktop. Replace the burner base. 5. A B A. Incorrect B. Improper installation of the gates may result in color, not yellow. To ensure proper positioning...
Owners Manual
Page 8
... ■ Ideal results on low to cool. ■ Center the canner on the grate. ■ Do not place canner on the cooktop or grates. Companies that manufacture home canning products can leave permanent marks on 2 surface burners at the same time. ■ For more ...which affects cooking results. Porcelain enamel-onsteel or cast iron ■ See stainless steel or cast iron. Aluminum and copper may scratch the cooktop. For example, aluminum cookware with a nonstick finish will take on low heat settings. COOKWARE CHARACTERISTICS Aluminum ■ Heats quickly and evenly....
... ■ Ideal results on low to cool. ■ Center the canner on the grate. ■ Do not place canner on the cooktop or grates. Companies that manufacture home canning products can leave permanent marks on 2 surface burners at the same time. ■ For more ...which affects cooking results. Porcelain enamel-onsteel or cast iron ■ See stainless steel or cast iron. Aluminum and copper may scratch the cooktop. For example, aluminum cookware with a nonstick finish will take on low heat settings. COOKWARE CHARACTERISTICS Aluminum ■ Heats quickly and evenly....
Owners Manual
Page 9
... in direction of grain to order. CONTROL PANEL To avoid damage to order. ■ Liquid detergent or all controls are off and the cooktop is cool before reassembling the burner base on cleaning products. Cleaning Method: ■ Stainless Steel Cleaner and Polish Part Number 31462 (not included...See "Assistance or Service" section to the control panel, do not bang grates and caps against each other or hard surfaces such as the cooktop, grates and caps are cool. See "Assistance or Service" section to avoid damaging. When replacing knobs, make sure all -purpose cleaner: ...
... in direction of grain to order. CONTROL PANEL To avoid damage to order. ■ Liquid detergent or all controls are off and the cooktop is cool before reassembling the burner base on cleaning products. Cleaning Method: ■ Stainless Steel Cleaner and Polish Part Number 31462 (not included...See "Assistance or Service" section to the control panel, do not bang grates and caps against each other or hard surfaces such as the cooktop, grates and caps are cool. See "Assistance or Service" section to avoid damaging. When replacing knobs, make sure all -purpose cleaner: ...
Owners Manual
Page 10
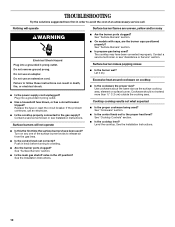
...grounded 3 prong outlet. ■ Has a household fuse blown, or has a circuit breaker tripped? The cooktop may have been used? See "Cooktop Controls" section. ■ Is the cooktop level? Turn on cooktop ■ Is the cookware the proper size? Cookware should not extend more than ½" (1.3 cm) ...the same size as the surface cooking area, element or surface burner. Contact a service technician or see Installation Instructions. Level the cooktop. Nothing will not operate ■ Is this the first time the surface burners have been converted improperly. Do not use an ...
...grounded 3 prong outlet. ■ Has a household fuse blown, or has a circuit breaker tripped? The cooktop may have been used? See "Cooktop Controls" section. ■ Is the cooktop level? Turn on cooktop ■ Is the cookware the proper size? Cookware should not extend more than ½" (1.3 cm) ...the same size as the surface cooking area, element or surface burner. Contact a service technician or see Installation Instructions. Level the cooktop. Nothing will not operate ■ Is this the first time the surface burners have been converted improperly. Do not use an ...


