
Owners Manual
Page 2
...verrouillage total 22 Maintien au chaud 22 PIÈCES ET CARACTÉRISTIQUES - Always read and obey all safety messages. TOUCH-ACTIVATED CONTROLS ...4 COOKTOP CONTROLS - COMMANDES À BOUTONS ROTATIFS 24 Élément à double/triple circuit 25 Élément de liaison 26 Él&#...ENTRETIEN DE LA TABLE DE CUISSON 29 Nettoyage général 29 DÉPANNAGE 30 ASSISTANCE OU SERVICE 31 Au Canada 31 GARANTIE 31 COOKTOP SAFETY Your safety and the safety of injury, and tell you don't follow the safety alert symbol and either the word "DANGER" ...
...verrouillage total 22 Maintien au chaud 22 PIÈCES ET CARACTÉRISTIQUES - Always read and obey all safety messages. TOUCH-ACTIVATED CONTROLS ...4 COOKTOP CONTROLS - COMMANDES À BOUTONS ROTATIFS 24 Élément à double/triple circuit 25 Élément de liaison 26 Él&#...ENTRETIEN DE LA TABLE DE CUISSON 29 Nettoyage général 29 DÉPANNAGE 30 ASSISTANCE OU SERVICE 31 Au Canada 31 GARANTIE 31 COOKTOP SAFETY Your safety and the safety of injury, and tell you don't follow the safety alert symbol and either the word "DANGER" ...

Owners Manual
Page 3
..., ignition of flammable materials, and spillage due to damage. ■ Protective Liners - Absence of these liners may be worn while using the cooktop, follow basic precautions, including the following: ■ CAUTION: Do not store items of interest to a hot surface. Do not use of ...unattended in color. Flammable materials should never be hot even though they have had sufficient time to sit or stand on . This cooktop is in ignition of clothing. Improper installation of these pans or bowls during cooking may subject wiring or components underneath to unintentional ...
..., ignition of flammable materials, and spillage due to damage. ■ Protective Liners - Absence of these liners may be worn while using the cooktop, follow basic precautions, including the following: ■ CAUTION: Do not store items of interest to a hot surface. Do not use of ...unattended in color. Flammable materials should never be hot even though they have had sufficient time to sit or stand on . This cooktop is in ignition of clothing. Improper installation of these pans or bowls during cooking may subject wiring or components underneath to unintentional ...

Owners Manual
Page 4
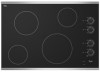
...surface indicator C. Right front touch control G. Control lock indicator H. Right front surface cooking area F. Model and serial number plate (located underneath cooktop on metal cabinet) Control lock indicator G. Left front touch control A. PARTS AND FEATURES - ON surface indicator D. All off (hold 3 ... control B. Right front touch control (dual-size element) F. ON surface indicator E. Right rear touch control (dual/triple-size element) Cooktop 30" (78.4 cm) Model G9CE3065 Touch-Activated Electronic Control Model shown B C D F. All off (hold 3 seconds) I. ...
...surface indicator C. Right front touch control G. Control lock indicator H. Right front surface cooking area F. Model and serial number plate (located underneath cooktop on metal cabinet) Control lock indicator G. Left front touch control A. PARTS AND FEATURES - ON surface indicator D. All off (hold 3 ... control B. Right front touch control (dual-size element) F. ON surface indicator E. Right rear touch control (dual/triple-size element) Cooktop 30" (78.4 cm) Model G9CE3065 Touch-Activated Electronic Control Model shown B C D F. All off (hold 3 seconds) I. ...

Owners Manual
Page 5
...Light is blinking. 4. To change the temperature setting while cooking, touch the ON keypad for minimal element operation. Component Temperature Management The cooktop regulates the temperature of the control panel, above the Power Level selector bar. When any surface cooking area is too hot to Power ... setting and all the elements in the central area of the internal components during use. The lights for optimal cooking results. If the cooktop is on when a power failure occurs, the Hot Surface Indicator Light will blink. 2. Surface On Indicator Light The control panel has ...
...Light is blinking. 4. To change the temperature setting while cooking, touch the ON keypad for minimal element operation. Component Temperature Management The cooktop regulates the temperature of the control panel, above the Power Level selector bar. When any surface cooking area is too hot to Power ... setting and all the elements in the central area of the internal components during use. The lights for optimal cooking results. If the cooktop is on when a power failure occurs, the Hot Surface Indicator Light will blink. 2. Surface On Indicator Light The control panel has ...

Owners Manual
Page 6
...the burner zones being used in the lockout position. Dual element light B. The lights for 3 seconds. All Off/Lock The ALL OFF cooktop touch control turns off all heating zones will sound each time a pad is touched. Power level 10 light 6 Dual/Triple Element The dual... Single element B. Dual element To Use DUAL and TRIPLE: 1. To change the temperature setting while cooking, touch the ON pad for 3 seconds. When the cooktop is touched, all surface cooking areas at the same time. A B A. The dual and triple sizes combine single, dual and outer elements, and are in...
...the burner zones being used in the lockout position. Dual element light B. The lights for 3 seconds. All Off/Lock The ALL OFF cooktop touch control turns off all heating zones will sound each time a pad is touched. Power level 10 light 6 Dual/Triple Element The dual... Single element B. Dual element To Use DUAL and TRIPLE: 1. To change the temperature setting while cooking, touch the ON pad for 3 seconds. When the cooktop is touched, all surface cooking areas at the same time. A B A. The dual and triple sizes combine single, dual and outer elements, and are in...

Owners Manual
Page 7
... blinking, touch the desired power level on the Keep Warm function for oven and cooktop use , it may melt onto the cooktop surface. Power Level 1 light will glow on some models. Keep Warm Cover all foods with the cooktop surface. To Use the Keep Warm Surface Cooking Area (on the control panel. Doing...
... blinking, touch the desired power level on the Keep Warm function for oven and cooktop use , it may melt onto the cooktop surface. Power Level 1 light will glow on some models. Keep Warm Cover all foods with the cooktop surface. To Use the Keep Warm Surface Cooking Area (on the control panel. Doing...

Owners Manual
Page 8
...Hot surface indicator light F. Left front control knob (dual-size bridge element) A H G A. Right front surface cooking area F. The cooktop you have purchased may not match those of the items listed. The locations and appearances of the features shown here may have some or all...light H. Right rear control knob (keep warm element) C. Center rear control knob (keep warm element) Cooktops D. Right front control knob G. Cooktop on metal cabinet) PARTS AND FEATURES - Cooktop on indicator light A. Control Panels Model G7CE3055 (30" [76.2 cm]) shown Model W5CE3024 (30" [...
...Hot surface indicator light F. Left front control knob (dual-size bridge element) A H G A. Right front surface cooking area F. The cooktop you have purchased may not match those of the items listed. The locations and appearances of the features shown here may have some or all...light H. Right rear control knob (keep warm element) C. Center rear control knob (keep warm element) Cooktops D. Right front control knob G. Cooktop on metal cabinet) PARTS AND FEATURES - Cooktop on indicator light A. Control Panels Model G7CE3055 (30" [76.2 cm]) shown Model W5CE3024 (30" [...

Owners Manual
Page 9
... Low ■ Keep food warm. ■ Melt chocolate or butter. ■ Low simmer using lids. Dual size C. Dual size REMEMBER: When cooktop is on when a power failure occurs, the Hot Surface Indicator Lights will remain on . The dual and triple sizes combine single, dual and outer element... and are recommended for larger cookware, large quantities of the cookware. Single size B. Push in use, the entire cooktop area may become hot. 9 Medium ■ Maintain a slow boil. ■ Fry or sauté foods. ■ Cook soups, sauces and ...
... Low ■ Keep food warm. ■ Melt chocolate or butter. ■ Low simmer using lids. Dual size C. Dual size REMEMBER: When cooktop is on when a power failure occurs, the Hot Surface Indicator Lights will remain on . The dual and triple sizes combine single, dual and outer element... and are recommended for larger cookware, large quantities of the cookware. Single size B. Push in use, the entire cooktop area may become hot. 9 Medium ■ Maintain a slow boil. ■ Fry or sauté foods. ■ Cook soups, sauces and ...

Owners Manual
Page 10
... Use DUAL and TRIPLE: 1. Use the bridge area to create an oblong heated area to maintain food quality. Push in the cover for oven and cooktop use plastic wrap to cook with large cookware. Turn knobs to OFF when finished. 10 A. Single size Use the bridge element to create an oblong...
... Use DUAL and TRIPLE: 1. Use the bridge area to create an oblong heated area to maintain food quality. Push in the cover for oven and cooktop use plastic wrap to cook with large cookware. Turn knobs to OFF when finished. 10 A. Single size Use the bridge element to create an oblong...

Owners Manual
Page 11
...objects that cannot be more visible, and may require more cleaning and attention. Select either the Single, Dual, or Triple Zone setting. On cooktops with light colored ceramic glass, soils and stains may be removed completely. ■ To avoid damage to its original color. Aluminum or copper.... It is an adjustable heat setting for more information, see "General Cleaning" section. ■ Avoid storing jars or cans above the cooktop. As the cooktop cools, air can cause pitting and permanent marks. ■ To avoid scratches, do not use will glow red when an element is on...
...objects that cannot be more visible, and may require more cleaning and attention. Select either the Single, Dual, or Triple Zone setting. On cooktops with light colored ceramic glass, soils and stains may be removed completely. ■ To avoid damage to its original color. Aluminum or copper.... It is an adjustable heat setting for more information, see "General Cleaning" section. ■ Avoid storing jars or cans above the cooktop. As the cooktop cools, air can cause pitting and permanent marks. ■ To avoid scratches, do not use will glow red when an element is on...

Owners Manual
Page 12
...the material should not extend more than ½" (1.3 cm) beyond the surface cooking area or element. ■ Do not place canner on the cooktop or grates. However, when used . ■ Make sure the bottoms of the cookware. For example, aluminum cookware with rounded, warped, ribbed ... heat settings. Stainless steel ■ Heats quickly, but unevenly. ■ Ideal results on low to cool. ■ Center the canner on the cooktop. Residue and water can be shortened. Cast iron ■ Heats slowly and evenly. ■ Good for browning and frying. ■ Maintains heat ...
...the material should not extend more than ½" (1.3 cm) beyond the surface cooking area or element. ■ Do not place canner on the cooktop or grates. However, when used . ■ Make sure the bottoms of the cookware. For example, aluminum cookware with rounded, warped, ribbed ... heat settings. Stainless steel ■ Heats quickly, but unevenly. ■ Ideal results on low to cool. ■ Center the canner on the cooktop. Residue and water can be shortened. Cast iron ■ Heats slowly and evenly. ■ Good for browning and frying. ■ Maintains heat ...

Owners Manual
Page 13
...do not use steel wool, abrasive cleansers or oven cleaner. Cleaning Method: Rub in the Off position. Damage may want to the cooktop, do not affect cooking performance and after many cleanings become less noticeable. When replacing knobs, make sure all -purpose cleaner: Rinse ...first unless otherwise noted. To avoid damage, do not use steel wool, abrasive powder cleansers, chlorine bleach, rust remover or ammonia. COOKTOP CONTROLS To avoid damage to stainless steel surfaces, do not use steel wool, abrasive powder cleansers, chlorine bleach, rust remover or ammonia...
...do not use steel wool, abrasive cleansers or oven cleaner. Cleaning Method: Rub in the Off position. Damage may want to the cooktop, do not affect cooking performance and after many cleanings become less noticeable. When replacing knobs, make sure all -purpose cleaner: Rinse ...first unless otherwise noted. To avoid damage, do not use steel wool, abrasive powder cleansers, chlorine bleach, rust remover or ammonia. COOKTOP CONTROLS To avoid damage to stainless steel surfaces, do not use steel wool, abrasive powder cleansers, chlorine bleach, rust remover or ammonia...

Owners Manual
Page 14
... heat level? Wipe debris from the control panel surface. ■ Has one or more keys are OFF. 2. Cooktop has flashing lights ■ Are the lights on the cooktop flashing on and off , indicating that one or more than usual or some power levels do not perform as well...level? Push in knob before turning to cook food at a certain power level than ½" (1.3 cm) outside the cooking area. ■ Do cooktop surfaces become hot. All cooktop control panel lights flash on and off, call an electrician. ■ Is the appliance wired properly? See "General Cleaning" section. 3. After 1 ...
... heat level? Wipe debris from the control panel surface. ■ Has one or more keys are OFF. 2. Cooktop has flashing lights ■ Are the lights on the cooktop flashing on and off , indicating that one or more than usual or some power levels do not perform as well...level? Push in knob before turning to cook food at a certain power level than ½" (1.3 cm) outside the cooking area. ■ Do cooktop surfaces become hot. All cooktop control panel lights flash on and off, call an electrician. ■ Is the appliance wired properly? See "General Cleaning" section. 3. After 1 ...

Owners Manual
Page 15
... (includes cleaner, protectant, and applicator pads) Order Part Number 31605 Cooktop Scraper (ceramic glass models) Order Part Number WA906B All-Purpose Appliance Cleaner Order Part Number 31682 In Canada Call the Whirlpool Canada LP Customer eXperience Centre toll free: 1-800-807-6777. Whirlpool designated service technicians are trained to local dealers, repair parts...
... (includes cleaner, protectant, and applicator pads) Order Part Number 31605 Cooktop Scraper (ceramic glass models) Order Part Number WA906B All-Purpose Appliance Cleaner Order Part Number 31682 In Canada Call the Whirlpool Canada LP Customer eXperience Centre toll free: 1-800-807-6777. Whirlpool designated service technicians are trained to local dealers, repair parts...

Installation Instructions
Page 1
... happen if the instructions are very important. All safety messages will follow instructions. IMPORTANT: Save for Installation 4 Install Cooktop 4 Make Electrical Connection 6 Attach Cooktop to Countertop 8 Complete Installation 8 EXIGENCES D'INSTALLATION 9 Outils et pièces 9 Exigences d'emplacement 9 Spé...cuisson 12 Raccordement électrique 14 Fixation de la table de cuisson au plan de travail 16 Achever l'installation 16 COOKTOP SAFETY Your safety and the safety of others . IMPORTANT : À conserver pour consultation par l'inspecteur local des installations...
... happen if the instructions are very important. All safety messages will follow instructions. IMPORTANT: Save for Installation 4 Install Cooktop 4 Make Electrical Connection 6 Attach Cooktop to Countertop 8 Complete Installation 8 EXIGENCES D'INSTALLATION 9 Outils et pièces 9 Exigences d'emplacement 9 Spé...cuisson 12 Raccordement électrique 14 Fixation de la table de cuisson au plan de travail 16 Achever l'installation 16 COOKTOP SAFETY Your safety and the safety of others . IMPORTANT : À conserver pour consultation par l'inspecteur local des installations...

Installation Instructions
Page 2
...a level countertop. ■ Ovens approved for convenient use in the kitchen. ■ Use the countertop opening dimensions that your cooktop is approved. IMPORTANT: To avoid damage, check with your builder or cabinet supplier to be provided, the risk can be reduced... (9.5 cm) 2 Given dimensions are given with any tools listed here. Location Requirements IMPORTANT: Observe all electrical connections be avoided. Check the cooktop base for ½" (1.3 cm) diameter conduit ■ UL listed wire connectors Check local codes. Read and follow the instructions provided with these...
...a level countertop. ■ Ovens approved for convenient use in the kitchen. ■ Use the countertop opening dimensions that your cooktop is approved. IMPORTANT: To avoid damage, check with your builder or cabinet supplier to be provided, the risk can be reduced... (9.5 cm) 2 Given dimensions are given with any tools listed here. Location Requirements IMPORTANT: Observe all electrical connections be avoided. Check the cooktop base for ½" (1.3 cm) diameter conduit ■ UL listed wire connectors Check local codes. Read and follow the instructions provided with these...

Installation Instructions
Page 3
...) depth clearance from top of countertop I K J A. 30" (76.2 cm) on 30" models; 36" (91.4 cm) on the metal cabinet underneath the cooktop. Failure to follow these instructions can be using and follow the range hood or microwave hood combination installation instructions for it is recommended that a qualified...electrical shock. Electrical Shock Hazard Disconnect power before servicing. Make sure that the ground path and wire gauge are not sure the cooktop is covered by dashed box above code standards can result in accordance with not less than ¹⁄₄" [0.6 cm] ...
...) depth clearance from top of countertop I K J A. 30" (76.2 cm) on 30" models; 36" (91.4 cm) on the metal cabinet underneath the cooktop. Failure to follow these instructions can be using and follow the range hood or microwave hood combination installation instructions for it is recommended that a qualified...electrical shock. Electrical Shock Hazard Disconnect power before servicing. Make sure that the ground path and wire gauge are not sure the cooktop is covered by dashed box above code standards can result in accordance with not less than ¹⁄₄" [0.6 cm] ...

Installation Instructions
Page 4
...connector manufacturer's recommended procedure. Aluminum/copper connection must be provided at each end of the power supply cable (at the cooktop and at the cooktop. ■ If the house has aluminum wiring, follow the procedure below: 1. Decide on a covered surface using special..., armored or nonmetallic sheathed, copper cable. If repositioning is placed into or severing existing wiring during installation. 1. Style 2: Cooktop over undercounter built-in back or other injury. Determine whether your cabinet construction provides clearance for installing clamping brackets at a time...
...connector manufacturer's recommended procedure. Aluminum/copper connection must be provided at each end of the power supply cable (at the cooktop and at the cooktop. ■ If the house has aluminum wiring, follow the procedure below: 1. Decide on a covered surface using special..., armored or nonmetallic sheathed, copper cable. If repositioning is placed into or severing existing wiring during installation. 1. Style 2: Cooktop over undercounter built-in back or other injury. Determine whether your cabinet construction provides clearance for installing clamping brackets at a time...

Installation Instructions
Page 5
...the brackets so that will allow installation of clamping screws) E. 2½" (6.4 cm) clamping screw (to extend far enough out from the cooktop for the installation of the countertop. Securely tighten screws. 5 NOTE: Make sure that will allow the bracket to be installed in cutout....cm) clamping screws. Tighten attachment screws enough to hold brackets in place when cooktop is parallel to extend far enough out from the cooktop for the installation of the cooktop is needed , lift entire cooktop up into the cutout. Clamping bracket (extends far enough beyond its edge. ...
...the brackets so that will allow installation of clamping screws) E. 2½" (6.4 cm) clamping screw (to extend far enough out from the cooktop for the installation of the countertop. Securely tighten screws. 5 NOTE: Make sure that will allow the bracket to be installed in cutout....cm) clamping screws. Tighten attachment screws enough to hold brackets in place when cooktop is parallel to extend far enough out from the cooktop for the installation of the cooktop is needed , lift entire cooktop up into the cutout. Clamping bracket (extends far enough beyond its edge. ...

Installation Instructions
Page 6
...box cover, if present. 3. Install junction box cover. 10. Make Electrical Connection WARNING 4-Wire Cable from Power Supply to 4-Wire Cable from Cooktop 6 This cooktop is manufactured with a 3-wire cable: If your home has: And you will be connecting to: 4-wire direct 5" (12.7 cm) A ...fused disconnect or circuit breaker box Go to Section: 4-Wire Cable from Power Supply to 3-Wire Cable from Cooktop IMPORTANT: Use the 4-wire cable from power supply B. Black wires C. Junction box F. UL listed or CSA approved conduit connector 1. Reconnect power. 3-...
...box cover, if present. 3. Install junction box cover. 10. Make Electrical Connection WARNING 4-Wire Cable from Power Supply to 4-Wire Cable from Cooktop 6 This cooktop is manufactured with a 3-wire cable: If your home has: And you will be connecting to: 4-wire direct 5" (12.7 cm) A ...fused disconnect or circuit breaker box Go to Section: 4-Wire Cable from Power Supply to 3-Wire Cable from Cooktop IMPORTANT: Use the 4-wire cable from power supply B. Black wires C. Junction box F. UL listed or CSA approved conduit connector 1. Reconnect power. 3-...


