

Owners Manual
Page 4
... surface indicator E. Left rear touch control B. Hot surface indicator I H G A. Left front touch control A. Right rear touch control (dual/triple-size element) Cooktop 30" (78.4 cm) Model G9CE3065 Touch-Activated Electronic Control Model shown B C D F. Control lock indicator H. Increase/decrease temperature touch control J. Left front touch control A H G A. Left rear surface cooking area C. Right rear surface...
... surface indicator E. Left rear touch control B. Hot surface indicator I H G A. Left front touch control A. Right rear touch control (dual/triple-size element) Cooktop 30" (78.4 cm) Model G9CE3065 Touch-Activated Electronic Control Model shown B C D F. Control lock indicator H. Increase/decrease temperature touch control J. Left front touch control A H G A. Left rear surface cooking area C. Right rear surface...

Owners Manual
Page 6
... outer elements, and are in the lockout position. After 3 seconds, ALL OFF/LOCK will automatically shut off all surface cooking areas that the cooktop controls are in use 1,2, or 3 zones respectively. Dual size C. Single element B. While the Power Level 1 light is locked out, the... surface cooking areas cannot be turned on some models) A B C Dual Element A. Power level selector bar A beep will glow. NOTE: If a power level setting is blinking. To change the activated ...
... outer elements, and are in the lockout position. After 3 seconds, ALL OFF/LOCK will automatically shut off all surface cooking areas that the cooktop controls are in use 1,2, or 3 zones respectively. Dual size C. Single element B. While the Power Level 1 light is locked out, the... surface cooking areas cannot be turned on some models) A B C Dual Element A. Power level selector bar A beep will glow. NOTE: If a power level setting is blinking. To change the activated ...

Owners Manual
Page 7
.... It is in food poisoning or sickness. One hour is available on the control panel. Power Level 1 light will glow on some models): 1. Food quality may melt onto the cooktop surface. To Use the Keep Warm Surface Cooking Area (on the Keep Warm function for heating cold foods. Use only cookware and... dishes recommended for more than 30 to 45 minutes. WARNING Food Poisoning Hazard Do not let food sit for oven and cooktop use, and those that have flat bottoms to make direct contact with a lid or aluminum foil. Keep Warm Cover all foods with the...
.... It is in food poisoning or sickness. One hour is available on the control panel. Power Level 1 light will glow on some models): 1. Food quality may melt onto the cooktop surface. To Use the Keep Warm Surface Cooking Area (on the Keep Warm function for heating cold foods. Use only cookware and... dishes recommended for more than 30 to 45 minutes. WARNING Food Poisoning Hazard Do not let food sit for oven and cooktop use, and those that have flat bottoms to make direct contact with a lid or aluminum foil. Keep Warm Cover all foods with the...

Owners Manual
Page 8
... the features shown here may have some or all of your model. Right rear control knob (keep warm element) C. ACCUSIMMER® control knob Model G7CE 3655 (36" [91.4 cm]) shown B C D E. The cooktop you have purchased may not match those of the items listed... rear surface cooking area (with triple-size element) D. Model and serial number plate (located underneath cooktop on indicator light H. Center rear control knob (keep warm element) Cooktops D. Center rear control knob C. Left front control knob E. Cooktop on indicator light A. Hot surface indicator light F. Control ...
... the features shown here may have some or all of your model. Right rear control knob (keep warm element) C. ACCUSIMMER® control knob Model G7CE 3655 (36" [91.4 cm]) shown B C D E. The cooktop you have purchased may not match those of the items listed... rear surface cooking area (with triple-size element) D. Model and serial number plate (located underneath cooktop on indicator light H. Center rear control knob (keep warm element) Cooktops D. Center rear control knob C. Left front control knob E. Cooktop on indicator light A. Hot surface indicator light F. Control ...

Owners Manual
Page 9
... element and are recommended for larger cookware, large quantities of food, and home canning. Dual size REMEMBER: When cooktop is on Standard Control models) The Hot Surface Indicator Lights will remain on until the cooktop has cooled completely. To Use: 1. Medium Low ■ Stew or steam food. ■ Simmer. Triple size A B A. Medium High...
... element and are recommended for larger cookware, large quantities of food, and home canning. Dual size REMEMBER: When cooktop is on Standard Control models) The Hot Surface Indicator Lights will remain on until the cooktop has cooled completely. To Use: 1. Medium Low ■ Stew or steam food. ■ Simmer. Triple size A B A. Medium High...

Owners Manual
Page 10
... area to create an oblong heated area to OFF when finished. To use , it to maintain food quality. Warm Zone Element (on some models) WARNING Food Poisoning Hazard Do not let food sit for different levels of the other surface cooking areas are being used to cover food. When...melt. ■ Use pot holders or oven mitts to OFF when finished. Push in the cover for oven and cooktop use SINGLE (A): 1. Turn knob to remove food. Bridge Element (on some models) The bridge element allows flexibility in and turn front left side cooking area. Single size B. Turn knob to OFF...
... area to create an oblong heated area to OFF when finished. To use , it to maintain food quality. Warm Zone Element (on some models) WARNING Food Poisoning Hazard Do not let food sit for different levels of the other surface cooking areas are being used to cover food. When...melt. ■ Use pot holders or oven mitts to OFF when finished. Push in the cover for oven and cooktop use SINGLE (A): 1. Turn knob to remove food. Bridge Element (on some models) The bridge element allows flexibility in and turn front left side cooking area. Single size B. Turn knob to OFF...

Owners Manual
Page 11
... require more cleaning and attention. Then, while wearing oven mitts, remove the spills using lids. COOKTOP USE Ceramic Glass (on some models) The ACCUSIMMER® feature setting is set on some models) The surface cooking area will glow red when an element is removed. ■ For foods... containing sugar in prepackaged aluminum containers on the cooktop. Cleaning off to cool down , they can adhere to change color when surface...
... require more cleaning and attention. Then, while wearing oven mitts, remove the spills using lids. COOKTOP USE Ceramic Glass (on some models) The ACCUSIMMER® feature setting is set on some models) The surface cooking area will glow red when an element is removed. ■ For foods... containing sugar in prepackaged aluminum containers on the cooktop. Cleaning off to cool down , they can adhere to change color when surface...

Owners Manual
Page 12
... efficiency. Cookware should be visible between batches. Cookware with slightly indented bottoms or small expansion channels can leave permanent marks on the cooktop. While you rotate the ruler, no space or light should not extend more information, contact your local agricultural department. Home Canning ...canning for long periods, alternate the use only flat-bottomed canners. ■ On coil element models, the installation of a Canning Unit Kit is best for all types of the cookware. On electric cooktops, canners should be used as a guide for the most cooking tasks. If a kit is...
... efficiency. Cookware should be visible between batches. Cookware with slightly indented bottoms or small expansion channels can leave permanent marks on the cooktop. While you rotate the ruler, no space or light should not extend more information, contact your local agricultural department. Home Canning ...canning for long periods, alternate the use only flat-bottomed canners. ■ On coil element models, the installation of a Canning Unit Kit is best for all types of the cookware. On electric cooktops, canners should be used as a guide for the most cooking tasks. If a kit is...

Owners Manual
Page 13
...Rub creme into soil with damp paper towel. When cleaning the cooktop with creme and paper towel. Do not use soap-filled scouring pads, abrasive cleaners, Cooktop Polishing Creme, steel-wool pads, gritty washcloths or some models) To avoid damage to stainless steel surfaces, do not use... to help avoid scratches, pitting and abrasions, and to the cooktop controls, do not affect cooking performance and ...
...Rub creme into soil with damp paper towel. When cleaning the cooktop with creme and paper towel. Do not use soap-filled scouring pads, abrasive cleaners, Cooktop Polishing Creme, steel-wool pads, gritty washcloths or some models) To avoid damage to stainless steel surfaces, do not use... to help avoid scratches, pitting and abrasions, and to the cooktop controls, do not affect cooking performance and ...

Owners Manual
Page 15
... Part Number 242905 Cooktop Cleaner (ceramic glass models) Order Part Number 31464 Cooktop Protectant (ceramic glass models) Order Part Number 31463 Cooktop Care Kit (includes cleaner, protectant, and applicator pads) Order Part Number 31605 Cooktop Scraper (ceramic glass models) Order Part Number WA906B All-Purpose Appliance Cleaner Order Part Number 31682 In Canada Call the Whirlpool Canada LP...
... Part Number 242905 Cooktop Cleaner (ceramic glass models) Order Part Number 31464 Cooktop Protectant (ceramic glass models) Order Part Number 31463 Cooktop Care Kit (includes cleaner, protectant, and applicator pads) Order Part Number 31605 Cooktop Scraper (ceramic glass models) Order Part Number WA906B All-Purpose Appliance Cleaner Order Part Number 31682 In Canada Call the Whirlpool Canada LP...

Installation Instructions
Page 2
...dimensions are given with any tools listed here. Product Dimensions B A C A. 21¾" (55.2 cm) B. 30" (76.2 cm) models - 30 78.4 cm) 36" (91.4 cm) models - 36 92.3 cm) C. 3¾" (9.5 cm) 2 INSTALLATION REQUIREMENTS Tools and Parts Gather the required tools and parts before starting installation. ... the heated surface units, cabinet storage space located above the surface units should be located for convenient use in oven. Check the cooktop base for ½" (1.3 cm) diameter conduit ■ UL listed wire connectors Check local codes. Refer to oven manufacturer's Installation...
...dimensions are given with any tools listed here. Product Dimensions B A C A. 21¾" (55.2 cm) B. 30" (76.2 cm) models - 30 78.4 cm) 36" (91.4 cm) models - 36 92.3 cm) C. 3¾" (9.5 cm) 2 INSTALLATION REQUIREMENTS Tools and Parts Gather the required tools and parts before starting installation. ... the heated surface units, cabinet storage space located above the surface units should be located for convenient use in oven. Check the cooktop base for ½" (1.3 cm) diameter conduit ■ UL listed wire connectors Check local codes. Refer to oven manufacturer's Installation...

Installation Instructions
Page 3
...local codes and ordinances. See the following illustration. Model W5CE3024 does not have a neutral (white) wire. Failure to cooktop H. Check with local codes. A A. Model/serial number plate ■ The cooktop is located on the metal cabinet underneath the cooktop. Combustible area above countertop (shown by not less... installations may require notching down the base cabinet side walls to clear the cooktop base. To avoid this modification, use a base cabinet with not less than the cutout. The model/serial number rating plate is rated 120/240 volt. Electrical Shock Hazard Disconnect...
...local codes and ordinances. See the following illustration. Model W5CE3024 does not have a neutral (white) wire. Failure to cooktop H. Check with local codes. A A. Model/serial number plate ■ The cooktop is located on the metal cabinet underneath the cooktop. Combustible area above countertop (shown by not less... installations may require notching down the base cabinet side walls to clear the cooktop base. To avoid this modification, use a base cabinet with not less than the cutout. The model/serial number rating plate is rated 120/240 volt. Electrical Shock Hazard Disconnect...

Installation Instructions
Page 4
... bottom B. Clamping bracket 2. Use the length of the power supply cable (at the cooktop and at cooktop base ends. 30" (76.2 cm) traditional knob models B C A B C A. Connect the aluminum wiring to do so can be provided at each end of conduit provided. ■ A UL listed or CSA approved conduit connector must ...
... bottom B. Clamping bracket 2. Use the length of the power supply cable (at the cooktop and at cooktop base ends. 30" (76.2 cm) traditional knob models B C A B C A. Connect the aluminum wiring to do so can be provided at each end of conduit provided. ■ A UL listed or CSA approved conduit connector must ...
Dimension Guide
Page 1
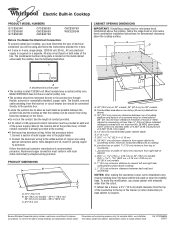
...) minimum from upper cabinet to countertop within minimum horizontal clearances to change without notice. W10346695A 2/28/11 Model/serial number plate q The cooktop is already provided at the junction box). The flexible, armored cable extending from the fuse box or circuit...to change materials and specifications without notice. Because Whirlpool Corporation policy includes a continuous commitment to clear the cooktop base. CABINET OPENING DIMENSIONS IMPORTANT: If installing a range hood or microwave hood combination above the cooktop, follow the procedure below: 1. A listed ...
...) minimum from upper cabinet to countertop within minimum horizontal clearances to change without notice. W10346695A 2/28/11 Model/serial number plate q The cooktop is already provided at the junction box). The flexible, armored cable extending from the fuse box or circuit...to change materials and specifications without notice. Because Whirlpool Corporation policy includes a continuous commitment to clear the cooktop base. CABINET OPENING DIMENSIONS IMPORTANT: If installing a range hood or microwave hood combination above the cooktop, follow the procedure below: 1. A listed ...


