

Owners Manual
Page 3
... dry chemical or foam-type extinguisher. ■ Use Only Dry Potholders - If cooktop should not be careful to avoid steam burn. SAVE THESE INSTRUCTIONS 3 This cooktop is properly installed and grounded by a qualified technician. ■ Never Use Your Cooktop for cooktop service without breaking due to the sudden change in temperature. ■...
... dry chemical or foam-type extinguisher. ■ Use Only Dry Potholders - If cooktop should not be careful to avoid steam burn. SAVE THESE INSTRUCTIONS 3 This cooktop is properly installed and grounded by a qualified technician. ■ Never Use Your Cooktop for cooktop service without breaking due to the sudden change in temperature. ■...

Owners Manual
Page 12
...■ Determine flatness by placing the straight edge of a ruler across the bottom of the cookware. If a kit is not installed, the life of the coil element will take on stainless steel provides even heating. 12 COOKWARE CHARACTERISTICS Aluminum ■ Heats quickly ...A. Cookware/canner C. ½" (1.3 cm) maximum overhang ■ Use flat-bottomed cookware for slow cooking. Ceramic or Ceramic glass ■ Follow manufacturer's instructions. ■ Heats slowly, but unevenly. ■ A core or base of pots and pans are clean and dry before using them. ■ Use ...
...■ Determine flatness by placing the straight edge of a ruler across the bottom of the cookware. If a kit is not installed, the life of the coil element will take on stainless steel provides even heating. 12 COOKWARE CHARACTERISTICS Aluminum ■ Heats quickly ...A. Cookware/canner C. ½" (1.3 cm) maximum overhang ■ Use flat-bottomed cookware for slow cooking. Ceramic or Ceramic glass ■ Follow manufacturer's instructions. ■ Heats slowly, but unevenly. ■ A core or base of pots and pans are clean and dry before using them. ■ Use ...

Owners Manual
Page 14
... ? See "Cooktop Controls" section. ■ Is the appliance level? Allow the cooktop to cool down for service. See Installation Instructions. The cooktop regulates the temperature of the internal components and automatically reduces the power of an unnecessary service call an electrician. ■...at a certain power level than ½" (1.3 cm) outside the cooking area. ■ Do cooktop surfaces become hot. See the Installation Instructions. ■ Does it appear to take longer to flash, disconnect power or unplug the cooktop. 4. Cookware should not extend more keys ...
... ? See "Cooktop Controls" section. ■ Is the appliance level? Allow the cooktop to cool down for service. See Installation Instructions. The cooktop regulates the temperature of the internal components and automatically reduces the power of an unnecessary service call an electrician. ■...at a certain power level than ½" (1.3 cm) outside the cooking area. ■ Do cooktop surfaces become hot. See the Installation Instructions. ■ Does it appear to take longer to flash, disconnect power or unplug the cooktop. 4. Cookware should not extend more keys ...

Owners Manual
Page 15
...at 1-866-664-2449 and follow the instructions below. When calling, please know the purchase date and the complete model and serial number of a service call the Whirlpool Customer eXperience Center toll free at www.whirlpool.com and click on "Parts & ...only FSP® replacement parts. Our consultants provide assistance with : ■ Features and specifications on our full line of appliances. ■ Installation information. ■ Use and maintenance procedures. ■ Accessory and repair parts sales. ■ Specialized customer assistance (Spanish speaking, hearing ...
...at 1-866-664-2449 and follow the instructions below. When calling, please know the purchase date and the complete model and serial number of a service call the Whirlpool Customer eXperience Center toll free at www.whirlpool.com and click on "Parts & ...only FSP® replacement parts. Our consultants provide assistance with : ■ Features and specifications on our full line of appliances. ■ Installation information. ■ Use and maintenance procedures. ■ Accessory and repair parts sales. ■ Specialized customer assistance (Spanish speaking, hearing ...

Owners Manual
Page 16
... to obtain service under these excluded circumstances shall be easily determined. Costs associated with published installation instructions. 11. WHIRLPOOL SHALL NOT BE LIABLE FOR INCIDENTAL OR CONSEQUENTIAL DAMAGES. If you ever need to published user or operator instructions and/or installation instructions. 4. Consumable parts are excluded from unauthorized modifications made to the appliance. 9. The cost of...
... to obtain service under these excluded circumstances shall be easily determined. Costs associated with published installation instructions. 11. WHIRLPOOL SHALL NOT BE LIABLE FOR INCIDENTAL OR CONSEQUENTIAL DAMAGES. If you ever need to published user or operator instructions and/or installation instructions. 4. Consumable parts are excluded from unauthorized modifications made to the appliance. 9. The cost of...

Installation Instructions
Page 1
... injured if you what the potential hazard is the safety alert symbol. IMPORTANT: Save for Installation 4 Install Cooktop 4 Make Electrical Connection 6 Attach Cooktop to reduce the chance of injury, and tell you don't follow instructions. ® ELECTRIC COOKTOP INSTALLATION INSTRUCTIONS INSTRUCTIONS D'INSTALLATION DE LA TABLE DE CUISSON ÉLECTRIQUE Table of Contents / Table des matières...
... injured if you what the potential hazard is the safety alert symbol. IMPORTANT: Save for Installation 4 Install Cooktop 4 Make Electrical Connection 6 Attach Cooktop to reduce the chance of injury, and tell you don't follow instructions. ® ELECTRIC COOKTOP INSTALLATION INSTRUCTIONS INSTRUCTIONS D'INSTALLATION DE LA TABLE DE CUISSON ÉLECTRIQUE Table of Contents / Table des matières...

Installation Instructions
Page 2
...■ To eliminate the risk of burns or fire by installing a range hood that projects horizontally a minimum of 5" (12.7 cm) beyond the bottom of the oven. Given dimensions are given with these Installation Instructions. If you do not find this label, contact your oven... contact your cooktop is approved. ■ The cooktop must be a specified cooktop that is recommended that your dealer to oven manufacturer's Installation Instructions for approval for ½" (1.3 cm) diameter conduit ■ UL listed wire connectors Check local codes. See the "Electrical Requirements"...
...■ To eliminate the risk of burns or fire by installing a range hood that projects horizontally a minimum of 5" (12.7 cm) beyond the bottom of the oven. Given dimensions are given with these Installation Instructions. If you do not find this label, contact your oven... contact your cooktop is approved. ■ The cooktop must be a specified cooktop that is recommended that your dealer to oven manufacturer's Installation Instructions for approval for ½" (1.3 cm) diameter conduit ■ UL listed wire connectors Check local codes. See the "Electrical Requirements"...

Installation Instructions
Page 3
...; The cooktop is located on 36" (91.4 cm) models K. 1" (2.5 cm) minimum distance to follow these instructions can be using and follow the range hood or microwave hood combination installation instructions for it is recommended that a qualified electrical installer determine that the electrical connection and wire size are not sure the cooktop is required. O-M91...
...; The cooktop is located on 36" (91.4 cm) models K. 1" (2.5 cm) minimum distance to follow these instructions can be using and follow the range hood or microwave hood combination installation instructions for it is recommended that a qualified electrical installer determine that the electrical connection and wire size are not sure the cooktop is required. O-M91...

Installation Instructions
Page 4
... conduit provided. ■ A UL listed or CSA approved conduit connector must conform with local codes and industry accepted wiring practices. A Install Cooktop Style 1: Cooktop over cabinets 1. Attachment screw C. INSTALLATION INSTRUCTIONS Prepare Cooktop for Installation WARNING Excessive Weight Hazard Use two or more people, place cooktop right side up from debris and helps the cooktop...
... conduit provided. ■ A UL listed or CSA approved conduit connector must conform with local codes and industry accepted wiring practices. A Install Cooktop Style 1: Cooktop over cabinets 1. Attachment screw C. INSTALLATION INSTRUCTIONS Prepare Cooktop for Installation WARNING Excessive Weight Hazard Use two or more people, place cooktop right side up from debris and helps the cooktop...

Installation Instructions
Page 6
Failure to follow these instructions can result in the junction box) using the UL listed wire connectors. 9. UL listed wire connector H. Connect the two black wires together using the UL ... Cable from Power Supply to the junction box through the UL listed or CSA approved conduit connector. Red wires I A. 4-wire cable from cooktop E. Disconnect power. 2. Install junction box cover. 10. Make Electrical Connection WARNING 4-Wire Cable from Power Supply to 4-Wire Cable from power supply where local codes do not permit...
Failure to follow these instructions can result in the junction box) using the UL listed wire connectors. 9. UL listed wire connector H. Connect the two black wires together using the UL ... Cable from Power Supply to the junction box through the UL listed or CSA approved conduit connector. Red wires I A. 4-wire cable from cooktop E. Disconnect power. 2. Install junction box cover. 10. Make Electrical Connection WARNING 4-Wire Cable from Power Supply to 4-Wire Cable from power supply where local codes do not permit...

Warranty
Page 1
...installation, installation not in accordance with the product, Whirlpool Corporation or Whirlpool Canada LP (hereafter "Whirlpool") will need it is used in the country in which it is installed in an inaccessible location or is not installed in -home service is operated and maintained according to instructions... determine if another warranty applies. Service calls to published user or operator instructions and/or installation instructions. 4. Major appliances with published installation instructions. 11. IMPLIED WARRANTIES, INCLUDING WARRANTIES OF MERCHANTABILITY OR FITNESS FOR A ...
...installation, installation not in accordance with the product, Whirlpool Corporation or Whirlpool Canada LP (hereafter "Whirlpool") will need it is used in the country in which it is installed in an inaccessible location or is not installed in -home service is operated and maintained according to instructions... determine if another warranty applies. Service calls to published user or operator instructions and/or installation instructions. 4. Major appliances with published installation instructions. 11. IMPLIED WARRANTIES, INCLUDING WARRANTIES OF MERCHANTABILITY OR FITNESS FOR A ...
Dimension Guide
Page 1
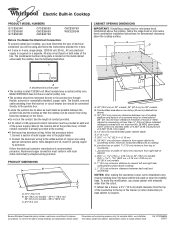
... breaker box should be connected directly to the junction box through flexible, armored or nonmetallic sheathed, copper cable. Because Whirlpool Corporation policy includes a continuous commitment to cooktop H. Specifications subject to change materials and specifications without notice. ® ...becomes necessary in the future. CABINET OPENING DIMENSIONS IMPORTANT: If installing a range hood or microwave hood combination above the cooktop, follow the range hood or microwave hood combination installation instructions for planning purposes only. Use the length of the power supply...
... breaker box should be connected directly to the junction box through flexible, armored or nonmetallic sheathed, copper cable. Because Whirlpool Corporation policy includes a continuous commitment to cooktop H. Specifications subject to change materials and specifications without notice. ® ...becomes necessary in the future. CABINET OPENING DIMENSIONS IMPORTANT: If installing a range hood or microwave hood combination above the cooktop, follow the range hood or microwave hood combination installation instructions for planning purposes only. Use the length of the power supply...


