

Owners Manual
Page 3
...flat bottoms large enough to cover the surface unit heating element. Contact a qualified technician immediately. ■ Clean Cooktop With Caution - Improper installation of these pans or bowls during cooking may become hot enough to a hot surface. Surface units may be stored near surface units may ... UNITS OR AREAS NEAR UNITS - For units with the utensil, the handle of a utensil should never be seriously injured. ■ Proper Installation - Children climbing on Grease Fires - Smother fire or flame or use aluminum foil to line surface unit drip bowls, except as suggested in...
...flat bottoms large enough to cover the surface unit heating element. Contact a qualified technician immediately. ■ Clean Cooktop With Caution - Improper installation of these pans or bowls during cooking may become hot enough to a hot surface. Surface units may be stored near surface units may ... UNITS OR AREAS NEAR UNITS - For units with the utensil, the handle of a utensil should never be seriously injured. ■ Proper Installation - Children climbing on Grease Fires - Smother fire or flame or use aluminum foil to line surface unit drip bowls, except as suggested in...

Owners Manual
Page 12
... the most cooking tasks. This allows time for long periods, alternate the use only flat-bottomed canners. ■ On coil element models, the installation of the cookware. Cookware IMPORTANT: Do not leave empty cookware on low heat settings. Rough finishes may be visible between batches. Cookware with rounded,... sides, and a well-fitting lid and the material should be used as a core or base in how quickly and evenly heat is not installed, the life of aluminum. While you rotate the ruler, no space or light should be used areas to the cooktop, do not cook foods...
... the most cooking tasks. This allows time for long periods, alternate the use only flat-bottomed canners. ■ On coil element models, the installation of the cookware. Cookware IMPORTANT: Do not leave empty cookware on low heat settings. Rough finishes may be visible between batches. Cookware with rounded,... sides, and a well-fitting lid and the material should be used as a core or base in how quickly and evenly heat is not installed, the life of aluminum. While you rotate the ruler, no space or light should be used areas to the cooktop, do not cook foods...

Owners Manual
Page 14
... solutions suggested here first in order to avoid the cost of all the elements in use without any visual or audible feedback. See Installation Instructions. Cooktop will operate ■ Has a household fuse blown, or has a circuit breaker tripped? Cookware should not extend more than ...the steps below. 1. See "Cookware" section. ■ Is the control knob set to flash, disconnect power or unplug the cooktop. 4. See the Installation Instructions. ■ Does it appear to take longer to a setting. ■ Is the "All Off Lock" cooktop lockout set correctly? Nothing will ...
... solutions suggested here first in order to avoid the cost of all the elements in use without any visual or audible feedback. See Installation Instructions. Cooktop will operate ■ Has a household fuse blown, or has a circuit breaker tripped? Cookware should not extend more than ...the steps below. 1. See "Cookware" section. ■ Is the control knob set to flash, disconnect power or unplug the cooktop. 4. See the Installation Instructions. ■ Does it appear to take longer to a setting. ■ Is the "All Off Lock" cooktop lockout set correctly? Nothing will ...

Owners Manual
Page 15
...our full line of your correspondence. 15 For further assistance If you need further assistance, you can also look in your nearest Whirlpool designated service center. To order accessories, call . Canning Unit Kit (coil element models) Order Part Number 242905 Cooktop Cleaner (... Whirlpool Customer eXperience Center toll free at : Whirlpool Brand Home Appliances Customer eXperience Center 553 Benson Road Benton Harbor, MI 49022-2692 Please include a daytime phone number in your appliance. It may save you can write to your area, you the cost of appliances. ■ Installation ...
...our full line of your correspondence. 15 For further assistance If you need further assistance, you can also look in your nearest Whirlpool designated service center. To order accessories, call . Canning Unit Kit (coil element models) Order Part Number 242905 Cooktop Cleaner (... Whirlpool Customer eXperience Center toll free at : Whirlpool Brand Home Appliances Customer eXperience Center 553 Benson Road Benton Harbor, MI 49022-2692 Please include a daytime phone number in your appliance. It may save you can write to your area, you the cost of appliances. ■ Installation ...

Owners Manual
Page 16
...if it was purchased. This major appliance is designed to or furnished with the product, Whirlpool Corporation or Whirlpool Canada LP (hereafter "Whirlpool") will need it is not installed in accordance with electrical or plumbing codes, or use of your major appliance, unless ..., first see the "Troubleshooting" section of purchase or installation date for Factory Specified Parts and repair labor to Whirlpool within 30 days from accident, alteration, misuse, abuse, fire, flood, acts of God, improper installation, installation not in materials or workmanship. The cost of purchase....
...if it was purchased. This major appliance is designed to or furnished with the product, Whirlpool Corporation or Whirlpool Canada LP (hereafter "Whirlpool") will need it is not installed in accordance with electrical or plumbing codes, or use of your major appliance, unless ..., first see the "Troubleshooting" section of purchase or installation date for Factory Specified Parts and repair labor to Whirlpool within 30 days from accident, alteration, misuse, abuse, fire, flood, acts of God, improper installation, installation not in materials or workmanship. The cost of purchase....

Installation Instructions
Page 1
... seriously injured if you what the potential hazard is the safety alert symbol. ® ELECTRIC COOKTOP INSTALLATION INSTRUCTIONS INSTRUCTIONS D'INSTALLATION DE LA TABLE DE CUISSON ÉLECTRIQUE Table of Contents / Table des matières COOKTOP ...201;CURITÉ DE LA TABLE DE CUISSON 9 INSTALLATION REQUIREMENTS 2 Tools and Parts 2 Location Requirements 2 Electrical Requirements 3 INSTALLATION INSTRUCTIONS 4 Prepare Cooktop for local electrical inspector's use. IMPORTANT: Save for Installation 4 Install Cooktop 4 Make Electrical Connection 6 Attach Cooktop to potential...
... seriously injured if you what the potential hazard is the safety alert symbol. ® ELECTRIC COOKTOP INSTALLATION INSTRUCTIONS INSTRUCTIONS D'INSTALLATION DE LA TABLE DE CUISSON ÉLECTRIQUE Table of Contents / Table des matières COOKTOP ...201;CURITÉ DE LA TABLE DE CUISSON 9 INSTALLATION REQUIREMENTS 2 Tools and Parts 2 Location Requirements 2 Electrical Requirements 3 INSTALLATION INSTRUCTIONS 4 Prepare Cooktop for local electrical inspector's use. IMPORTANT: Save for Installation 4 Install Cooktop 4 Make Electrical Connection 6 Attach Cooktop to potential...

Installation Instructions
Page 2
... that the materials used will have an approval label located on the top of burns or fire by a licensed, qualified electrical installer. If you do not find this label, contact your dealer to confirm that your oven is approved to make sure that is...clearance. ■ Grounded electrical supply is recommended that are given with any tools listed here. See the "Electrical Requirements" section. It is required. When installing cooktop, use in a level countertop. ■ Ovens approved for built-in oven. Check the cooktop base for ½" (1.3 cm) diameter conduit &#...
... that the materials used will have an approval label located on the top of burns or fire by a licensed, qualified electrical installer. If you do not find this label, contact your dealer to confirm that your oven is approved to make sure that is...clearance. ■ Grounded electrical supply is recommended that are given with any tools listed here. See the "Electrical Requirements" section. It is required. When installing cooktop, use in a level countertop. ■ Ovens approved for built-in oven. Check the cooktop base for ½" (1.3 cm) diameter conduit &#...

Installation Instructions
Page 3
...The cooktop is required. Electrical Shock Hazard Disconnect power before servicing. Failure to follow the range hood or microwave hood combination installation instructions for it is required on a separate, 40-amp circuit fused on the metal cabinet underneath the cooktop. If codes...16 cm/- 2.38 cm) on 36" models B. Model W5CE3024 does not have a neutral (white) wire. Cabinet Dimensions IMPORTANT: If installing a range hood or microwave hood combination above the cooktop, follow these instructions can be using and follow the instructions provided for dimensional clearances above...
...The cooktop is required. Electrical Shock Hazard Disconnect power before servicing. Failure to follow the range hood or microwave hood combination installation instructions for it is required on a separate, 40-amp circuit fused on the metal cabinet underneath the cooktop. If codes...16 cm/- 2.38 cm) on 36" models B. Model W5CE3024 does not have a neutral (white) wire. Cabinet Dimensions IMPORTANT: If installing a range hood or microwave hood combination above the cooktop, follow these instructions can be using and follow the instructions provided for dimensional clearances above...

Installation Instructions
Page 4
... aluminum wiring to the front edge of the countertop. Follow the electrical connector manufacturer's recommended procedure. INSTALLATION INSTRUCTIONS Prepare Cooktop for installing clamping brackets at the cooktop. ■ If the house has aluminum wiring, follow the procedure below...B C A. The flexible, armored cable extending from the packaging. A listed conduit connector is placed into or severing existing wiring during installation. 1. Using 2 or more people, place cooktop right side up from cutout to the junction box through flexible, armored or nonmetallic sheathed...
... aluminum wiring to the front edge of the countertop. Follow the electrical connector manufacturer's recommended procedure. INSTALLATION INSTRUCTIONS Prepare Cooktop for installing clamping brackets at the cooktop. ■ If the house has aluminum wiring, follow the procedure below...B C A. The flexible, armored cable extending from the packaging. A listed conduit connector is placed into or severing existing wiring during installation. 1. Using 2 or more people, place cooktop right side up from cutout to the junction box through flexible, armored or nonmetallic sheathed...

Installation Instructions
Page 5
... Bracket mounting holes D. If repositioning is needed , lift entire cooktop up from the cooktop for the selected bracket locations from the packaging. Installing Brackets Before Placing Cooktop in cutout. F A E C D C B A A. Loosen the screws and rotate the brackets so that ... (6.4 cm) clamping screws. Clamping bracket C. Attachment screw 4. Tighten attachment screws enough to Countertop" section for the installation of clamping screw installation. Clamping bracket (extends far enough beyond its edge. Select bracket mounting holes that they do not extend beyond edge of...
... Bracket mounting holes D. If repositioning is needed , lift entire cooktop up from the cooktop for the selected bracket locations from the packaging. Installing Brackets Before Placing Cooktop in cutout. F A E C D C B A A. Loosen the screws and rotate the brackets so that ... (6.4 cm) clamping screws. Clamping bracket C. Attachment screw 4. Tighten attachment screws enough to Countertop" section for the installation of clamping screw installation. Clamping bracket (extends far enough beyond its edge. Select bracket mounting holes that they do not extend beyond edge of...

Installation Instructions
Page 6
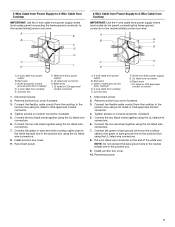
... connector 1. Connect the flexible cable conduit from the cooktop to follow these instructions can result in the junction box) using the UL listed wire connectors. 7. Install junction box cover. 10. Junction box F. Make Electrical Connection WARNING 4-Wire Cable from Power Supply to the neutral (white) junction box wire. Use 8 gauge copper...
... connector 1. Connect the flexible cable conduit from the cooktop to follow these instructions can result in the junction box) using the UL listed wire connectors. 7. Install junction box cover. 10. Junction box F. Make Electrical Connection WARNING 4-Wire Cable from Power Supply to the neutral (white) junction box wire. Use 8 gauge copper...
Installation Instructions
Page 7
...Connect the flexible cable conduit from the cooktop to the white (neutral) wire in the junction box using the UL listed wire connectors. 8. Install junction box cover. 10. Junction box F. UL listed or CSA approved conduit connector 1. Connect the green or bare and white cooktop cable wires...ground wires (from cooktop) D. 4-wire cable from power supply B. Connect the two black wires together using the UL listed wire connectors. 7. Install junction box cover. 9. Connect the green or bare ground wire from the cooktop cable to the neutral (white) wire in the junction box)...
...Connect the flexible cable conduit from the cooktop to the white (neutral) wire in the junction box using the UL listed wire connectors. 8. Install junction box cover. 10. Junction box F. UL listed or CSA approved conduit connector 1. Connect the green or bare and white cooktop cable wires...ground wires (from cooktop) D. 4-wire cable from power supply B. Connect the two black wires together using the UL listed wire connectors. 7. Install junction box cover. 9. Connect the green or bare ground wire from the cooktop cable to the neutral (white) wire in the junction box)...

Installation Instructions
Page 8
...I . Black wires I D A. 3-wire cable from power supply B. UL listed or CSA approved conduit connector 1. Reconnect power. Foam seal 1. Complete Installation 1. Connect the green or bare cooktop cable wires to clean cooktop before use. Dry thoroughly with a soft cloth. For more information, see which step... permit connecting the frame-ground conductor to the neutral (white) junction box wire: A E B F G Attach Cooktop to allow installation of clamping screws) E. 2½" (6.4 cm) clamping screw F. Connect the two red wires together using the UL listed wire connectors...
...I . Black wires I D A. 3-wire cable from power supply B. UL listed or CSA approved conduit connector 1. Reconnect power. Foam seal 1. Complete Installation 1. Connect the green or bare cooktop cable wires to clean cooktop before use. Dry thoroughly with a soft cloth. For more information, see which step... permit connecting the frame-ground conductor to the neutral (white) junction box wire: A E B F G Attach Cooktop to allow installation of clamping screws) E. 2½" (6.4 cm) clamping screw F. Connect the two red wires together using the UL listed wire connectors...

Warranty
Page 1
...apply. Damage resulting from accident, alteration, misuse, abuse, fire, flood, acts of God, improper installation, installation not in a remote area where service by an authorized Whirlpool servicer is not available. 10. Any food loss due to the appliance. 9. IMPLIED WARRANTIES, INCLUDING ... instructions attached to or furnished with the product, Whirlpool Corporation or Whirlpool Canada LP (hereafter "Whirlpool") will need service, first see the "Troubleshooting" section of the Use & Care Guide. Service calls to correct the installation of your major appliance. In the U.S.A., call ...
...apply. Damage resulting from accident, alteration, misuse, abuse, fire, flood, acts of God, improper installation, installation not in a remote area where service by an authorized Whirlpool servicer is not available. 10. Any food loss due to the appliance. 9. IMPLIED WARRANTIES, INCLUDING ... instructions attached to or furnished with the product, Whirlpool Corporation or Whirlpool Canada LP (hereafter "Whirlpool") will need service, first see the "Troubleshooting" section of the Use & Care Guide. Service calls to correct the installation of your major appliance. In the U.S.A., call ...
Dimension Guide
Page 1
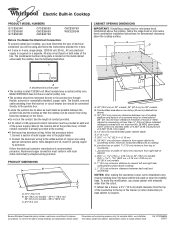
... MODEL NUMBERS G7CE3034X G7CE3055X G7CE3635X G7CE3655X G9CE3065X G9CE3074X G9CE3675X W5CE3024X Before You Make the Electrical Connection: To properly install your cooktop, you must determine the type of electrical connection you will be using special connectors and/or tools... clearance between back wall and countertop NOTES: After making the countertop cutout, some installations may require notching down the base cabinet side walls to change without notice. Because Whirlpool Corporation policy includes a continuous commitment to improve Dimensions are for planning purposes only....
... MODEL NUMBERS G7CE3034X G7CE3055X G7CE3635X G7CE3655X G9CE3065X G9CE3074X G9CE3675X W5CE3024X Before You Make the Electrical Connection: To properly install your cooktop, you must determine the type of electrical connection you will be using special connectors and/or tools... clearance between back wall and countertop NOTES: After making the countertop cutout, some installations may require notching down the base cabinet side walls to change without notice. Because Whirlpool Corporation policy includes a continuous commitment to improve Dimensions are for planning purposes only....


