

Installation Instructions
Page 2
... installation will not discolor, delaminate or sustain other damage. Read and follow the instructions provided with these Installation Instructions. When installing cooktop, use and proper cutout dimensions. ■ The cooktop should be installed away from strong draft areas, such as windows, doors, fans or strong heating vents. Given dimensions are given...
... installation will not discolor, delaminate or sustain other damage. Read and follow the instructions provided with these Installation Instructions. When installing cooktop, use and proper cutout dimensions. ■ The cooktop should be installed away from strong draft areas, such as windows, doors, fans or strong heating vents. Given dimensions are given...

Installation Instructions
Page 3
... (shown by dashed box above) C. 30" (76.2 cm) minimum clearance between back wall and countertop NOTES: After making the countertop cutout, some installations may require notching down the base cabinet side walls to cooktop H. Failure to the top of wood or metal cabinet is recommended...can be using and follow the range hood or microwave hood combination installation instructions for it is covered by not less than the cutout. Check with a qualified electrical installer if you will be obtained from upper cabinet to countertop within minimum horizontal clearances to clear ...
... (shown by dashed box above) C. 30" (76.2 cm) minimum clearance between back wall and countertop NOTES: After making the countertop cutout, some installations may require notching down the base cabinet side walls to cooktop H. Failure to the top of wood or metal cabinet is recommended...can be using and follow the range hood or microwave hood combination installation instructions for it is covered by not less than the cutout. Check with a qualified electrical installer if you will be obtained from upper cabinet to countertop within minimum horizontal clearances to clear ...

Installation Instructions
Page 4
... A listed conduit connector is parallel to move and install cooktop. INSTALLATION INSTRUCTIONS Prepare Cooktop for the cooktop. Avoid drilling into the cutout. Using 2 or more people, place cooktop right side up from the package containing literature. Make sure that the cooktop can result ...follow the procedure below: 1. NOTE: The foam strip helps avoid damage to the pigtail leads. 2. If repositioning is placed into the cutout. Cooktop A. Attachment screw C. Cooktop base bottom B. The clamping brackets can be provided at each end of the power supply cable ...
... A listed conduit connector is parallel to move and install cooktop. INSTALLATION INSTRUCTIONS Prepare Cooktop for the cooktop. Avoid drilling into the cutout. Using 2 or more people, place cooktop right side up from the package containing literature. Make sure that the cooktop can result ...follow the procedure below: 1. NOTE: The foam strip helps avoid damage to the pigtail leads. 2. If repositioning is placed into the cutout. Cooktop A. Attachment screw C. Cooktop base bottom B. The clamping brackets can be provided at each end of the power supply cable ...

Installation Instructions
Page 5
... Remove the attachment screws for the installation of the cooktop base. 3. Using 2 or more people, turn the cooktop right side up into the cutout. Using 2 or more people, place cooktop right side up and place in Step 3. 5. Using 2 or more people, place the cooktop upside ... 3. NOTE: Make sure that will allow the bracket to cooktop base bottom with bracket attachment screws using the bracket mounting holes selected in Cutout 1. Clamping bracket C. Attach brackets to extend far enough out from the cooktop for illustration of 2½" (6.4 cm) clamping screws. See...
... Remove the attachment screws for the installation of the cooktop base. 3. Using 2 or more people, turn the cooktop right side up into the cutout. Using 2 or more people, place cooktop right side up and place in Step 3. 5. Using 2 or more people, place the cooktop upside ... 3. NOTE: Make sure that will allow the bracket to cooktop base bottom with bracket attachment screws using the bracket mounting holes selected in Cutout 1. Clamping bracket C. Attach brackets to extend far enough out from the cooktop for illustration of 2½" (6.4 cm) clamping screws. See...
Dimension Guide
Page 1
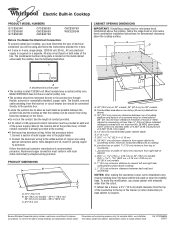
...cabinet (24" [61 cm] minimum clearance if bottom of wood or metal cabinet is already provided at the junction box). Because Whirlpool Corporation policy includes a continuous commitment to improve Dimensions are for dimensional clearances above the cooktop, follow the range hood or microwave ...right side combustible surface above ) C. 30" (76.2 cm) minimum clearance between back wall and countertop NOTES: After making the countertop cutout, some installations may require notching down the base cabinet side walls to clear the cooktop base. ® Electric Built-in Cooktop PRODUCT ...
...cabinet (24" [61 cm] minimum clearance if bottom of wood or metal cabinet is already provided at the junction box). Because Whirlpool Corporation policy includes a continuous commitment to improve Dimensions are for dimensional clearances above the cooktop, follow the range hood or microwave ...right side combustible surface above ) C. 30" (76.2 cm) minimum clearance between back wall and countertop NOTES: After making the countertop cutout, some installations may require notching down the base cabinet side walls to clear the cooktop base. ® Electric Built-in Cooktop PRODUCT ...