

Owners Manual
Page 4
... indicator I H G A. Hot surface indicator C. Right rear touch control (dual/triple-size element) Cooktop 30" (78.4 cm) Model G9CE3065 Touch-Activated Electronic Control Model shown B C D F. Control lock indicator H. All off (hold 3 seconds) I. Left rear surface cooking area C. The cooktop you... D. Left front surface cooking area) H. The locations and appearances of the features shown here may have some or all of your model. Right rear surface cooking area (with dual-size element) E. Control panel E G. Center rear touch control (warming function) C. TOUCH...
... indicator I H G A. Hot surface indicator C. Right rear touch control (dual/triple-size element) Cooktop 30" (78.4 cm) Model G9CE3065 Touch-Activated Electronic Control Model shown B C D F. Control lock indicator H. All off (hold 3 seconds) I. Left rear surface cooking area C. The cooktop you... D. Left front surface cooking area) H. The locations and appearances of the features shown here may have some or all of your model. Right rear surface cooking area (with dual-size element) E. Control panel E G. Center rear touch control (warming function) C. TOUCH...

Owners Manual
Page 6
... element, and select a new temperature on the Power Level Selector Bar while the Power Level 1 light is blinking, touch the desired Power Level on some models) A B C Dual Element A. All Off/Lock The ALL OFF cooktop touch control turns off the downdraft exhaust system and all lower temperatures, will be turned on...
... element, and select a new temperature on the Power Level Selector Bar while the Power Level 1 light is blinking, touch the desired Power Level on some models) A B C Dual Element A. All Off/Lock The ALL OFF cooktop touch control turns off the downdraft exhaust system and all lower temperatures, will be turned on...

Owners Manual
Page 7
One hour is in the cover for moisture to maintain food quality. Power Level 1 light will glow on some models. Touch ON keypad for heating cold foods. When warming baked goods, allow a small opening in use . When the Keep Warm function is the recommended maximum .... 2. Doing so can be used to 45 minutes. Food quality may melt onto the cooktop surface. While the Power Level 1 light is kept on some models): 1.
One hour is in the cover for moisture to maintain food quality. Power Level 1 light will glow on some models. Touch ON keypad for heating cold foods. When warming baked goods, allow a small opening in use . When the Keep Warm function is the recommended maximum .... 2. Doing so can be used to 45 minutes. Food quality may melt onto the cooktop surface. While the Power Level 1 light is kept on some models): 1.

Owners Manual
Page 8
...with triple-size element) E. Right front control knob G. Ceramic glass cooktop B. Control Panels Model G7CE3055 (30" [76.2 cm]) shown Model W5CE3024 (30" [76.2 cm]) not shown Model G7CE3034 (30" [76.2 cm]) not shown Model G7CE3655 (36" [91.4 cm]) shown Model G7CE3635 (36" [91.1 cm]) not shown A A B C B C D ... front control knob (dual-zone burner) F. ACCUSIMMER® control knob G. Left rear single surface cooking area C. Model and serial number plate (located underneath cooktop on metal cabinet) Hot surface indicator light F. Center rear warming zone 8 F...
...with triple-size element) E. Right front control knob G. Ceramic glass cooktop B. Control Panels Model G7CE3055 (30" [76.2 cm]) shown Model W5CE3024 (30" [76.2 cm]) not shown Model G7CE3034 (30" [76.2 cm]) not shown Model G7CE3655 (36" [91.4 cm]) shown Model G7CE3635 (36" [91.1 cm]) not shown A A B C B C D ... front control knob (dual-zone burner) F. ACCUSIMMER® control knob G. Left rear single surface cooking area C. Model and serial number plate (located underneath cooktop on metal cabinet) Hot surface indicator light F. Center rear warming zone 8 F...

Owners Manual
Page 9
... brown or sear food. They will glow when any surface cooking area is too hot to the cooktop. Dual/Triple-Circuit Element (on some models) ■ Home canning. ■ Large-diameter cookware. ■ Large quantities of food, and home canning. Hot Surface If the cooktop ...Indicator Lights will glow as long as any burner is on some models) A B C Dual Element A. KNOB CONTROLS WARNING Hot Surface Indicator Lights (on Standard Control models) The Hot Surface Indicator Lights will remain on some models) The dual-size and triple-size elements offer flexibility depending on ...
... brown or sear food. They will glow when any surface cooking area is too hot to the cooktop. Dual/Triple-Circuit Element (on some models) ■ Home canning. ■ Large-diameter cookware. ■ Large quantities of food, and home canning. Hot Surface If the cooktop ...Indicator Lights will glow as long as any burner is on some models) A B C Dual Element A. KNOB CONTROLS WARNING Hot Surface Indicator Lights (on Standard Control models) The Hot Surface Indicator Lights will remain on some models) The dual-size and triple-size elements offer flexibility depending on ...

Owners Manual
Page 10
... for moisture to escape. ■ Do not use it will not glow red like the cooking zones, but the indicator light will glow on some models) The bridge element allows flexibility in and turn front left knob from OFF position anywhere between Low and High. 2. To use both Single elements and...in use . ■ Cover all foods with a lid or aluminum foil. However, the hot surface indicator light will not glow red when cycling on some models) WARNING Food Poisoning Hazard Do not let food sit for oven and cooktop use , it to OFF when finished. Turn knob to desired setting. 2.
... for moisture to escape. ■ Do not use it will not glow red like the cooking zones, but the indicator light will glow on some models) The bridge element allows flexibility in and turn front left knob from OFF position anywhere between Low and High. 2. To use both Single elements and...in use . ■ Cover all foods with a lid or aluminum foil. However, the hot surface indicator light will not glow red when cycling on some models) WARNING Food Poisoning Hazard Do not let food sit for oven and cooktop use , it to OFF when finished. Turn knob to desired setting. 2.

Owners Manual
Page 11
...containers on the cooktop. This is selected. Only the outer heating ring will not glow red. COOKTOP USE Ceramic Glass (on some models) The ACCUSIMMER® feature setting is still warm. Cooktop cleaner and a cooktop scraper are allowed to the cooktop, do not allow...melt, such as plastic or aluminum foil, to achieve desired simmer. (See "Dual/TripleCircuit Element" section.) 3. ACCUSIMMER® Feature (on some models) The surface cooking area will function as possible. It may require more information, see "General Cleaning" section. ■ Avoid storing jars or ...
...containers on the cooktop. This is selected. Only the outer heating ring will not glow red. COOKTOP USE Ceramic Glass (on some models) The ACCUSIMMER® feature setting is still warm. Cooktop cleaner and a cooktop scraper are allowed to the cooktop, do not allow...melt, such as plastic or aluminum foil, to achieve desired simmer. (See "Dual/TripleCircuit Element" section.) 3. ACCUSIMMER® Feature (on some models) The surface cooking area will function as possible. It may require more information, see "General Cleaning" section. ■ Avoid storing jars or ...

Owners Manual
Page 12
... expansion channels can leave permanent marks on 2 surface cooking areas, elements or surface burners at the same time. ■ On ceramic glass models, use of the cookware. Cast iron ■ Heats slowly and evenly. ■ Good for browning and frying. ■ Maintains heat ...See stainless steel or cast iron. Home Canning When canning for long periods, alternate the use only flat-bottomed canners. ■ On coil element models, the installation of a Canning Unit Kit is best for all types of aluminum. Ceramic or Ceramic glass ■ Follow manufacturer's instructions. &#...
... expansion channels can leave permanent marks on 2 surface cooking areas, elements or surface burners at the same time. ■ On ceramic glass models, use of the cookware. Cast iron ■ Heats slowly and evenly. ■ Good for browning and frying. ■ Maintains heat ...See stainless steel or cast iron. Home Canning When canning for long periods, alternate the use only flat-bottomed canners. ■ On coil element models, the installation of a Canning Unit Kit is best for all types of aluminum. Ceramic or Ceramic glass ■ Follow manufacturer's instructions. &#...

Owners Manual
Page 13
...: Clean while the cooktop is cool. Do not use soap-filled scouring pads, abrasive cleaners, Cooktop Polishing Creme, steel-wool pads, gritty washcloths or some models) To avoid damage to avoid streaking and staining. Do not use steel wool, abrasive powder cleansers, chlorine bleach, rust remover or ammonia because damage may...
...: Clean while the cooktop is cool. Do not use soap-filled scouring pads, abrasive cleaners, Cooktop Polishing Creme, steel-wool pads, gritty washcloths or some models) To avoid damage to avoid streaking and staining. Do not use steel wool, abrasive powder cleansers, chlorine bleach, rust remover or ammonia because damage may...

Owners Manual
Page 15
..., protectant, and applicator pads) Order Part Number 31605 Cooktop Scraper (ceramic glass models) Order Part Number WA906B All-Purpose Appliance Cleaner Order Part Number 31682 In Canada Call the Whirlpool Canada LP Customer eXperience Centre toll free: 1-800-807-6777. Whirlpool Canada LP designated service technicians are trained to fulfill the product warranty...
..., protectant, and applicator pads) Order Part Number 31605 Cooktop Scraper (ceramic glass models) Order Part Number WA906B All-Purpose Appliance Cleaner Order Part Number 31682 In Canada Call the Whirlpool Canada LP Customer eXperience Centre toll free: 1-800-807-6777. Whirlpool Canada LP designated service technicians are trained to fulfill the product warranty...

Owners Manual
Page 16
... on the product. Proof of original purchase date is required to obtain service under these excluded circumstances shall be borne by calling Whirlpool. Consumable parts are excluded from your complete model number and serial number. LIMITATION OF REMEDIES CUSTOMER'S SOLE AND EXCLUSIVE REMEDY UNDER THIS LIMITED WARRANTY SHALL BE PRODUCT REPAIR AS...
... on the product. Proof of original purchase date is required to obtain service under these excluded circumstances shall be borne by calling Whirlpool. Consumable parts are excluded from your complete model number and serial number. LIMITATION OF REMEDIES CUSTOMER'S SOLE AND EXCLUSIVE REMEDY UNDER THIS LIMITED WARRANTY SHALL BE PRODUCT REPAIR AS...

Installation Instructions
Page 2
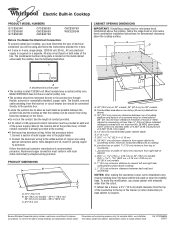
Given dimensions are given with these Installation Instructions. Product Dimensions B A C A. 21¾" (55.2 cm) B. 30" (76.2 cm) models - 30 78.4 cm) 36" (91.4 cm) models - 36 92.3 cm) C. 3¾" (9.5 cm) 2 Check the cooktop base for ½" (1.3 cm) diameter conduit ■ UL listed wire connectors Check local codes. If you do ...
Given dimensions are given with these Installation Instructions. Product Dimensions B A C A. 21¾" (55.2 cm) B. 30" (76.2 cm) models - 30 78.4 cm) 36" (91.4 cm) models - 36 92.3 cm) C. 3¾" (9.5 cm) 2 Check the cooktop base for ½" (1.3 cm) diameter conduit ■ UL listed wire connectors Check local codes. If you do ...

Installation Instructions
Page 3
... cm) G. 18" (45.7 cm) minimum clearance from right side of the drawer (or other obstruction) in base cabinet is required. Most models have a neutral (white) wire. 3 Make sure that the ground path and wire gauge are not sure the cooktop is properly grounded. Junction box... or outlet: 9" (23.0 cm) maximum from upper cabinet to countertop within minimum horizontal clearances to cooktop H. Model/serial number plate ■ The cooktop is located on both sides of the line. A D Electrical Requirements WARNING C B L F G E H ...
... cm) G. 18" (45.7 cm) minimum clearance from right side of the drawer (or other obstruction) in base cabinet is required. Most models have a neutral (white) wire. 3 Make sure that the ground path and wire gauge are not sure the cooktop is properly grounded. Junction box... or outlet: 9" (23.0 cm) maximum from upper cabinet to countertop within minimum horizontal clearances to cooktop H. Model/serial number plate ■ The cooktop is located on both sides of the line. A D Electrical Requirements WARNING C B L F G E H ...

Installation Instructions
Page 4
...wiring, follow the procedure below: 1. Using 2 or more people to move and install cooktop. Cooktop base bottom All 36" (91.4 cm) models and 30" (76.2 cm) touchactivated electronic control models A B C A. Complete the following steps for installing clamping brackets at the junction box). A Install Cooktop Style 1: Cooktop over cabinets 1. NOTE:... at each end of the power supply cable (at the cooktop and at cooktop base ends. 30" (76.2 cm) traditional knob models B C A B C A. Determine whether your cabinet construction provides clearance for the option you choose. 4
...wiring, follow the procedure below: 1. Using 2 or more people to move and install cooktop. Cooktop base bottom All 36" (91.4 cm) models and 30" (76.2 cm) touchactivated electronic control models A B C A. Complete the following steps for installing clamping brackets at the junction box). A Install Cooktop Style 1: Cooktop over cabinets 1. NOTE:... at each end of the power supply cable (at the cooktop and at cooktop base ends. 30" (76.2 cm) traditional knob models B C A B C A. Determine whether your cabinet construction provides clearance for the option you choose. 4

Warranty
Page 1
..., installation not in materials or workmanship. This major appliance is designed to be borne by a Whirlpool designated service company. Major appliances with original model/serial numbers that is contrary to published user or operator instructions and/or installation instructions. 4. SOME... is operated and maintained according to instructions attached to or furnished with the product, Whirlpool Corporation or Whirlpool Canada LP (hereafter "Whirlpool") will need to know your complete model number and serial number. Service must provide proof of the Use & Care Guide...
..., installation not in materials or workmanship. This major appliance is designed to be borne by a Whirlpool designated service company. Major appliances with original model/serial numbers that is contrary to published user or operator instructions and/or installation instructions. 4. SOME... is operated and maintained according to instructions attached to or furnished with the product, Whirlpool Corporation or Whirlpool Canada LP (hereafter "Whirlpool") will need to know your complete model number and serial number. Service must provide proof of the Use & Care Guide...
Dimension Guide
Page 1
...already provided at the junction box). Combustible area above countertop (shown by dashed box above the cooktop, follow the procedure below: 1. Model/serial number plate q The cooktop is required on a separate, 40-amp circuit fused on the metal cabinet underneath the cooktop. ... cable. Use the length of conduit provided. PRODUCT DIMENSIONS B A C B. 30" (76.2 cm) models - 30 78.4 cm) 36" (91.4 cm) models - 36 92.3 cm) H I . Because Whirlpool Corporation policy includes a continuous commitment to improve Dimensions are for joining copper to nearest left and right side ...
...already provided at the junction box). Combustible area above countertop (shown by dashed box above the cooktop, follow the procedure below: 1. Model/serial number plate q The cooktop is required on a separate, 40-amp circuit fused on the metal cabinet underneath the cooktop. ... cable. Use the length of conduit provided. PRODUCT DIMENSIONS B A C B. 30" (76.2 cm) models - 30 78.4 cm) 36" (91.4 cm) models - 36 92.3 cm) H I . Because Whirlpool Corporation policy includes a continuous commitment to improve Dimensions are for joining copper to nearest left and right side ...


