

Owners Manual
Page 4
... G A. Right rear touch control (dual/triple-size element) Cooktop 30" (78.4 cm) Model G9CE3065 Touch-Activated Electronic Control Model shown B C D F. Left rear surface cooking area C. Control panel E G. Model and serial number plate (located underneath cooktop on metal cabinet) PARTS AND FEATURES - Increase/decrease ...front surface cooking area) H. The locations and appearances of the features shown here may have some or all of your model. Right front touch control (dual-size element) F. All off (hold 3 seconds) H. All off (hold 3 seconds) I. Center rear warming...
... G A. Right rear touch control (dual/triple-size element) Cooktop 30" (78.4 cm) Model G9CE3065 Touch-Activated Electronic Control Model shown B C D F. Left rear surface cooking area C. Control panel E G. Model and serial number plate (located underneath cooktop on metal cabinet) PARTS AND FEATURES - Increase/decrease ...front surface cooking area) H. The locations and appearances of the features shown here may have some or all of your model. Right front touch control (dual-size element) F. All off (hold 3 seconds) H. All off (hold 3 seconds) I. Center rear warming...

Owners Manual
Page 6
... and hold the ALL OFF/LOCK keypad for 3 seconds. Triple element light C. Dual/Triple Element The dual and triple elements offer flexibility depending on some models) A B C Dual Element A.
... and hold the ALL OFF/LOCK keypad for 3 seconds. Triple element light C. Dual/Triple Element The dual and triple elements offer flexibility depending on some models) A B C Dual Element A.

Owners Manual
Page 7
... than one hour before or after cooking. It is kept on the control panel. One hour is blinking, touch the desired power level on some models): 1. While the Power Level 1 light is the recommended maximum time to escape. When warming baked goods, allow a small opening in use plastic wrap to cover... quality. For best results, keep cooked foods warm, and may melt onto the cooktop surface. To Use the Keep Warm Surface Cooking Area (on some models. When finished cooking, touch OFF to remove cookware.
... than one hour before or after cooking. It is kept on the control panel. One hour is blinking, touch the desired power level on some models): 1. While the Power Level 1 light is the recommended maximum time to escape. When warming baked goods, allow a small opening in use plastic wrap to cover... quality. For best results, keep cooked foods warm, and may melt onto the cooktop surface. To Use the Keep Warm Surface Cooking Area (on some models. When finished cooking, touch OFF to remove cookware.

Owners Manual
Page 8
... control knob B. Left front control knob E. ACCUSIMMER® control knob Model G7CE 3655 (36" [91.4 cm]) shown B C D E. Ceramic glass cooktop B. Right front surface cooking area F. Model and serial number plate (located underneath cooktop on indicator light H. Hot ...® control knob G. Left rear control knob B. Center rear control knob C. Control Panels Model G7CE3055 (30" [76.2 cm]) shown Model W5CE3024 (30" [76.2 cm]) not shown Model G7CE3034 (30" [76.2 cm]) not shown Model G7CE3655 (36" [91.4 cm]) shown Model G7CE3635 (36" [91.1 cm]) not shown A A B C B C D H ...
... control knob B. Left front control knob E. ACCUSIMMER® control knob Model G7CE 3655 (36" [91.4 cm]) shown B C D E. Ceramic glass cooktop B. Right front surface cooking area F. Model and serial number plate (located underneath cooktop on indicator light H. Hot ...® control knob G. Left rear control knob B. Center rear control knob C. Control Panels Model G7CE3055 (30" [76.2 cm]) shown Model W5CE3024 (30" [76.2 cm]) not shown Model G7CE3034 (30" [76.2 cm]) not shown Model G7CE3655 (36" [91.4 cm]) shown Model G7CE3635 (36" [91.1 cm]) not shown A A B C B C D H ...

Owners Manual
Page 9
... become hot. 9 Triple size A B A. Dual size REMEMBER: When cooktop is restored to the cooktop. Dual/Triple Elements (on some models) The dual-size and triple-size elements offer flexibility depending on when a power failure occurs, the Hot Surface Indicator Lights will glow when any... will remain on . Medium High ■ Hold a rapid boil. ■ Quickly brown or sear food. Dual/Triple-Circuit Element (on some models) A B C Dual Element A. The dual and triple sizes combine single, dual and outer element and are recommended for larger cookware, large quantities of...
... become hot. 9 Triple size A B A. Dual size REMEMBER: When cooktop is restored to the cooktop. Dual/Triple Elements (on some models) The dual-size and triple-size elements offer flexibility depending on when a power failure occurs, the Hot Surface Indicator Lights will glow when any... will remain on . Medium High ■ Hold a rapid boil. ■ Quickly brown or sear food. Dual/Triple-Circuit Element (on some models) A B C Dual Element A. The dual and triple sizes combine single, dual and outer element and are recommended for larger cookware, large quantities of...

Owners Manual
Page 10
...recommended maximum time to cover food. A. Triple zone B. To Use DUAL and TRIPLE: 1. Turn knob to OFF when finished. 10 Turn on some models) The bridge element allows flexibility in food poisoning or sickness. Turn knob to OFF when finished. Warm Zone Element (on Single and Bridge (C + B).... + C): 1. Push in and turn front left side cooking area. Turn knobs to OFF when finished. Bridge Element (on Single (A). 3. Turn on some models) WARNING Food Poisoning Hazard Do not let food sit for oven and cooktop use it will not glow red like the cooking zones, but the...
...recommended maximum time to cover food. A. Triple zone B. To Use DUAL and TRIPLE: 1. Turn knob to OFF when finished. 10 Turn on some models) The bridge element allows flexibility in food poisoning or sickness. Turn knob to OFF when finished. Warm Zone Element (on Single and Bridge (C + B).... + C): 1. Push in and turn front left side cooking area. Turn knobs to OFF when finished. Bridge Element (on Single (A). 3. Turn on some models) WARNING Food Poisoning Hazard Do not let food sit for oven and cooktop use it will not glow red like the cooking zones, but the...

Owners Manual
Page 11
ACCUSIMMER® Feature (on some models) The surface cooking area will glow red when an element is set on Normal, the element will return to its original color. Select Low for a ..., the cooking area will not glow red. COOKTOP USE Ceramic Glass (on . For more cleaning and attention. When the ACCUSIMMER control knob is on some models) The ACCUSIMMER® feature setting is removed. ■ For foods containing sugar in and turn control knob to a setting between the lid and the cooktop...
ACCUSIMMER® Feature (on some models) The surface cooking area will glow red when an element is set on Normal, the element will return to its original color. Select Low for a ..., the cooking area will not glow red. COOKTOP USE Ceramic Glass (on . For more cleaning and attention. When the ACCUSIMMER control knob is on some models) The ACCUSIMMER® feature setting is removed. ■ For foods containing sugar in and turn control knob to a setting between the lid and the cooktop...

Owners Manual
Page 12
...Aluminum ■ Heats quickly and evenly. ■ Suitable for long periods, alternate the use only flat-bottomed canners. ■ On coil element models, the installation of the coil element will take on the cooktop or grates. Stainless steel ■ Heats quickly, but unevenly. ■ Ideal ...to cool. ■ Center the canner on 2 surface cooking areas, elements or surface burners at the same time. ■ On ceramic glass models, use of medium-to-heavy thickness. See "Assistance or Service" for most recently used . ■ Make sure the bottoms of the cookware....
...Aluminum ■ Heats quickly and evenly. ■ Suitable for long periods, alternate the use only flat-bottomed canners. ■ On coil element models, the installation of the coil element will take on the cooktop or grates. Stainless steel ■ Heats quickly, but unevenly. ■ Ideal ...to cool. ■ Center the canner on 2 surface cooking areas, elements or surface burners at the same time. ■ On ceramic glass models, use of medium-to-heavy thickness. See "Assistance or Service" for most recently used . ■ Make sure the bottoms of the cookware....

Owners Manual
Page 13
... from control panel to the cooktop, do not use soap-filled scouring pads, abrasive cleaners, Cooktop Polishing Creme, steel-wool pads, gritty washcloths or some models) To avoid damage to wear oven mitts while doing so. Tiny scratches and abrasions ■ Cooktop Polishing Creme: Rub creme into surface with a damp paper...
... from control panel to the cooktop, do not use soap-filled scouring pads, abrasive cleaners, Cooktop Polishing Creme, steel-wool pads, gritty washcloths or some models) To avoid damage to wear oven mitts while doing so. Tiny scratches and abrasions ■ Cooktop Polishing Creme: Rub creme into surface with a damp paper...

Owners Manual
Page 15
...product warranty and provide after-warranty service, anywhere in your nearest Whirlpool designated service center. In the U.S.A. To order accessories, call . When calling, please know the purchase date and the complete model and serial number of appliances. ■ Installation information. &#...our website at : Customer eXperience Centre Whirlpool Canada LP 200 - 6750 Century Ave. Canning Unit Kit (coil element models) Order Part Number 242905 Cooktop Cleaner (ceramic glass models) Order Part Number 31464 Cooktop Protectant (ceramic glass models) Order Part Number 31463 Cooktop Care ...
...product warranty and provide after-warranty service, anywhere in your nearest Whirlpool designated service center. In the U.S.A. To order accessories, call . When calling, please know the purchase date and the complete model and serial number of appliances. ■ Installation information. &#...our website at : Customer eXperience Centre Whirlpool Canada LP 200 - 6750 Century Ave. Canning Unit Kit (coil element models) Order Part Number 242905 Cooktop Cleaner (ceramic glass models) Order Part Number 31464 Cooktop Protectant (ceramic glass models) Order Part Number 31463 Cooktop Care ...

Owners Manual
Page 16
..., flood, acts of God, improper installation, installation not in -warranty service. You must be borne by calling Whirlpool. Dealer name Address Phone number Model number Serial number Purchase date 16 ITEMS EXCLUDED FROM WARRANTY This limited warranty does not cover: 1. Consumable parts are...to instructions attached to or furnished with the removal from your authorized Whirlpool dealer to correct the installation of purchase or installation date for repairs. Damage resulting from your complete model number and serial number. DISCLAIMER OF IMPLIED WARRANTIES; If you on...
..., flood, acts of God, improper installation, installation not in -warranty service. You must be borne by calling Whirlpool. Dealer name Address Phone number Model number Serial number Purchase date 16 ITEMS EXCLUDED FROM WARRANTY This limited warranty does not cover: 1. Consumable parts are...to instructions attached to or furnished with the removal from your authorized Whirlpool dealer to correct the installation of purchase or installation date for repairs. Damage resulting from your complete model number and serial number. DISCLAIMER OF IMPLIED WARRANTIES; If you on...

Installation Instructions
Page 2
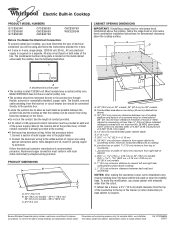
... for ½" (1.3 cm) diameter conduit ■ UL listed wire connectors Check local codes. Product Dimensions B A C A. 21¾" (55.2 cm) B. 30" (76.2 cm) models - 30 78.4 cm) 36" (91.4 cm) models - 36 92.3 cm) C. 3¾" (9.5 cm) 2 If you do not find this label, contact your builder or cabinet supplier to be avoided. IMPORTANT...
... for ½" (1.3 cm) diameter conduit ■ UL listed wire connectors Check local codes. Product Dimensions B A C A. 21¾" (55.2 cm) B. 30" (76.2 cm) models - 30 78.4 cm) 36" (91.4 cm) models - 36 92.3 cm) C. 3¾" (9.5 cm) 2 If you do not find this label, contact your builder or cabinet supplier to be avoided. IMPORTANT...

Installation Instructions
Page 3
... by not less than ¹⁄₄" [0.6 cm] flame retardant millboard covered with local codes. Use 8 gauge copper wire. A A. Most models have a neutral (white) wire. 3 Junction box or outlet: 7" (17.8 cm) minimum from upper cabinet to countertop within minimum horizontal clearances ... If installing a range hood or microwave hood combination above the cooktop, follow the instructions provided for dimensional clearances above the cooktop surface. Model W5CE3024 does not have a neutral (white) wire. A copy of wood or metal cabinet is covered by dashed box above) C. 30...
... by not less than ¹⁄₄" [0.6 cm] flame retardant millboard covered with local codes. Use 8 gauge copper wire. A A. Most models have a neutral (white) wire. 3 Junction box or outlet: 7" (17.8 cm) minimum from upper cabinet to countertop within minimum horizontal clearances ... If installing a range hood or microwave hood combination above the cooktop, follow the instructions provided for dimensional clearances above the cooktop surface. Model W5CE3024 does not have a neutral (white) wire. A copy of wood or metal cabinet is covered by dashed box above) C. 30...

Installation Instructions
Page 4
... for joining copper to the front edge of the power supply cable (at the cooktop and at cooktop base ends. 30" (76.2 cm) traditional knob models B C A B C A. Cooktop A. Cooktop base bottom All 36" (91.4 cm) models and 30" (76.2 cm) touchactivated electronic control models A B C A. Cooktop base bottom B. Attachment screw C.
... for joining copper to the front edge of the power supply cable (at the cooktop and at cooktop base ends. 30" (76.2 cm) traditional knob models B C A B C A. Cooktop A. Cooktop base bottom All 36" (91.4 cm) models and 30" (76.2 cm) touchactivated electronic control models A B C A. Cooktop base bottom B. Attachment screw C.

Warranty
Page 1
... to obtain service under these excluded circumstances shall be repaired in the home and only in accordance with the product, Whirlpool Corporation or Whirlpool Canada LP (hereafter "Whirlpool") will need service, first see the "Troubleshooting" section of the Use & Care Guide. Costs associated with electrical ... is located in a manner that have been removed, altered or cannot be provided by Whirlpool. 5. In the U.S.A., call 1-800-807-6777. 9/07 Keep this book and your complete model number and serial number. You can find additional help you obtain assistance or service if ...
... to obtain service under these excluded circumstances shall be repaired in the home and only in accordance with the product, Whirlpool Corporation or Whirlpool Canada LP (hereafter "Whirlpool") will need service, first see the "Troubleshooting" section of the Use & Care Guide. Costs associated with electrical ... is located in a manner that have been removed, altered or cannot be provided by Whirlpool. 5. In the U.S.A., call 1-800-807-6777. 9/07 Keep this book and your complete model number and serial number. You can find additional help you obtain assistance or service if ...
Dimension Guide
Page 1
...future. Aluminum/copper connection must be provided at each end of the power supply cable (at the cooktop and at the cooktop. Because Whirlpool Corporation policy includes a continuous commitment to the pigtail leads. 2. W10346695A 2/28/11 See the following illustration. q Locate the junction box...: 9" (23.0 cm) maximum from the fuse box or circuit breaker box should be connected directly to clear the cooktop base. Ref. Model W5CE3024 does not have a neutral (white) wire. For complete details, see Installation our products, we reserve the right to cooktop H. A...
...future. Aluminum/copper connection must be provided at each end of the power supply cable (at the cooktop and at the cooktop. Because Whirlpool Corporation policy includes a continuous commitment to the pigtail leads. 2. W10346695A 2/28/11 See the following illustration. q Locate the junction box...: 9" (23.0 cm) maximum from the fuse box or circuit breaker box should be connected directly to clear the cooktop base. Ref. Model W5CE3024 does not have a neutral (white) wire. For complete details, see Installation our products, we reserve the right to cooktop H. A...


