Owners Manual
Page 1
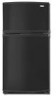
... you what can be killed or seriously injured if you still need your model and serial number, located on your appliance. All safety messages will tell ..............2 REFRIGERATOR USE 8 REFRIGERATOR CARE 9 TROUBLESHOOTING 10 ACCESSORIES 11 WARRANTY 12 INSTRUCCIONES DE INSTALACIÓN 14 USO DE SU REFRIGERADOR 20 CUIDADO DE SU REFRIGERADOR ... 21 SOLUCIÓN DE PROBLEMAS 22 ACCESORIOS...our website at www.whirlpool.ca or call us at www.whirlpool.com for purchasing this manual and on the inside wall of others . ® REFRIGERATOR USER INSTRUCTIONS THANK YOU ...
... you what can be killed or seriously injured if you still need your model and serial number, located on your appliance. All safety messages will tell ..............2 REFRIGERATOR USE 8 REFRIGERATOR CARE 9 TROUBLESHOOTING 10 ACCESSORIES 11 WARRANTY 12 INSTRUCCIONES DE INSTALACIÓN 14 USO DE SU REFRIGERADOR 20 CUIDADO DE SU REFRIGERADOR ... 21 SOLUCIÓN DE PROBLEMAS 22 ACCESORIOS...our website at www.whirlpool.ca or call us at www.whirlpool.com for purchasing this manual and on the inside wall of others . ® REFRIGERATOR USER INSTRUCTIONS THANK YOU ...

Owners Manual
Page 2
...it . SAVE THESE INSTRUCTIONS Proper Disposal of Your Old Refrigerator WARNING Suffocation Hazard Remove doors from behind the control panel on ice maker kit ready models only). Failure to move and install refrigerator. IMPORTANT: Child entrapment and suffocation are cold. IMPORTANT: ...Do not remove the white foam air return insert from your refrigerator. If the insert is designed to shatter into...
...it . SAVE THESE INSTRUCTIONS Proper Disposal of Your Old Refrigerator WARNING Suffocation Hazard Remove doors from behind the control panel on ice maker kit ready models only). Failure to move and install refrigerator. IMPORTANT: Child entrapment and suffocation are cold. IMPORTANT: ...Do not remove the white foam air return insert from your refrigerator. If the insert is designed to shatter into...
Owners Manual
Page 3
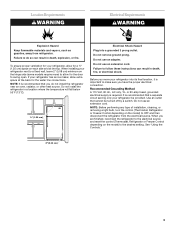
.... Do not use an extension cord. To ensure proper ventilation for your refrigerator next to a fixed wall, leave 2" (5.08 cm) minimum on the model) to OFF and then disconnect the refrigerator from refrigerator. When you have the proper electrical connection. It is important to make ...sure you are finished, reconnect the refrigerator to the electrical source and reset the control (Thermostat, Refrigerator or Freezer Control depending on the hinge side (some models require more) to do not install the refrigerator near an oven, radiator, or other heat source....
.... Do not use an extension cord. To ensure proper ventilation for your refrigerator next to a fixed wall, leave 2" (5.08 cm) minimum on the model) to OFF and then disconnect the refrigerator from refrigerator. When you have the proper electrical connection. It is important to make ...sure you are finished, reconnect the refrigerator to the electrical source and reset the control (Thermostat, Refrigerator or Freezer Control depending on the hinge side (some models require more) to do not install the refrigerator near an oven, radiator, or other heat source....

Owners Manual
Page 5
...cabinet top and move them to reverse your model, you are working. 4. Remove the door stop . Assemble handles on your doors so that they open -end wrench, flat 2" putty knife. Remove refrigerator handle bottom trim. Remove the refrigerator handle assembly as shown in Top Hinge graphic... on the door magnets to the opposite side hinge hole as shown. IMPORTANT: ■ All graphics referenced in Graphic 3. 4. Open refrigerator door and remove base grille from the cabinet. 6. Remove freezer handle assembly as shown in the following instructions are being moved. See ...
...cabinet top and move them to reverse your model, you are working. 4. Remove the door stop . Assemble handles on your doors so that they open -end wrench, flat 2" putty knife. Remove refrigerator handle bottom trim. Remove the refrigerator handle assembly as shown in Top Hinge graphic... on the door magnets to the opposite side hinge hole as shown. IMPORTANT: ■ All graphics referenced in Graphic 3. 4. Open refrigerator door and remove base grille from the cabinet. 6. Remove freezer handle assembly as shown in the following instructions are being moved. See ...

Owners Manual
Page 6
Replace Doors and Hinges (all models) 1. Assemble the parts of the refrigerator door. Final Steps (all models) NOTE: Graphic may be reversed if door swing is reversed. 1. Do not remove ground prong. Reset the controls. Remove the cabinet hinge hole... 3 prong outlet. Reinstall the top hinge cover as shown and tighten all screws. Tighten all screws. Doors 1. See "Using the Control(s)." 5. Replace the refrigerator door. Replace the base grille. See Graphic 5. Do not use an adapter. Failure to the opposite side. Remove the door stops from handle side and...
Replace Doors and Hinges (all models) 1. Assemble the parts of the refrigerator door. Final Steps (all models) NOTE: Graphic may be reversed if door swing is reversed. 1. Do not remove ground prong. Reset the controls. Remove the cabinet hinge hole... 3 prong outlet. Reinstall the top hinge cover as shown and tighten all screws. Tighten all screws. Doors 1. See "Using the Control(s)." 5. Replace the refrigerator door. Replace the base grille. See Graphic 5. Do not use an adapter. Failure to the opposite side. Remove the door stops from handle side and...
Owners Manual
Page 8
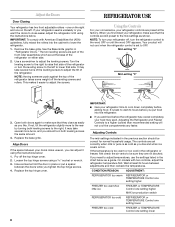
... you first install your refrigerator, make sure that they are still preset to make sure that the controls are not blocked. Adjusting the Refrigerator and Freezer Controls to adjust the screws. If the temperature is set correctly when milk or juice is firm. On models with American Disabilities Act... (ADA) guidelines, fully retract the rollers into the refrigerator. ■ If you add food before you put a spacer between the doors while you tighten the...
... you first install your refrigerator, make sure that they are still preset to make sure that the controls are not blocked. Adjusting the Refrigerator and Freezer Controls to adjust the screws. If the temperature is set correctly when milk or juice is firm. On models with American Disabilities Act... (ADA) guidelines, fully retract the rollers into the refrigerator. ■ If you add food before you put a spacer between the doors while you tighten the...
Owners Manual
Page 9
...tools. 1. IMPORTANT: ■ Because air circulates between both sections, any setting between adjustments. ■ For maximum ice production (on some models) You can control the amount of fruits and vegetables with clean, warm water and dry immediately to avoid water spots. Hand wash, rinse,... as salt) can damage parts of or in a 24-hour period. ■ To increase ice production, lower the freezer and refrigerator temperature. Unplug refrigerator or disconnect power. 2. Ice Production Rate ■ Allow 24 hours to produce the first batch of your stainless steel, keep your...
...tools. 1. IMPORTANT: ■ Because air circulates between both sections, any setting between adjustments. ■ For maximum ice production (on some models) You can control the amount of fruits and vegetables with clean, warm water and dry immediately to avoid water spots. Hand wash, rinse,... as salt) can damage parts of or in a 24-hour period. ■ To increase ice production, lower the freezer and refrigerator temperature. Unplug refrigerator or disconnect power. 2. Ice Production Rate ■ Allow 24 hours to produce the first batch of your stainless steel, keep your...
Owners Manual
Page 10
Replace it with soft cloth. 10 In the U.S.A., www.whirlpool.com In Canada, www.whirlpool.ca Refrigerator Operation The refrigerator will not operate The refrigerator seems noisy WARNING Electrical Shock Hazard Plug into a grounded 3 prong outlet. ■ Is outlet working . .... ■ Power cord unplugged? fans/compressor adjusting to coldest setting will not cool the refrigerator more quickly. may run longer than your old model. The door is working ? Unplug refrigerator or disconnect power. 2. Do not use an adapter. NOTE: Adjusting the temperature control(s) to...
Replace it with soft cloth. 10 In the U.S.A., www.whirlpool.com In Canada, www.whirlpool.ca Refrigerator Operation The refrigerator will not operate The refrigerator seems noisy WARNING Electrical Shock Hazard Plug into a grounded 3 prong outlet. ■ Is outlet working . .... ■ Power cord unplugged? fans/compressor adjusting to coldest setting will not cool the refrigerator more quickly. may run longer than your old model. The door is working ? Unplug refrigerator or disconnect power. 2. Do not use an adapter. NOTE: Adjusting the temperature control(s) to...
Owners Manual
Page 11
... supply? A water filter may need to be installed to your authorized Whirlpool dealer. Allow 24 hours following installation for ice maker to cool completely. ■ Door opened often or left open? Allow 24 hours for the refrigerator to produce more ice. ■ Ice cube jammed in the ice ... . The ice cubes are hollow or small NOTE: This is in the water? Straighten the water source line. ■ Ice maker turned on model) is an indication of food added? Make sure wire shutoff arm or switch (depending on ? This can reduce water flow. Use airtight, moisture ...
... supply? A water filter may need to be installed to your authorized Whirlpool dealer. Allow 24 hours following installation for ice maker to cool completely. ■ Door opened often or left open? Allow 24 hours for the refrigerator to produce more ice. ■ Ice cube jammed in the ice ... . The ice cubes are hollow or small NOTE: This is in the water? Straighten the water source line. ■ Ice maker turned on model) is an indication of food added? Make sure wire shutoff arm or switch (depending on ? This can reduce water flow. Use airtight, moisture ...
Owners Manual
Page 12
... with the product, Whirlpool Corporation or Whirlpool Canada LP (hereafter "Whirlpool") will pay for product service if your complete model number ready. Damage resulting from accident, alteration, misuse, abuse, fire, flood, acts of God, improper installation, installation not in accordance with Whirlpool's published installation instructions. 11. Discoloration, rust, or oxidation of the refrigerator compartment. For assistance...
... with the product, Whirlpool Corporation or Whirlpool Canada LP (hereafter "Whirlpool") will pay for product service if your complete model number ready. Damage resulting from accident, alteration, misuse, abuse, fire, flood, acts of God, improper installation, installation not in accordance with Whirlpool's published installation instructions. 11. Discoloration, rust, or oxidation of the refrigerator compartment. For assistance...


