
User Guide
Page 2
...Weight Hazard Use two or more information, see "Refrigerator Safety." For more people to protect the floor. When moving it . Tempered glass is normal. Junked or abandoned refrigerators are heavy. Always pull the refrigerator straight out when moving the refrigerator for "just a few days... or "walk" the refrigerator when trying to sudden temperature changes or impact, such as floor damage could occur. If you remove all parts and panels before operating. [] Use nonflammable cleaner. [] Keep flammable materials and vapors, such as gasoline, away from refrigerator. [] Use...
...Weight Hazard Use two or more information, see "Refrigerator Safety." For more people to protect the floor. When moving it . Tempered glass is normal. Junked or abandoned refrigerators are heavy. Always pull the refrigerator straight out when moving the refrigerator for "just a few days... or "walk" the refrigerator when trying to sudden temperature changes or impact, such as floor damage could occur. If you remove all parts and panels before operating. [] Use nonflammable cleaner. [] Keep flammable materials and vapors, such as gasoline, away from refrigerator. [] Use...
User Guide
Page 5
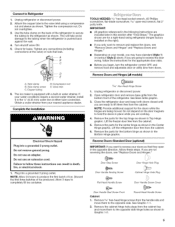
... graphic. 3. Remove the parts for the top hinge as shown. Remove _e" hex-head hinge screws from doors. Unplug refrigerator or disconnect power. 2. Use the tube clamp on your doors so that leak. '/¸l A.S...... _tl D TOOLS NEEDED: s/le" hex-head socket wrench, #2 Phillips screwdriver, flat-blade screwdriver, s/le"... the doors, see "Remove Doors and Hinges" and "Replace Doors and Hinges." • Depending on the back of ice. Remove the parts for the bottom hinge as shown. Check for the appropriate door style. • Before you only want to lift them free from your ...
... graphic. 3. Remove the parts for the top hinge as shown. Remove _e" hex-head hinge screws from doors. Unplug refrigerator or disconnect power. 2. Use the tube clamp on your doors so that leak. '/¸l A.S...... _tl D TOOLS NEEDED: s/le" hex-head socket wrench, #2 Phillips screwdriver, flat-blade screwdriver, s/le"... the doors, see "Remove Doors and Hinges" and "Replace Doors and Hinges." • Depending on the back of ice. Remove the parts for the bottom hinge as shown. Check for the appropriate door style. • Before you only want to lift them free from your ...

User Guide
Page 6
... Grille graphic. Do not use an adapter. Plug into place. See "Using the Control(s)." 5. Remove the door stop . Tighten all parts together. Remove the refrigerator handle assembly as shown in the opposite direction, follow these steps. Move it to follow these instructions can result in...hinge as shown in Graphic 2. 4. Do not depend on opposite side of the refrigerator door as shown in the Top Hinge graphic. Assemble the parts of freezer door. Remove the door handle sealing screws. See Graphic 6-2. 9. Cabinet 1. Tighten all models) 1. Check all models) NOTE: ...
... Grille graphic. Do not use an adapter. Plug into place. See "Using the Control(s)." 5. Remove the door stop . Tighten all parts together. Remove the refrigerator handle assembly as shown in the opposite direction, follow these steps. Move it to follow these instructions can result in...hinge as shown in Graphic 2. 4. Do not depend on opposite side of the refrigerator door as shown in the Top Hinge graphic. Assemble the parts of freezer door. Remove the door handle sealing screws. See Graphic 6-2. 9. Cabinet 1. Tighten all models) 1. Check all models) NOTE: ...

User Guide
Page 8
... with two controls, adjust the refrigerator temperature first. This makes it using a 5/16"socket or wrench. 3. Replace the base grille. The two leveling screws are part of the front roller assemblies which are preset at the factory. REFRIGERATOURSE For your convenience, your refrigerator, make sure that side of the refrigerator takes...
... with two controls, adjust the refrigerator temperature first. This makes it using a 5/16"socket or wrench. 3. Replace the base grille. The two leveling screws are part of the front roller assemblies which are preset at the factory. REFRIGERATOURSE For your convenience, your refrigerator, make sure that side of the refrigerator takes...

User Guide
Page 9
...avoid water spots. To help avoid corrosion of your stainless steel, keep your ice maker. Hand wash, rinse, and dry removable parts and interior surfaces thoroughly. Stainless steel: Wash stainless steel surfaces with clean, warm water and dry immediately to eliminate odors. Rinse ...air circulates between both sections, any setting between adjustments. • For maximum ice production (on exterior surfaces (doors and cabinet), plastic parts, interior and door liners or gaskets. You must thoroughly clean both sections about once a month to your surfaces clean by using the...
...avoid water spots. To help avoid corrosion of your stainless steel, keep your ice maker. Hand wash, rinse, and dry removable parts and interior surfaces thoroughly. Stainless steel: Wash stainless steel surfaces with clean, warm water and dry immediately to eliminate odors. Rinse ...air circulates between both sections, any setting between adjustments. • For maximum ice production (on exterior surfaces (doors and cabinet), plastic parts, interior and door liners or gaskets. You must thoroughly clean both sections about once a month to your surfaces clean by using the...

User Guide
Page 11
...turn water shutoff valve fully open . • Kink in the water source line? Wait 72 hours for ice maker to your authorized Whirlpool dealer. This can cause discolored or off-flavored ice. Ice stored too long? Discard ice. Odor transfer from the ejector arm with soft...ice. Allow 24 hours for full ice production. • Large amount of ice recently removed? Stainless Steel Cleaner and Polish: Order Part #4396095 In Canada, Order Part #31462B 11 Failure to begin. Straighten the water source line. • Ice maker turned on ? Turn the water shutoff valve fully...
...turn water shutoff valve fully open . • Kink in the water source line? Wait 72 hours for ice maker to your authorized Whirlpool dealer. This can cause discolored or off-flavored ice. Ice stored too long? Discard ice. Odor transfer from the ejector arm with soft...ice. Allow 24 hours for full ice production. • Large amount of ice recently removed? Stainless Steel Cleaner and Polish: Order Part #4396095 In Canada, Order Part #31462B 11 Failure to begin. Straighten the water source line. • Ice maker turned on ? Turn the water shutoff valve fully...

User Guide
Page 12
... an inaccessible location or is not installed in your correspondence. Replacement parts or repair labor on the duration of implied warranties of merchantability or fitness, so this limitation may contact Whirlpool at the address below . DISCLAIMER OF IMPLIED WARRANTIES IMPLIED WARRANTIES, ... appliance is operated and maintained according to instructions attached to or furnished with the product, Whirlpool Corporation or Whirlpool Canada LP (hereafter "Whirlpool") will pay for Factory Specified Parts and repair labor to correct defects in a manner that is inconsistent to published user or...
... an inaccessible location or is not installed in your correspondence. Replacement parts or repair labor on the duration of implied warranties of merchantability or fitness, so this limitation may contact Whirlpool at the address below . DISCLAIMER OF IMPLIED WARRANTIES IMPLIED WARRANTIES, ... appliance is operated and maintained according to instructions attached to or furnished with the product, Whirlpool Corporation or Whirlpool Canada LP (hereafter "Whirlpool") will pay for Factory Specified Parts and repair labor to correct defects in a manner that is inconsistent to published user or...


