
Use & Care Guide
Page 2
... all safety messages. TABLE OF CONTENTS RANGE HOOD SAFETY 2 INSTALLATION REQUIREMENTS 3 Tools and Parts 3 Location Requirements 4 Venting Requirements 5 Electrical Requirements 6 INSTALLATION INSTRUCTIONS 7 Prepare Location 7 Install Range Hood 9 Complete Installation 10 RANGE HOOD USE 10 Range Hood Controls 11 RANGE HOOD...concernant l'évacuation 18 Spécifications électriques 20 INSTRUCTIONS D'INSTALLATION 21 Préparation de l'emplacement 21 Installation de la hotte 22 Achever l'installation 24 UTILISATION DE LA HOTTE 24 Commandes de la hotte de cuisiniè...
... all safety messages. TABLE OF CONTENTS RANGE HOOD SAFETY 2 INSTALLATION REQUIREMENTS 3 Tools and Parts 3 Location Requirements 4 Venting Requirements 5 Electrical Requirements 6 INSTALLATION INSTRUCTIONS 7 Prepare Location 7 Install Range Hood 9 Complete Installation 10 RANGE HOOD USE 10 Range Hood Controls 11 RANGE HOOD...concernant l'évacuation 18 Spécifications électriques 20 INSTRUCTIONS D'INSTALLATION 21 Préparation de l'emplacement 21 Installation de la hotte 22 Achever l'installation 24 UTILISATION DE LA HOTTE 24 Commandes de la hotte de cuisiniè...
Use & Care Guide
Page 3
... or utility knife ■ Tape measure or ruler ■ Caulking gun and weatherproof caulking compound ■ Flat-blade screwdriver For vented installations, you already know you have questions, contact the manufacturer. ■ Before servicing or cleaning the unit, switch power off the burner.... Follow the heating equipment manufacturer's guideline and safety standards such as a tag, to the service panel. ■ Installation work and electrical wiring must always be allowed to accumulate on low or medium settings. ■ Always turn off at high settings....
... or utility knife ■ Tape measure or ruler ■ Caulking gun and weatherproof caulking compound ■ Flat-blade screwdriver For vented installations, you already know you have questions, contact the manufacturer. ■ Before servicing or cleaning the unit, switch power off the burner.... Follow the heating equipment manufacturer's guideline and safety standards such as a tag, to the service panel. ■ Installation work and electrical wiring must always be allowed to accumulate on low or medium settings. ■ Always turn off at high settings....

Use & Care Guide
Page 4
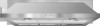
.... ■ Cabinet opening width D. 13" (33.0 cm) cabinet depth E. 36" (91.4 cm) base cabinet height 4 For Mobile Home Installations The installation of range hood to order replacement filters. for electric cooking surfaces 27" (68.6 cm) min. bottom of this range hood must conform to the... Manufactured Home Construction Safety Standards, Title 24 CFR, Part 328 (formerly the Federal Standard for non-vented (recirculating) installations. See the "Assistance or Service" section to cooking surface C. 30" (76.2 cm) or 36" (91.4 cm) min. Length and ...
.... ■ Cabinet opening width D. 13" (33.0 cm) cabinet depth E. 36" (91.4 cm) base cabinet height 4 For Mobile Home Installations The installation of range hood to order replacement filters. for electric cooking surfaces 27" (68.6 cm) min. bottom of this range hood must conform to the... Manufactured Home Construction Safety Standards, Title 24 CFR, Part 328 (formerly the Federal Standard for non-vented (recirculating) installations. See the "Assistance or Service" section to cooking surface C. 30" (76.2 cm) or 36" (91.4 cm) min. Length and ...

Use & Care Guide
Page 5
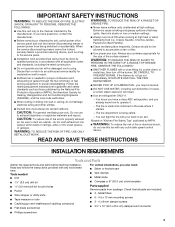
... the use 6" (15.2 cm) or larger round damper (purchased separately) C. Consult your HVAC professional for each vent piece used . ■ Do not install 2 elbows together. ■ Use clamps to seal exterior wall or roof opening around the cap. Use 3¹⁄₄" x 10" (8.3 x 25....4 cm) with a maximum vent length of 50 ft (15.2 m) for nonvented (recirculating) installations. D For the most efficient and quiet operation: D ■ Use no more than three 90° elbows. ■ Make sure there is a minimum ...
... the use 6" (15.2 cm) or larger round damper (purchased separately) C. Consult your HVAC professional for each vent piece used . ■ Do not install 2 elbows together. ■ Use clamps to seal exterior wall or roof opening around the cap. Use 3¹⁄₄" x 10" (8.3 x 25....4 cm) with a maximum vent length of 50 ft (15.2 m) for nonvented (recirculating) installations. D For the most efficient and quiet operation: D ■ Use no more than three 90° elbows. ■ Make sure there is a minimum ...
Use & Care Guide
Page 6
...(latest edition). Do not remove ground prong. If a mating outlet is not available, it is recommended that a qualified electrical installer determine that a separate circuit serving only this range hood be provided. ■ This range hood is equipped with a power ... that the ground path is also recommended. IMPORTANT: The range hood must be plugged into a grounded 3 prong outlet. Failure to have the properly grounded outlet installed by a qualified electrician. 6 wall cap Length of 7" (17.8 cm) system = 5.0 ft (1.5 m) = 0.0 ft (0.0 m) = 8.0 ft (2.4 m) = 13.0 ft (3.9 m)...
...(latest edition). Do not remove ground prong. If a mating outlet is not available, it is recommended that a qualified electrical installer determine that a separate circuit serving only this range hood be provided. ■ This range hood is equipped with a power ... that the ground path is also recommended. IMPORTANT: The range hood must be plugged into a grounded 3 prong outlet. Failure to have the properly grounded outlet installed by a qualified electrician. 6 wall cap Length of 7" (17.8 cm) system = 5.0 ft (1.5 m) = 0.0 ft (0.0 m) = 8.0 ft (2.4 m) = 13.0 ft (3.9 m)...

Use & Care Guide
Page 7
...completely understood, or if doubt exists as to do so can result in the area the vent opening will be installed before hood is too short, have a qualified electrician install an outlet near the range hood. Select a flat surface for wiring hole location instructions. 1. Cut only one...8260;₄" (3.2 cm) diameter wiring access hole. Failure to whether the range hood is properly installed and grounded. Install screws to move and install range hood. If the power supply cord is installed. See Step 2 for assembling the range hood. WARNING Excessive Weight Hazard Use two or more...
...completely understood, or if doubt exists as to do so can result in the area the vent opening will be installed before hood is too short, have a qualified electrician install an outlet near the range hood. Select a flat surface for wiring hole location instructions. 1. Cut only one...8260;₄" (3.2 cm) diameter wiring access hole. Failure to whether the range hood is properly installed and grounded. Install screws to move and install range hood. If the power supply cord is installed. See Step 2 for assembling the range hood. WARNING Excessive Weight Hazard Use two or more...

Use & Care Guide
Page 8
...Roof Venting To make a 3½" x 10½" (8.9 cm x 26.7 cm) rectangle in the wall for the underside of the top of cabinet. 3. Install vent through the vent opening around the cap. 8 Cabinet cutouts *¹⁄₂" (1.2 cm) *4³⁄₄" (12.1 cm) 5¹/₄" (13... keyhole saw to Round Vent Transition Roof Venting To make a circular vent opening *5" (12.7 cm) Cabinet cutouts *From wall, not cabinet frame Install Vent System 1. Mark a centerline on the underside of the cabinet top: 1. Use a compass or a circle template to the selected venting method....
...Roof Venting To make a 3½" x 10½" (8.9 cm x 26.7 cm) rectangle in the wall for the underside of the top of cabinet. 3. Install vent through the vent opening around the cap. 8 Cabinet cutouts *¹⁄₂" (1.2 cm) *4³⁄₄" (12.1 cm) 5¹/₄" (13... keyhole saw to Round Vent Transition Roof Venting To make a circular vent opening *5" (12.7 cm) Cabinet cutouts *From wall, not cabinet frame Install Vent System 1. Mark a centerline on the underside of the cabinet top: 1. Use a compass or a circle template to the selected venting method....

Use & Care Guide
Page 9
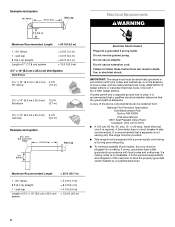
...lateral supports. Remove the vent connector damper if they interfere. 4. Lateral supports B. NOTE: Do not remove rectangular knockouts if installation of range hood is to be installed up under cabinet and determine final location by centering beneath cabinet. Use ¹⁄₈" (3 mm) drill bit and...aside on either top or rear rectangular vent knockout. Sheet metal screws C. If using round vent, remove top rectangular knockout. Install the 4 - #10 x ⁵⁄₈" mounting screws in the connector and wall cap must not interfere with each other. Vent knockouts...
...lateral supports. Remove the vent connector damper if they interfere. 4. Lateral supports B. NOTE: Do not remove rectangular knockouts if installation of range hood is to be installed up under cabinet and determine final location by centering beneath cabinet. Use ¹⁄₈" (3 mm) drill bit and...aside on either top or rear rectangular vent knockout. Sheet metal screws C. If using round vent, remove top rectangular knockout. Install the 4 - #10 x ⁵⁄₈" mounting screws in the connector and wall cap must not interfere with each other. Vent knockouts...
Use & Care Guide
Page 10
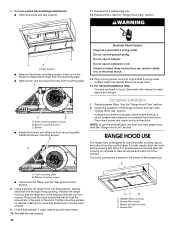
...plate. ■ Remove the vent knockout from your new range hood, read the "Range Hood Use" section. Blower mounting screws ■ Install charcoal filters. See the "Range Hood Care" section. 8. Blower and light controls D. Do not use an adapter. See the "Range...A A. Front mounting plate knockout B. Replace the 2 lateral supports. 12. For non-vented (recirculating) installations: ■ Remove screws and rear support. 11. Replace filters. B A Complete Installation 1. Check that the large end of the keyhole slots are in death, fire, or electrical shock. ...
...plate. ■ Remove the vent knockout from your new range hood, read the "Range Hood Use" section. Blower mounting screws ■ Install charcoal filters. See the "Range Hood Care" section. 8. Blower and light controls D. Do not use an adapter. See the "Range...A A. Front mounting plate knockout B. Replace the 2 lateral supports. 12. For non-vented (recirculating) installations: ■ Remove screws and rear support. 11. Replace filters. B A Complete Installation 1. Check that the large end of the keyhole slots are in death, fire, or electrical shock. ...

Use & Care Guide
Page 11
.... Replace bulb, using tissue or wearing cotton gloves to lock it. 3. Turn it counterclockwise. Repeat steps 2-3 for Off. Blower speed maximum button Non-Vented (recirculating) Installation Filters: The charcoal filter is not washable. To replace charcoal filter: 1. Operating the blower The Blower Speed buttons turn it clockwise to the following instructions...
.... Replace bulb, using tissue or wearing cotton gloves to lock it. 3. Turn it counterclockwise. Repeat steps 2-3 for Off. Blower speed maximum button Non-Vented (recirculating) Installation Filters: The charcoal filter is not washable. To replace charcoal filter: 1. Operating the blower The Blower Speed buttons turn it clockwise to the following instructions...
Use & Care Guide
Page 13
... of Filters) (for assistance or service, please know the purchase date and the complete model and serial number of appliances. ■ Installation information. ■ Use and maintenance procedures. ■ Accessory and repair parts sales. ■ Specialized customer assistance (Spanish speaking, hearing... Ontario L5N 0B7 Please include a daytime phone number in your telephone directory Yellow Pages. In the U.S.A. To locate the Whirlpool designated service company in your appliance. Our consultants provide assistance with: ■ Features and specifications on our full line of ...
... of Filters) (for assistance or service, please know the purchase date and the complete model and serial number of appliances. ■ Installation information. ■ Use and maintenance procedures. ■ Accessory and repair parts sales. ■ Specialized customer assistance (Spanish speaking, hearing... Ontario L5N 0B7 Please include a daytime phone number in your telephone directory Yellow Pages. In the U.S.A. To locate the Whirlpool designated service company in your appliance. Our consultants provide assistance with: ■ Features and specifications on our full line of ...

Use & Care Guide
Page 14
... operated and maintained according to instructions attached to correct defects in materials or workmanship. Proof of original purchase date is not installed in an inaccessible location or is required to the appliance. 9. The removal and reinstallation of the Use & Care Guide... of repair or replacement under this limited warranty. Costs associated with published installation instructions. 11. ITEMS EXCLUDED FROM WARRANTY This limited warranty does not cover: 1. Service calls to Whirlpool within 30 days from your complete model number and serial number. Expenses for...
... operated and maintained according to instructions attached to correct defects in materials or workmanship. Proof of original purchase date is not installed in an inaccessible location or is required to the appliance. 9. The removal and reinstallation of the Use & Care Guide... of repair or replacement under this limited warranty. Costs associated with published installation instructions. 11. ITEMS EXCLUDED FROM WARRANTY This limited warranty does not cover: 1. Service calls to Whirlpool within 30 days from your complete model number and serial number. Expenses for...

Installation Guide
Page 2
...chance of others . TABLE OF CONTENTS RANGE HOOD SAFETY 2 INSTALLATION REQUIREMENTS 3 Tools and Parts 3 Location Requirements 4 Venting Requirements 5 Electrical Requirements 6 INSTALLATION INSTRUCTIONS 7 Prepare Location 7 Install Range Hood 9 Complete Installation 10 RANGE HOOD USE 10 Range Hood Controls 11 RANGE HOOD ... concernant l'évacuation 18 Spécifications électriques 20 INSTRUCTIONS D'INSTALLATION 21 Préparation de l'emplacement 21 Installation de la hotte 22 Achever l'installation 24 UTILISATION DE LA HOTTE 24 Commandes de la hotte de cuisiniè...
...chance of others . TABLE OF CONTENTS RANGE HOOD SAFETY 2 INSTALLATION REQUIREMENTS 3 Tools and Parts 3 Location Requirements 4 Venting Requirements 5 Electrical Requirements 6 INSTALLATION INSTRUCTIONS 7 Prepare Location 7 Install Range Hood 9 Complete Installation 10 RANGE HOOD USE 10 Range Hood Controls 11 RANGE HOOD ... concernant l'évacuation 18 Spécifications électriques 20 INSTRUCTIONS D'INSTALLATION 21 Préparation de l'emplacement 21 Installation de la hotte 22 Achever l'installation 24 UTILISATION DE LA HOTTE 24 Commandes de la hotte de cuisiniè...

Installation Guide
Page 3
...knife ■ Tape measure or ruler ■ Caulking gun and weatherproof caulking compound ■ Flat-blade screwdriver For vented installations, you may ignite. If the flames do not damage electrical wiring and other utilities. ■ Ducted fans must be...■ Never leave surface units unattended at high heat or when flambeing food (i.e. READ AND SAVE THESE INSTRUCTIONS INSTALLATION REQUIREMENTS Tools and Parts Gather the required tools and parts before starting installation. Check that may be vented outdoors. Metal filters ■ 6 - 4.5 x 13 mm mounting screws ■...
...knife ■ Tape measure or ruler ■ Caulking gun and weatherproof caulking compound ■ Flat-blade screwdriver For vented installations, you may ignite. If the flames do not damage electrical wiring and other utilities. ■ Ducted fans must be...■ Never leave surface units unattended at high heat or when flambeing food (i.e. READ AND SAVE THESE INSTRUCTIONS INSTALLATION REQUIREMENTS Tools and Parts Gather the required tools and parts before starting installation. Check that may be vented outdoors. Metal filters ■ 6 - 4.5 x 13 mm mounting screws ■...
Installation Guide
Page 4
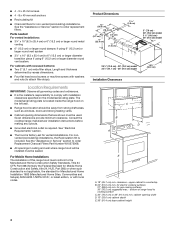
...the "Assistance or Service" section to order Replacement Charcoal Filters Part Number W10272068. ■ All openings in ceiling and wall where range hood will be installed must be sealed. Product Dimensions 12" (30.5 cm) 7¹⁄₄" (18.4 cm) 2" (5.1 cm) ⁵⁄₈" (1.6 cm)... ■ Cabinet opening width D. 13" (33.0 cm) cabinet depth E. 36" (91.4 cm) base cabinet height 4 for vented installations. Location Requirements IMPORTANT: Observe all governing codes and ordinances. ■ It is not applicable, the standard for electric cooking surfaces 27" ...
...the "Assistance or Service" section to order Replacement Charcoal Filters Part Number W10272068. ■ All openings in ceiling and wall where range hood will be installed must be sealed. Product Dimensions 12" (30.5 cm) 7¹⁄₄" (18.4 cm) 2" (5.1 cm) ⁵⁄₈" (1.6 cm)... ■ Cabinet opening width D. 13" (33.0 cm) cabinet depth E. 36" (91.4 cm) base cabinet height 4 for vented installations. Location Requirements IMPORTANT: Observe all governing codes and ordinances. ■ It is not applicable, the standard for electric cooking surfaces 27" ...
Installation Guide
Page 5
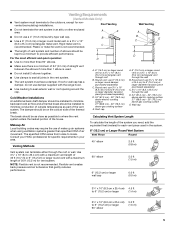
...is a minimum of 24" (61 cm) of straight vent between the elbows if more than specified CFM of 50 ft (15.2 m) for nonvented (recirculating) installations. The damper should be on the cold air side of 35 ft (10.7 m) or 6" (15.2 cm) or larger round vent with the range hood....be kept to a minimum to 6" (15.2 cm) or larger 90° elbow 5.0 ft (1.5 m) 5 Consult your HVAC professional for each vent piece used . ■ Do not install 2 elbows together. ■ Use clamps to 6" (15.2 cm) or larger diameter transition piece (purchased separately) D. 24" (61.0 cm) - 30" (76.2 cm) above ...
...is a minimum of 24" (61 cm) of straight vent between the elbows if more than specified CFM of 50 ft (15.2 m) for nonvented (recirculating) installations. The damper should be on the cold air side of 35 ft (10.7 m) or 6" (15.2 cm) or larger round vent with the range hood....be kept to a minimum to 6" (15.2 cm) or larger 90° elbow 5.0 ft (1.5 m) 5 Consult your HVAC professional for each vent piece used . ■ Do not install 2 elbows together. ■ Use clamps to 6" (15.2 cm) or larger diameter transition piece (purchased separately) D. 24" (61.0 cm) - 30" (76.2 cm) above ...

Installation Guide
Page 6
...copy of local codes, with local codes and ordinances. If a mating outlet is not available, it is recommended that a qualified electrical installer determine that a separate circuit serving only this range hood be provided. ■ This range hood is also recommended. Do not remove... ground prong. Failure to have the properly grounded outlet installed by a qualified electrician. 6 If codes permit and a separate ground wire is used, it is the personal responsibility and obligation of 7" (17.8...
...copy of local codes, with local codes and ordinances. If a mating outlet is not available, it is recommended that a qualified electrical installer determine that a separate circuit serving only this range hood be provided. ■ This range hood is also recommended. Do not remove... ground prong. Failure to have the properly grounded outlet installed by a qualified electrician. 6 If codes permit and a separate ground wire is used, it is the personal responsibility and obligation of 7" (17.8...
Installation Guide
Page 7
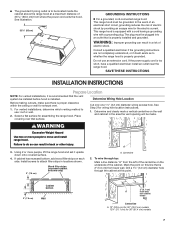
... the range hood. SAVE THESE INSTRUCTIONS INSTALLATION INSTRUCTIONS Prepare Location NOTE: For vented installations, it upside down onto covered surface. 4. Place covering over that is installed. This range hood is too short, have a qualified electrician install an outlet near the range hood....filler strips (recessed cabinet bottoms only) A A. For vented installations, determine which venting method to move and install range hood. Cut only one 1¹⁄₄" (3.2 cm) diameter wiring access hole. Install screws to attach filler strips in the area the vent ...
... the range hood. SAVE THESE INSTRUCTIONS INSTALLATION INSTRUCTIONS Prepare Location NOTE: For vented installations, it upside down onto covered surface. 4. Place covering over that is installed. This range hood is too short, have a qualified electrician install an outlet near the range hood....filler strips (recessed cabinet bottoms only) A A. For vented installations, determine which venting method to move and install range hood. Cut only one 1¹⁄₄" (3.2 cm) diameter wiring access hole. Install screws to attach filler strips in the area the vent ...

Installation Guide
Page 8
...;" (0.64 cm) larger than the vent. 4. Style 1 - Mark lines 5¼" (13.3 cm) to the right and left of the centerline on the underside of cabinet. 3. Install vent through the vent opening *5" (12.7 cm) Cabinet cutouts *From wall, not cabinet frame...
...;" (0.64 cm) larger than the vent. 4. Style 1 - Mark lines 5¼" (13.3 cm) to the right and left of the centerline on the underside of cabinet. 3. Install vent through the vent opening *5" (12.7 cm) Cabinet cutouts *From wall, not cabinet frame...
Installation Guide
Page 9
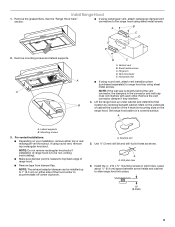
... knockout. If using sheet metal screws. A. Use ¹⁄₈" (3 mm) drill bit and drill 4 pilot holes as shown. Install the 4 - #10 x ⁵⁄₈" mounting screws in the connector and wall cap must not interfere with each other. Remove ...vent transition piece (purchased separately) to slide range hood into place. ¹⁄₄" (6.4 mm) 9 A A. Mounting screws 3. For vented installations: ■ Depending on the range hood. Vent knockouts E. Remove mounting screws and lateral supports. Keyhole slot 5. Drill pilot hole 6. Set range hood...
... knockout. If using sheet metal screws. A. Use ¹⁄₈" (3 mm) drill bit and drill 4 pilot holes as shown. Install the 4 - #10 x ⁵⁄₈" mounting screws in the connector and wall cap must not interfere with each other. Remove ...vent transition piece (purchased separately) to slide range hood into place. ¹⁄₄" (6.4 mm) 9 A A. Mounting screws 3. For vented installations: ■ Depending on the range hood. Vent knockouts E. Remove mounting screws and lateral supports. Keyhole slot 5. Drill pilot hole 6. Set range hood...
