
Installation Guide
Page 2
... tell you don't follow the safety alert symbol and either the word "DANGER" or "WARNING." TABLE OF CONTENTS RANGE HOOD SAFETY 2 INSTALLATION REQUIREMENTS 4 Tools and Parts 4 Location Requirements 4 Venting Requirements 5 Electrical Requirements 6 INSTALLATION INSTRUCTIONS 7 Prepare Location 7 Install Hood Liner Internal Blower Motor 8 Install Hood Liner In-Line (External Type) Blower Motor...
... tell you don't follow the safety alert symbol and either the word "DANGER" or "WARNING." TABLE OF CONTENTS RANGE HOOD SAFETY 2 INSTALLATION REQUIREMENTS 4 Tools and Parts 4 Location Requirements 4 Venting Requirements 5 Electrical Requirements 6 INSTALLATION INSTRUCTIONS 7 Prepare Location 7 Install Hood Liner Internal Blower Motor 8 Install Hood Liner In-Line (External Type) Blower Motor...
Installation Guide
Page 4
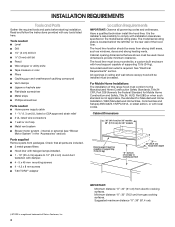
... weatherproof caulking compound ■ Vent clamps ■ Jigsaw or keyhole saw ■ Flat-blade screwdriver ■ Metal snips ■ Phillips screwdriver Parts needed ■ Home power supply cable ■ 1 - ½" (1.3 cm) UL listed or CSA approved strain relief ■ 3 UL...cap ■ Metal vent system ■ Blower motor system - Cabinet opening dimensions that all parts are shown must be used. See "Electrical Requirements" section. Parts supplied Remove parts from electric cooking surfaces. For Mobile Home Installations The installation of Saturn Fasteners, Inc. 4 ...
... weatherproof caulking compound ■ Vent clamps ■ Jigsaw or keyhole saw ■ Flat-blade screwdriver ■ Metal snips ■ Phillips screwdriver Parts needed ■ Home power supply cable ■ 1 - ½" (1.3 cm) UL listed or CSA approved strain relief ■ 3 UL...cap ■ Metal vent system ■ Blower motor system - Cabinet opening dimensions that all parts are shown must be used. See "Electrical Requirements" section. Parts supplied Remove parts from electric cooking surfaces. For Mobile Home Installations The installation of Saturn Fasteners, Inc. 4 ...
Installation Guide
Page 5
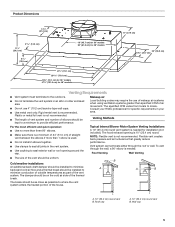
... install 2 elbows together. ■ Use clamps to seal all joints in your HVAC professional for installation (not included). The break should be as close as part of straight vent between the elbows if more than three 90° elbows. ■ Make sure there is a minimum of 24" (61.0 cm) of the...
... install 2 elbows together. ■ Use clamps to seal all joints in your HVAC professional for installation (not included). The break should be as close as part of straight vent between the elbows if more than three 90° elbows. ■ Make sure there is a minimum of 24" (61.0 cm) of the...
Installation Guide
Page 6
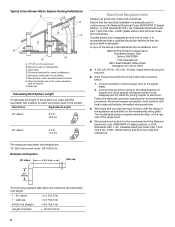
... System Length To calculate the length of the National Electrical Code, ANSI/NFPA 70 (latest edition), or CSA Standards C22. 1-94, Canadian Electrical Code, Part 1 and C22.2 No. 0-M91 (latest edition) and all governing codes and ordinances. Connect a section of system = 13.0 ft (3.9 m) 6... ■ Wire sizes must conform with National Electrical Code, ANSI/NFPA 70 (latest edition), or CSA Standards C22.1-94, Canadian Electrical Code, Part 1 and C22.2 No. 0-M91 (latest edition) and all local codes and ordinances. Mount from : National Fire Protection Association One Batterymarch Park...
... System Length To calculate the length of the National Electrical Code, ANSI/NFPA 70 (latest edition), or CSA Standards C22. 1-94, Canadian Electrical Code, Part 1 and C22.2 No. 0-M91 (latest edition) and all governing codes and ordinances. Connect a section of system = 13.0 ft (3.9 m) 6... ■ Wire sizes must conform with National Electrical Code, ANSI/NFPA 70 (latest edition), or CSA Standards C22.1-94, Canadian Electrical Code, Part 1 and C22.2 No. 0-M91 (latest edition) and all local codes and ordinances. Mount from : National Fire Protection Association One Batterymarch Park...
Installation Guide
Page 7
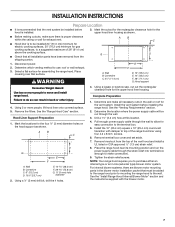
...8324;" (3.2 cm) hole at this location. 4. Remove knockout from the shipping carton. 1. For internal blower systems, there are blower motor mounting parts in the blower motor installation packet that surface. Wall B. Using 2 or more people to the wall. Complete Preparation 1. Install the 10" (25...185;⁄₂" (1.3 cm) strain relief. 8. WARNING A B C G A. See the "Range Hood Care" section. Determine and make all installation parts have been removed from the top of the range hood liner using four 4.2 x 8 mm screws. 6. Wall B. See the "Install Range Hood ...
...8324;" (3.2 cm) hole at this location. 4. Remove knockout from the shipping carton. 1. For internal blower systems, there are blower motor mounting parts in the blower motor installation packet that surface. Wall B. Using 2 or more people to the wall. Complete Preparation 1. Install the 10" (25...185;⁄₂" (1.3 cm) strain relief. 8. WARNING A B C G A. See the "Range Hood Care" section. Determine and make all installation parts have been removed from the top of the range hood liner using four 4.2 x 8 mm screws. 6. Wall B. See the "Install Range Hood ...

Installation Guide
Page 11
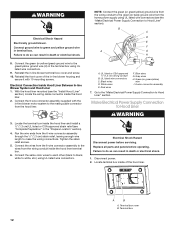
... -line blower housing and hood liner. Connect the wires from the wiring conduit to the wires from the in -line blower system and seal all parts and panels before servicing. Green (or yellow/green) and green/yellow wires I A. Use UL listed wire connectors and connect the black wires (C) together. 4. Make Electrical...
... -line blower housing and hood liner. Connect the wires from the wiring conduit to the wires from the in -line blower system and seal all parts and panels before servicing. Green (or yellow/green) and green/yellow wires I A. Use UL listed wire connectors and connect the black wires (C) together. 4. Make Electrical...
Installation Guide
Page 12
... wire length to Hood Liner" section). Go to the "Make Electrical Power Supply Connection to the green/yellow ground wire (H) in terminal box. Replace all parts and panels before servicing.
... wire length to Hood Liner" section). Go to the "Make Electrical Power Supply Connection to the green/yellow ground wire (H) in terminal box. Replace all parts and panels before servicing.
Installation Guide
Page 17
... nearest designated service center. Accessories Stainless Steel Grease Filter - To locate the Whirlpool designated service company in your correspondence. For further assistance If you need to order replacement parts, we recommend that you can write to fulfill the product warranty and provide ...line of 65,000 Btus. Order Model Number UXB0600DYS 1200 CFM Internal Blower Motor System - Call the Whirlpool Customer eXperience Center toll free: 1-800-253-1301. kit contains 1 filter Order Part Number W10351855 Order quantity 3 for 36" (91.4 cm) model Order quantity 4 for 48" ...
... nearest designated service center. Accessories Stainless Steel Grease Filter - To locate the Whirlpool designated service company in your correspondence. For further assistance If you need to order replacement parts, we recommend that you can write to fulfill the product warranty and provide ...line of 65,000 Btus. Order Model Number UXB0600DYS 1200 CFM Internal Blower Motor System - Call the Whirlpool Customer eXperience Center toll free: 1-800-253-1301. kit contains 1 filter Order Part Number W10351855 Order quantity 3 for 36" (91.4 cm) model Order quantity 4 for 48" ...

Installation Guide
Page 18
... for other damage to the finish of your major appliance, to instruct you need to Whirlpool within 30 days from your sales slip together for repairs. Consumable parts are excluded from defects in accordance with original model/serial numbers that is contrary to be.... This warranty is used for Factory Specified Parts and repair labor to correct defects in -home service is operated and maintained according to instructions attached to or furnished with the product, Whirlpool Corporation or Whirlpool Canada LP (hereafter "Whirlpool") will need service, first see the "...
... for other damage to the finish of your major appliance, to instruct you need to Whirlpool within 30 days from your sales slip together for repairs. Consumable parts are excluded from defects in accordance with original model/serial numbers that is contrary to be.... This warranty is used for Factory Specified Parts and repair labor to correct defects in -home service is operated and maintained according to instructions attached to or furnished with the product, Whirlpool Corporation or Whirlpool Canada LP (hereafter "Whirlpool") will need service, first see the "...

Warranty Information
Page 1
... how to use or when it is used in the country in -home service is covered by Whirlpool. 5. Service calls to refrigerator or freezer product failures. 7. Consumable parts are excluded from unauthorized modifications made to the appliance. 9. Any food loss due to repair or ...accident, alteration, misuse, abuse, fire, flood, acts of God, improper installation, installation not in a remote area where service by a Whirlpool designated service company. Costs associated with published installation instructions. 11. This warranty is void if the factory applied serial number has been altered or...
... how to use or when it is used in the country in -home service is covered by Whirlpool. 5. Service calls to refrigerator or freezer product failures. 7. Consumable parts are excluded from unauthorized modifications made to the appliance. 9. Any food loss due to repair or ...accident, alteration, misuse, abuse, fire, flood, acts of God, improper installation, installation not in a remote area where service by a Whirlpool designated service company. Costs associated with published installation instructions. 11. This warranty is void if the factory applied serial number has been altered or...

