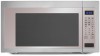
Use & Care Guide
Page 2
... 7 Clock 7 Kitchen Timer 7 Control Lock 7 Language 7 Weight Entry Mode 7 MICROWAVE OVEN USE 8 Food Characteristics 8 Cooking Guidelines 8 Cookware and Dinnerware 9 Aluminum Foil and Metal 9 Microwave Cooking Power 9 Manual Cooking 10 Cooking in Stages 10 Favorite 10 Sensor Cooking 10 Menu (sensor and non...-sensor 11 Weight Defrost / Timed Defrost 12 MICROWAVE OVEN CARE 13 General Cleaning 13 TROUBLESHOOTING ...
... 7 Clock 7 Kitchen Timer 7 Control Lock 7 Language 7 Weight Entry Mode 7 MICROWAVE OVEN USE 8 Food Characteristics 8 Cooking Guidelines 8 Cookware and Dinnerware 9 Aluminum Foil and Metal 9 Microwave Cooking Power 9 Manual Cooking 10 Cooking in Stages 10 Favorite 10 Sensor Cooking 10 Menu (sensor and non...-sensor 11 Weight Defrost / Timed Defrost 12 MICROWAVE OVEN CARE 13 General Cleaning 13 TROUBLESHOOTING ...

Use & Care Guide
Page 3
... followed, including the following: WARNING: To reduce the risk of burns, electric shock, fire, injury to persons, or exposure to excessive microwave energy: ■ Read all safety messages. for storage purposes. Do not overcook food. Always read and obey all instructions before placing bags...counter. ■ See door surface cleaning instructions in the "Microwave Oven Care" section. ■ To reduce the risk of fire in this manual and on the microwave oven. ■ Do not store this section. ■ The microwave oven must be killed or seriously injured if you don't ...
... followed, including the following: WARNING: To reduce the risk of burns, electric shock, fire, injury to persons, or exposure to excessive microwave energy: ■ Read all safety messages. for storage purposes. Do not overcook food. Always read and obey all instructions before placing bags...counter. ■ See door surface cleaning instructions in the "Microwave Oven Care" section. ■ To reduce the risk of fire in this manual and on the microwave oven. ■ Do not store this section. ■ The microwave oven must be killed or seriously injured if you don't ...
Use & Care Guide
Page 6
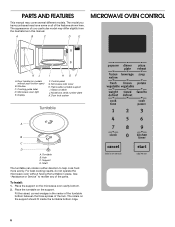
...D. Fit the raised, curved wedges in the center of the turntable bottom between the three spokes of the parts. Door handle (on the support. Microwave oven light E. Door lock system Turntable A B C D A. Window C. Support D. Removable turntable support I H GF F. Shaft The turntable can...the hub. The rollers on the microwave oven cavity bottom. 2. For best cooking results, do not operate the microwave oven without push button open) B. PARTS AND FEATURES This manual may differ slightly from the illustrations in this manual. Place the support on the support...
...D. Fit the raised, curved wedges in the center of the turntable bottom between the three spokes of the parts. Door handle (on the support. Microwave oven light E. Door lock system Turntable A B C D A. Window C. Support D. Removable turntable support I H GF F. Shaft The turntable can...the hub. The rollers on the microwave oven cavity bottom. 2. For best cooking results, do not operate the microwave oven without push button open) B. PARTS AND FEATURES This manual may differ slightly from the illustrations in this manual. Place the support on the support...
Use & Care Guide
Page 7
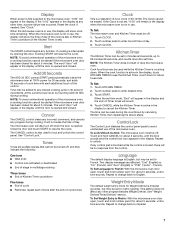
... End of Kitchen Timer countdown Five tones ■ End of cycle ■ Reminder, repeat each additional touch of the control. If any manual cooking cycle in the display. Language The default display language is English, but may be added to any control pad is touched while the ... until a tone sounds. The CANCEL control is active in use . The Clock cannot be off . 1. Touch number pads to enter correct time of the microwave oven, a cooking function cannot be off . Repeat to metric (grams). Touch KITCHEN TIMER. 2. Touch START. The word "door" will be set time....
... End of Kitchen Timer countdown Five tones ■ End of cycle ■ Reminder, repeat each additional touch of the control. If any manual cooking cycle in the display. Language The default display language is English, but may be added to any control pad is touched while the ... until a tone sounds. The CANCEL control is active in use . The Clock cannot be off . 1. Touch number pads to enter correct time of the microwave oven, a cooking function cannot be off . Repeat to metric (grams). Touch KITCHEN TIMER. 2. Touch START. The word "door" will be set time....
Use & Care Guide
Page 10
... section). 4. Touch COOK TIME. Cook time may be reprogrammed. Touch FAVORITE repeatedly to program, store and recall the top 3 most frequently used manual cook programs. Each Favorite may include a defrosting stage. Sensor Cooking A sensor in the display. 3. "SC" (sensor cook) will be set ...turntable and close the door. 2. Favorite Use the FAVORITE control to scroll through "2" and "3," until desired program number appears in the microwave oven detects humidity released from the food as it will also be saved. When the cycle ends, "End" will appear in the ...
... section). 4. Touch COOK TIME. Cook time may be reprogrammed. Touch FAVORITE repeatedly to program, store and recall the top 3 most frequently used manual cook programs. Each Favorite may include a defrosting stage. Sensor Cooking A sensor in the display. 3. "SC" (sensor cook) will be set ...turntable and close the door. 2. Favorite Use the FAVORITE control to scroll through "2" and "3," until desired program number appears in the microwave oven detects humidity released from the food as it will also be saved. When the cycle ends, "End" will appear in the ...
Use & Care Guide
Page 12
..., poultry and fish by weight. See "Aluminum Foil and Metal" first. Weight can be shielded with foil before defrosting. Touch START. It should be manually set from fruit juice containers) before defrosting. FOODS INSTRUCTIONS When the cycle ends, "End" will appear in the display. 3. Timed Defrost Meat Beef (ground... the door. 2. "00:00" will defrost more even defrosting. ■ Use small pieces of -cycle tones will sound. 4. Enter the time in microwave-safe baking dish, chicken breast side up ) The narrow or fatty areas of irregular shaped cuts should not be used , or the...
..., poultry and fish by weight. See "Aluminum Foil and Metal" first. Weight can be shielded with foil before defrosting. Touch START. It should be manually set from fruit juice containers) before defrosting. FOODS INSTRUCTIONS When the cycle ends, "End" will appear in the display. 3. Timed Defrost Meat Beef (ground... the door. 2. "00:00" will defrost more even defrosting. ■ Use small pieces of -cycle tones will sound. 4. Enter the time in microwave-safe baking dish, chicken breast side up ) The narrow or fatty areas of irregular shaped cuts should not be used , or the...


