
Owners Manual
Page 6
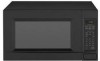
...Turn over foods like pork chops, baking potatoes, roasts, or whole cauliflower halfway through the cooking time to expose all materials from the microwave, cover food with foil or casserole lid and let it has cooled sufficiently. In this case, a sensitive thermal safety device automatically turns...to microwave energy. ● Place delicate areas of foods, such as chicken pieces or salmon steaks, with the thicker, meatier parts toward the center of accident causing oven damage. BUILT-IN CAPACITY For information call: 1-800-688-9900 U.S.A. 1-800-688-2002 Canada • Available Trim kit is...
...Turn over foods like pork chops, baking potatoes, roasts, or whole cauliflower halfway through the cooking time to expose all materials from the microwave, cover food with foil or casserole lid and let it has cooled sufficiently. In this case, a sensitive thermal safety device automatically turns...to microwave energy. ● Place delicate areas of foods, such as chicken pieces or salmon steaks, with the thicker, meatier parts toward the center of accident causing oven damage. BUILT-IN CAPACITY For information call: 1-800-688-9900 U.S.A. 1-800-688-2002 Canada • Available Trim kit is...

Dimension Guide
Page 1
..., we reserve the right to improve Dimensions are located. Countertop Microwave Ovens PRODUCT MODEL NUMBERS UMC5200BA Electrical: A 120-volt, 60 Hz, AC-only, 15 or 20 amp fused electrical supply with product. Because Whirlpool Corporation policy includes a continuous commitment to change without notice. Blocking... separate circuit serving only this appliance be built into a wall or cabinet, or over approved electric single oven only, using approved trim kits. See dealer for planning purposes only. Allow a few inches of space at the back and side of the oven where the ...
..., we reserve the right to improve Dimensions are located. Countertop Microwave Ovens PRODUCT MODEL NUMBERS UMC5200BA Electrical: A 120-volt, 60 Hz, AC-only, 15 or 20 amp fused electrical supply with product. Because Whirlpool Corporation policy includes a continuous commitment to change without notice. Blocking... separate circuit serving only this appliance be built into a wall or cabinet, or over approved electric single oven only, using approved trim kits. See dealer for planning purposes only. Allow a few inches of space at the back and side of the oven where the ...

Installation Instructions
Page 1
... be killed or seriously injured if you what the potential hazard is the safety alert symbol. All safety messages will follow instructions. MICROWAVE OVEN BUILT-IN TRIM KIT INSTALLATION INSTRUCTIONS Built-In Trim Kit Models UMTK27, UMTK30 UL listed for use over built-in this manual and on your appliance. These words mean: DANGER You...
... be killed or seriously injured if you what the potential hazard is the safety alert symbol. All safety messages will follow instructions. MICROWAVE OVEN BUILT-IN TRIM KIT INSTALLATION INSTRUCTIONS Built-In Trim Kit Models UMTK27, UMTK30 UL listed for use over built-in this manual and on your appliance. These words mean: DANGER You...

Installation Instructions
Page 2
...without a built-in oven), and a clearance of the lower oven cutout and the microwave oven cutout floor. Make sure the surrounding cabinetry has clearance to microwave oven cutout floor. ■ Trim kit frame extends 11/16" (1.8 cm) below ). Allow a clearance of at least ...) 24" (61.0 cm) 1 3.7 cm)* 2⁷⁄₈" (7.3 cm)** ⁷⁄₈" (2.2 cm) *27" (68.6 cm) trim kit **30" (76.2 cm) trim kit 3" (7.6 cm) A. Microwave oven cutout C. Cutout for installation above the cutout opening . 13/16" screws (2) 9/16" screws (16) 1/2" screws (4 - Upper cabinet B....
...without a built-in oven), and a clearance of the lower oven cutout and the microwave oven cutout floor. Make sure the surrounding cabinetry has clearance to microwave oven cutout floor. ■ Trim kit frame extends 11/16" (1.8 cm) below ). Allow a clearance of at least ...) 24" (61.0 cm) 1 3.7 cm)* 2⁷⁄₈" (7.3 cm)** ⁷⁄₈" (2.2 cm) *27" (68.6 cm) trim kit **30" (76.2 cm) trim kit 3" (7.6 cm) A. Microwave oven cutout C. Cutout for installation above the cutout opening . 13/16" screws (2) 9/16" screws (16) 1/2" screws (4 - Upper cabinet B....

Installation Instructions
Page 4
... complete. Install Top and Bottom Brackets 1. Tape the template in Step 4, then remove template. 6. Open microwave oven door, and secure trim kit frame using seven 9/16" screws. 4. Painted 1/2" screws (4) Installation is centered in the opening, and slide...can result in following illustration. A B C A. Plug in Malaysia Bottom bracket Install Trim Kit Frame 1. Align bottom bracket to 3/16" (4.7 mm) protruding from microwave oven cavity. Cabinet D. Do not use an extension cord. Microwave oven door (open) C. Install the 3/16" screw, and leave 1/8" (3.2 mm...
... complete. Install Top and Bottom Brackets 1. Tape the template in Step 4, then remove template. 6. Open microwave oven door, and secure trim kit frame using seven 9/16" screws. 4. Painted 1/2" screws (4) Installation is centered in the opening, and slide...can result in following illustration. A B C A. Plug in Malaysia Bottom bracket Install Trim Kit Frame 1. Align bottom bracket to 3/16" (4.7 mm) protruding from microwave oven cavity. Cabinet D. Do not use an extension cord. Microwave oven door (open) C. Install the 3/16" screw, and leave 1/8" (3.2 mm...


