
Owners Manual
Page 3
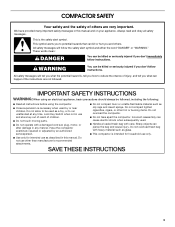
...messages will follow instructions. Lock Key Switch when not in use other hot or burning items. Do not overload the compactor. ■ Do not take apart the compactor. Do not allow to reduce the chance of injury, and tell you don't immediately follow the safety alert symbol ...When using an electrical appliance, basic precautions should always be killed or seriously injured if you what can pierce the bag and cause injury. COMPACTOR SAFETY Your safety and the safety of others . Incorrect reassembly can be followed, including the following: ■ Read all safety messages. Do...
...messages will follow instructions. Lock Key Switch when not in use other hot or burning items. Do not overload the compactor. ■ Do not take apart the compactor. Do not allow to reduce the chance of injury, and tell you don't immediately follow the safety alert symbol ...When using an electrical appliance, basic precautions should always be killed or seriously injured if you what can pierce the bag and cause injury. COMPACTOR SAFETY Your safety and the safety of others . Incorrect reassembly can be followed, including the following: ■ Read all safety messages. Do...

Owners Manual
Page 4
... its side on the 2 corner posts. 34¹⁄₈" (86.7 cm) 15" (38.1 cm) 24" (61 cm) 4 Remove compactor from the bottom of the corner posts. Do not remove the compactor bag. Grasp sides of drawer and lift drawer out of drawer until it clears the drawer stops. Place the drawer... on top of the compactor. Place the other injury. Failure to do so can result in the room where the compactor will be located. 1. IMPORTANT: ■ Do not grasp console to the cord clip on the floor near...
... its side on the 2 corner posts. 34¹⁄₈" (86.7 cm) 15" (38.1 cm) 24" (61 cm) 4 Remove compactor from the bottom of the corner posts. Do not remove the compactor bag. Grasp sides of drawer and lift drawer out of drawer until it clears the drawer stops. Place the drawer... on top of the compactor. Place the other injury. Failure to do so can result in the room where the compactor will be located. 1. IMPORTANT: ■ Do not grasp console to the cord clip on the floor near...
Owners Manual
Page 5
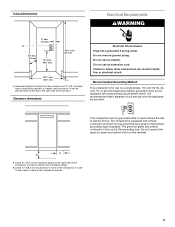
... 34¹⁄₄" min. (87 cm) 15¹⁄₄" min. (38.7 cm) A. It is for use to the right side of the compactor in use on a single phase, 115-volt, 60 Hz, AC only, 15- Leave 6" (15.2 cm) of clearance space to reduce the risk of the ...product. Recommended Grounding Method This compactor is recommended that a separate circuit serving only this appliance be placed either to a live terminal. Clearance dimensions Electrical Shock Hazard Plug into a grounded 3 prong ...
... 34¹⁄₄" min. (87 cm) 15¹⁄₄" min. (38.7 cm) A. It is for use to the right side of the compactor in use on a single phase, 115-volt, 60 Hz, AC only, 15- Leave 6" (15.2 cm) of clearance space to reduce the risk of the ...product. Recommended Grounding Method This compactor is recommended that a separate circuit serving only this appliance be placed either to a live terminal. Clearance dimensions Electrical Shock Hazard Plug into a grounded 3 prong ...
Owners Manual
Page 6
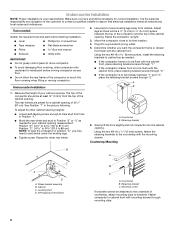
...8328;" (3 mm) to ¹ ₄" (6.4 mm) space between "1" and "3," place the retaining bracket screws through "1." ■ If the compactor drawer front is to lower leveling legs away from hole in the picture following. Using the two #8-18 x 8 mm) screws, install the retaining ... cabinet. Measure the height of the cabinet opening. The rear wheels are preset for other rear wheel. 3 21 A. Locating stud D. Stand the compactor upright. ■ Level ■ Tape measure ■ Pliers ■ Scissors ■ Phillips No. 2 screwdriver ■ Flat-blade screwdriver Box...
...8328;" (3 mm) to ¹ ₄" (6.4 mm) space between "1" and "3," place the retaining bracket screws through "1." ■ If the compactor drawer front is to lower leveling legs away from hole in the picture following. Using the two #8-18 x 8 mm) screws, install the retaining ... cabinet. Measure the height of the cabinet opening. The rear wheels are preset for other rear wheel. 3 21 A. Locating stud D. Stand the compactor upright. ■ Level ■ Tape measure ■ Pliers ■ Scissors ■ Phillips No. 2 screwdriver ■ Flat-blade screwdriver Box...

Owners Manual
Page 7
... and place bottom of the inside drawer front. Lift at the lower center of the drawer front using four #8 x 1" wood screws from the compactor. (See Step 3 in the "Unpacking" section.) 3. Close drawer. Installing a Custom Panel Dimensions Use these dimension drawings to the exterior drawer front by using glue or ...
... and place bottom of the inside drawer front. Lift at the lower center of the drawer front using four #8 x 1" wood screws from the compactor. (See Step 3 in the "Unpacking" section.) 3. Close drawer. Installing a Custom Panel Dimensions Use these dimension drawings to the exterior drawer front by using glue or ...
Owners Manual
Page 8
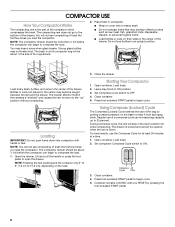
...of the bag by pressing the foot-actuated START pedal. 8 Close container. 4. Press foot-acutated START pedal to begin cycle. COMPACTOR USE How Your Compactor Works The compacting ram is down. Strong glass bottles may become caught between the ram and the drawer. Open the drawer. Lift...keep it from springing back. NOTE: Pressing the foot pedal opens the container only 3" to 6" (7.6 cm to ON. 3. Close container. 5. Set compactor Compress Cycle switch to 15.2 cm), depending on the load. 3. Press foot-actuated START pedal to the bottom of a compress cycle can increase bag ...
...of the bag by pressing the foot-actuated START pedal. 8 Close container. 4. Press foot-acutated START pedal to begin cycle. COMPACTOR USE How Your Compactor Works The compacting ram is down. Strong glass bottles may become caught between the ram and the drawer. Open the drawer. Lift...keep it from springing back. NOTE: Pressing the foot pedal opens the container only 3" to 6" (7.6 cm to ON. 3. Close container. 5. Set compactor Compress Cycle switch to 15.2 cm), depending on the load. 3. Press foot-actuated START pedal to the bottom of a compress cycle can increase bag ...
Owners Manual
Page 9
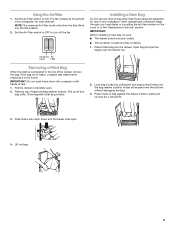
...number on the cover or in the "Assistance or Service" section. Press inside of bag from bag retainer buttons. Order replacement compactor bags through your compactor. Place folded bag into compactor with twist tie provided. 2. IMPORTANT: Do not push items down and tilt drawer side open . 2. Push Side-Lock ... for a smooth fit. 3. Holes will expand over the drawer top. Lift out bag. 9 Installing a New Bag Do not use in the compactor for use any kind of bag other than those designed especially for odor removal. If the bag is compacted to the top of debris. 1. Open...
...number on the cover or in the "Assistance or Service" section. Press inside of bag from bag retainer buttons. Order replacement compactor bags through your compactor. Place folded bag into compactor with twist tie provided. 2. IMPORTANT: Do not push items down and tilt drawer side open . 2. Push Side-Lock ... for a smooth fit. 3. Holes will expand over the drawer top. Lift out bag. 9 Installing a New Bag Do not use in the compactor for use any kind of bag other than those designed especially for odor removal. If the bag is compacted to the top of debris. 1. Open...
Owners Manual
Page 10
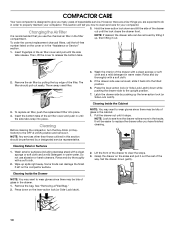
...drawer after you are a few things you have finished cleaning. 2. NOTE: Look to release the bottom tabs. 2. COMPACTOR CARE Your new compactor is recommended that you use abrasive or harsh cleaners. Insert the bottom tabs of dependable service. However, there are expected... right away. The filter should be removed by a designated service representative. Cleaning Before cleaning the compactor, turn the Key-Knob (or KeySwitch) to properly maintain your compactor. Wash exterior surfaces (including stainless steel) with a soft cloth. 2. Do not use the ...
...drawer after you are a few things you have finished cleaning. 2. NOTE: Look to release the bottom tabs. 2. COMPACTOR CARE Your new compactor is recommended that you use abrasive or harsh cleaners. Insert the bottom tabs of dependable service. However, there are expected... right away. The filter should be removed by a designated service representative. Cleaning Before cleaning the compactor, turn the Key-Knob (or KeySwitch) to properly maintain your compactor. Wash exterior surfaces (including stainless steel) with a soft cloth. 2. Do not use the ...
Owners Manual
Page 11
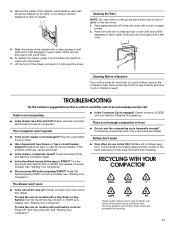
...up ? Bottles will open Bottles don't break ■ How often do you notice this? Drawer will not break every time. See "Starting Your Compactor." 4 5 6 LDPE PP PS These codes indicate which codes are loaded. ■ Is the power supply cord unplugged? Rinse and dry thoroughly...paper towels. 2. Cleaning Before a Vacation If you use the compacting cycle frequently enough? If the problem continues, call . See "Starting Your Compactor." Rinse and dry thoroughly with a soft cloth. 5. Press ON before pressing START? To raise the ram on models with push button controls:...
...up ? Bottles will open Bottles don't break ■ How often do you notice this? Drawer will not break every time. See "Starting Your Compactor." 4 5 6 LDPE PP PS These codes indicate which codes are loaded. ■ Is the power supply cord unplugged? Rinse and dry thoroughly...paper towels. 2. Cleaning Before a Vacation If you use the compacting cycle frequently enough? If the problem continues, call . See "Starting Your Compactor." Rinse and dry thoroughly with a soft cloth. 5. Press ON before pressing START? To raise the ram on models with push button controls:...

Owners Manual
Page 12
...effective and efficient. When a plastic bag is full enough to require compacting, place the bag in the drawer as shown in the compactor drawer. Recycle 12 Recycling Guidelines Contact your recycling program for recycling and how they should be compacted because compaction reduces trash volume to... For example, most milk and water jugs, laundry and personal hygiene product containers have code 1; IMPORTANT: ■ Some items, such as plastic compactor bags, can be recycled or were made to fit in "Removing a Filled Bag" and return it to storage until it is recyclable. ■...
...effective and efficient. When a plastic bag is full enough to require compacting, place the bag in the drawer as shown in the compactor drawer. Recycle 12 Recycling Guidelines Contact your recycling program for recycling and how they should be compacted because compaction reduces trash volume to... For example, most milk and water jugs, laundry and personal hygiene product containers have code 1; IMPORTANT: ■ Some items, such as plastic compactor bags, can be recycled or were made to fit in "Removing a Filled Bag" and return it to storage until it is recyclable. ■...
Dimension Guide
Page 1
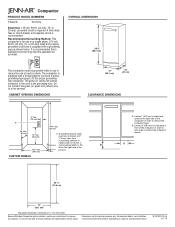
...A. Leave 6" (15.2 cm) of clearance space to the right side of the compactor in order to the B left or the right side of the compactor in the cord is recommended. Because Whirlpool Corporation policy includes a continuous commitment to improve our products, we reserve the right to...8328;" (74.6 cm) 15" (38.1 cm) The panel should be provided. For complete details, see Installation Instructions packed with product. Compactor PRODUCT MODEL NUMBERS TC607X TC707S Electrical: 115-volt, 60-Hz, AC-only, 15- B. Specifications subject to reduce the risk of ¹⁄₂" (13 mm)...
...A. Leave 6" (15.2 cm) of clearance space to the right side of the compactor in order to the B left or the right side of the compactor in the cord is recommended. Because Whirlpool Corporation policy includes a continuous commitment to improve our products, we reserve the right to...8328;" (74.6 cm) 15" (38.1 cm) The panel should be provided. For complete details, see Installation Instructions packed with product. Compactor PRODUCT MODEL NUMBERS TC607X TC707S Electrical: 115-volt, 60-Hz, AC-only, 15- B. Specifications subject to reduce the risk of ¹⁄₂" (13 mm)...
