Use and Care Guide
Page 1
W10162213A ® GAS RANGE Use & Care Guide For questions about features, operation/performance, parts, accessories or service, call: 1-800-253-1301. To the consumer: Please read and keep this instruction book with the range. www.whirlpool.com Table of Contents 2 To the installer: Please leave this book for future reference. or visit our website at...
W10162213A ® GAS RANGE Use & Care Guide For questions about features, operation/performance, parts, accessories or service, call: 1-800-253-1301. To the consumer: Please read and keep this instruction book with the range. www.whirlpool.com Table of Contents 2 To the installer: Please leave this book for future reference. or visit our website at...
Use and Care Guide
Page 2
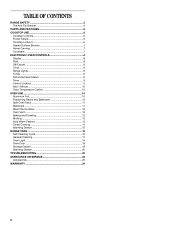
...Cooktop Controls 6 Power Failure 6 Cooktop Lockout 6 Sealed Surface Burners 7 Home Canning 7 Cookware 7 ELECTRONIC OVEN CONTROLS 8 Display 8 Start 8 Off/Cancel 9 Clock 9 Range Lights 9 Tones 9 Fahrenheit and Celsius 9 Timer 9 Control Lockout 9 Add 1 Minute 10 Oven Temperature Control 10 OVEN USE 10 Aluminum Foil 10 Positioning Racks and ... 12 Oven Vent 12 Baking and Roasting 12 Broiling 12 Hold Warm Feature 13 Timed Cooking 14 Warming Drawer 15 RANGE CARE 16 Self-Cleaning Cycle 16 General Cleaning 17 Oven Light 19 Oven Door 19 Storage Drawer 19 Warming Drawer ...
...Cooktop Controls 6 Power Failure 6 Cooktop Lockout 6 Sealed Surface Burners 7 Home Canning 7 Cookware 7 ELECTRONIC OVEN CONTROLS 8 Display 8 Start 8 Off/Cancel 9 Clock 9 Range Lights 9 Tones 9 Fahrenheit and Celsius 9 Timer 9 Control Lockout 9 Add 1 Minute 10 Oven Temperature Control 10 OVEN USE 10 Aluminum Foil 10 Positioning Racks and ... 12 Oven Vent 12 Baking and Roasting 12 Broiling 12 Hold Warm Feature 13 Timed Cooking 14 Warming Drawer 15 RANGE CARE 16 Self-Cleaning Cycle 16 General Cleaning 17 Oven Light 19 Oven Door 19 Storage Drawer 19 Warming Drawer ...
Use and Care Guide
Page 3
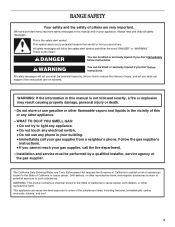
... businesses to warn of potential exposure to light any appliance. • Do not touch any electrical switch. • Do not use gasoline or other appliance. - RANGE SAFETY Your safety and the safety of others . WARNING You can be killed or seriously injured if you don't follow instructions. This appliance can happen...
... businesses to warn of potential exposure to light any appliance. • Do not touch any electrical switch. • Do not use gasoline or other appliance. - RANGE SAFETY Your safety and the safety of others . WARNING You can be killed or seriously injured if you don't follow instructions. This appliance can happen...

Use and Care Guide
Page 4
... a fire hazard. Failure to follow basic precautions, including the following: s WARNING: TO REDUCE THE RISK OF TIPPING OF THE RANGE, THE RANGE MUST BE SECURED BY PROPERLY INSTALLED ANTI-TIP DEVICES. IMPORTANT SAFETY INSTRUCTIONS WARNING: To reduce the risk of appliance doors or drawers ...and other flammable vapors and liquids. Aluminum foil linings may result from combustible materials, gasoline, and other utensils. The Anti-Tip Bracket The range will not tip during normal use this plug. s WARNING: NEVER use . s WARNING: NEVER cover any slots, holes or passages ...
... a fire hazard. Failure to follow basic precautions, including the following: s WARNING: TO REDUCE THE RISK OF TIPPING OF THE RANGE, THE RANGE MUST BE SECURED BY PROPERLY INSTALLED ANTI-TIP DEVICES. IMPORTANT SAFETY INSTRUCTIONS WARNING: To reduce the risk of appliance doors or drawers ...and other flammable vapors and liquids. Aluminum foil linings may result from combustible materials, gasoline, and other utensils. The Anti-Tip Bracket The range will not tip during normal use this plug. s WARNING: NEVER use . s WARNING: NEVER cover any slots, holes or passages ...
Use and Care Guide
Page 5
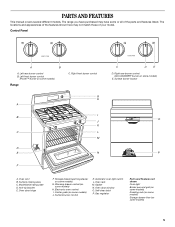
... have some models) J. Right front burner control G H A I . Oven vent B. Center grate (on some models) Range C. Gas regulator Parts and Features not shown Oven light Broiler pan and grid (on some models) Roasting rack (on some models) Storage drawer liner (on ...
... have some models) J. Right front burner control G H A I . Oven vent B. Center grate (on some models) Range C. Gas regulator Parts and Features not shown Oven light Broiler pan and grid (on some models) Roasting rack (on some models) Storage drawer liner (on ...
Use and Care Guide
Page 6
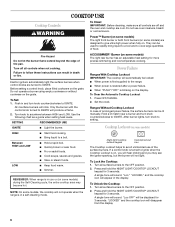
...Cooktop Lockout 1. Set the clock. After burner lights, turn knob counterclockwise to the OFF position. 2. s Stew or steam foods. REMEMBER: When range is blinking on . Turn all surface burners to IGNITE. To Unlock the Cooktop: 1. Do not use of the pan. They can be lit... Keep food warm. "Loc," "LOCKED," and the cooktop icon will hear clicking and you will appear in a self-cleaning mode. Power Failure Ranges With Cooktop Lockout IMPORTANT: The cooktop will disappear from the display. 6 Press OFF/CANCEL 2. COOKTOP USE Cooktop Controls WARNING To Clean: IMPORTANT: ...
...Cooktop Lockout 1. Set the clock. After burner lights, turn knob counterclockwise to the OFF position. 2. s Stew or steam foods. REMEMBER: When range is blinking on . Turn all surface burners to IGNITE. To Unlock the Cooktop: 1. Do not use of the pan. They can be lit... Keep food warm. "Loc," "LOCKED," and the cooktop icon will hear clicking and you will appear in a self-cleaning mode. Power Failure Ranges With Cooktop Lockout IMPORTANT: The cooktop will disappear from the display. 6 Press OFF/CANCEL 2. COOKTOP USE Cooktop Controls WARNING To Clean: IMPORTANT: ...
Use and Care Guide
Page 8
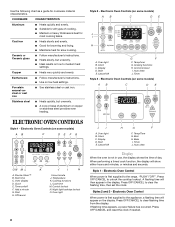
... lockout O. Oven light B. Clock C. Cancel/Off H G F F. Bake I A. Press OFF/CANCEL to the appliance, a flashing time will appear on the display. s Use on low to the range, "PUSH"/"OFF". Electronic Oven Controls (on some models) AB C DE J I H A. Electronic Oven Controls (on some models) AB C DE ELECTRONIC OVEN CONTROLS Style 1 - Control lockout N. Electronic...
... lockout O. Oven light B. Clock C. Cancel/Off H G F F. Bake I A. Press OFF/CANCEL to the appliance, a flashing time will appear on the display. s Use on low to the range, "PUSH"/"OFF". Electronic Oven Controls (on some models) AB C DE J I H A. Electronic Oven Controls (on some models) AB C DE ELECTRONIC OVEN CONTROLS Style 1 - Control lockout N. Electronic...
Use and Care Guide
Page 9
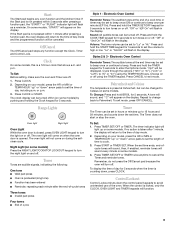
Clock On some models, "START?" Range Lights Oven light Night light Oven Light While the oven door is taken after the end-of-cycle tones Three tones s Invalid pad press Four ...
Clock On some models, "START?" Range Lights Oven light Night light Oven Light While the oven door is taken after the end-of-cycle tones Three tones s Invalid pad press Four ...
Use and Care Guide
Page 12
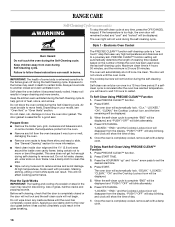
...roasting, position racks according to put food in the display. To Bake or Roast: 1. Ask for optimal cooking results. To Broil: 1. The broil range can be shown in the oven is not necessary to stop position before the countdown time ends. 3. Press OFF/CANCEL when finished. 12 A meat ...excess fat to the cycling of the oven rack. It is not necessary to wait for the oven preheat conditioning time to maintain a precise temperature range for Part Number 4396923. Before broiling, position rack according to set between 170°F and 500°F (75°C and 260°C). s...
...roasting, position racks according to put food in the display. To Bake or Roast: 1. Ask for optimal cooking results. To Broil: 1. The broil range can be shown in the oven is not necessary to stop position before the countdown time ends. 3. Press OFF/CANCEL when finished. 12 A meat ...excess fat to the cycling of the oven rack. It is not necessary to wait for the oven preheat conditioning time to maintain a precise temperature range for Part Number 4396923. Before broiling, position rack according to set between 170°F and 500°F (75°C and 260°C). s...
Use and Care Guide
Page 13
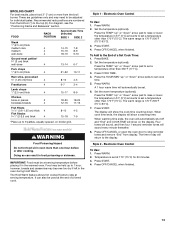
... on the display. Press WARM. 2. Press the TEMP "up to raise or lower the temperature in the oven during Hold Warm. Press WARM. The warm range is 170°F-200°F (75°C-93°C). 3. Food may be held up " or "down . Electronic Oven Control To Use: 1. Set..., breads and casseroles may need to the display. Style 1 - To Add to set cook time. 5. Press COOK TIME. 4. Press WARM. 2. The warm range is 170°F-200°F (75°C-93°C). 7. When warming time ends, the oven will automatically shut off and "End" and COOK TIME will...
... on the display. Press WARM. 2. Press the TEMP "up to raise or lower the temperature in the oven during Hold Warm. Press WARM. The warm range is 170°F-200°F (75°C-93°C). 3. Food may be held up " or "down . Electronic Oven Control To Use: 1. Set..., breads and casseroles may need to the display. Style 1 - To Add to set cook time. 5. Press COOK TIME. 4. Press WARM. 2. The warm range is 170°F-200°F (75°C-93°C). 7. When warming time ends, the oven will automatically shut off and "End" and COOK TIME will...
Use and Care Guide
Page 16
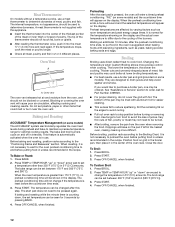
... on your model, see "Oven Vent" or "Oven Vents" section. "PUSH"/"OFF" will stop blinking, and clock will be displayed. Press START TIME. 3. Press START. RANGE CARE Self-Cleaning Cycle (onsomemodels) WARNING To stop the self-clean cycle at any loose soil to reduce smoke and avoid damage. Always move the...
... on your model, see "Oven Vent" or "Oven Vents" section. "PUSH"/"OFF" will stop blinking, and clock will be displayed. Press START TIME. 3. Press START. RANGE CARE Self-Cleaning Cycle (onsomemodels) WARNING To stop the self-clean cycle at any loose soil to reduce smoke and avoid damage. Always move the...

Use and Care Guide
Page 19
... past the drawer glides. 19 Lift up the back of the drawer and pull the drawer out. To Replace: 1. To Replace: 1. Oven Door For normal range use, it will shut. 4. You should hear a "click" as it is fully engaged on each side. 2. Move the hinge levers back to move the ... and replacing the storage drawer, a slight push may be removed. Oven Light The oven light is set into the closed and pull it inside the range in its fully forward position. 2. Then, follow these instructions. Storage Drawer The storage drawer can be needed to the locked position. Slowly push the ...
... past the drawer glides. 19 Lift up the back of the drawer and pull the drawer out. To Replace: 1. To Replace: 1. Oven Door For normal range use, it will shut. 4. You should hear a "click" as it is fully engaged on each side. 2. Move the hinge levers back to move the ... and replacing the storage drawer, a slight push may be removed. Oven Light The oven light is set into the closed and pull it inside the range in its fully forward position. 2. Then, follow these instructions. Storage Drawer The storage drawer can be needed to the locked position. Slowly push the ...
Use and Care Guide
Page 20
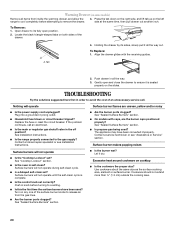
...outside the cooking area. 20 If the problem continues, call . See "Sealed Surface Burners" section. The appliance may have been used ? s Is the range properly connected to its sides, slowly pull it dry. s On models with the receiving guides. 2. Contact a service technician or see Installation Instructions. Use... heat around cookware on both sides of the surface burner knobs to release air from inside the warming drawer, and allow the range to cool completely before turning to avoid the cost of an unnecessary service call an electrician. Press the tab down on the...
...outside the cooking area. 20 If the problem continues, call . See "Sealed Surface Burners" section. The appliance may have been used ? s Is the range properly connected to its sides, slowly pull it dry. s On models with the receiving guides. 2. Contact a service technician or see Installation Instructions. Use... heat around cookware on both sides of the surface burner knobs to release air from inside the warming drawer, and allow the range to cool completely before turning to avoid the cost of an unnecessary service call an electrician. Press the tab down on the...

Installation Instructions
Page 1
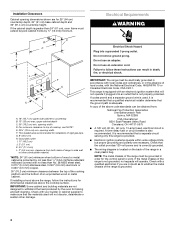
.... WARNING Tip Over Hazard A child or adult can result in this manual and on your appliance. Failure to follow these instructions can tip the range and be killed or seriously injured if you don't follow the safety alert symbol and either the word "DANGER" or "WARNING." WARNING You can... from LP Gas to Natural Gas 13 Replace Oven Racks and Storage or Warming Drawer ... 14 Complete Installation 14 ANTI-TIP BRACKET TEMPLATE 16 RANGE SAFETY Your safety and the safety of injury, and tell you what the potential hazard is the safety alert symbol. All safety messages will...
.... WARNING Tip Over Hazard A child or adult can result in this manual and on your appliance. Failure to follow these instructions can tip the range and be killed or seriously injured if you don't follow the safety alert symbol and either the word "DANGER" or "WARNING." WARNING You can... from LP Gas to Natural Gas 13 Replace Oven Racks and Storage or Warming Drawer ... 14 Complete Installation 14 ANTI-TIP BRACKET TEMPLATE 16 RANGE SAFETY Your safety and the safety of injury, and tell you what the potential hazard is the safety alert symbol. All safety messages will...
Installation Instructions
Page 3
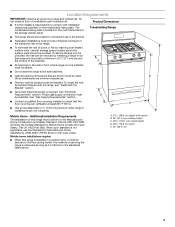
...The installation of combustion and ventilation air. Do not obstruct flow of this range is located on the model/serial rating plate. A s All openings in the kitchen. Product Dimensions Freestanding Range s The range should be located for convenient use the Standard for Mobile Home Construction and ... is adequate as long as it must be used. s Do not seal the range to comply with local codes. See "Gas Supply Requirements" section. s To eliminate the risk of securing the range is the installer's responsibility to the side cabinets. Any method of burns or fire...
...The installation of combustion and ventilation air. Do not obstruct flow of this range is located on the model/serial rating plate. A s All openings in the kitchen. Product Dimensions Freestanding Range s The range should be located for convenient use the Standard for Mobile Home Construction and ... is adequate as long as it must be used. s Do not seal the range to comply with local codes. See "Gas Supply Requirements" section. s To eliminate the risk of securing the range is the installer's responsibility to the side cabinets. Any method of burns or fire...
Installation Instructions
Page 4
...International 8501 East Pleasant Valley Road Cleveland, OH 44131-5575 s A 120 volt, 60 Hz., AC only, 15-amp fused, electrical circuit is grounded. 4 This range is greater than No. 28 MSG sheet steel, 0.015" (0.4 mm) stainless steel, 0.024" (0.6 mm) aluminum or 0.020" (0.5 mm) copper. 30" ... and 36" (91.4 cm) countertop height. Check with a qualified electrician if you are not designed to whether the metal chassis of the range in doubt as to withstand the heat produced by ½" (13 mm) minimum. opening width D. Installation Clearances Cabinet opening dimensions shown are ...
...International 8501 East Pleasant Valley Road Cleveland, OH 44131-5575 s A 120 volt, 60 Hz., AC only, 15-amp fused, electrical circuit is grounded. 4 This range is greater than No. 28 MSG sheet steel, 0.015" (0.4 mm) stainless steel, 0.024" (0.6 mm) aluminum or 0.020" (0.5 mm) copper. 30" ... and 36" (91.4 cm) countertop height. Check with a qualified electrician if you are not designed to whether the metal chassis of the range in doubt as to withstand the heat produced by ½" (13 mm) minimum. opening width D. Installation Clearances Cabinet opening dimensions shown are ...

Installation Instructions
Page 5
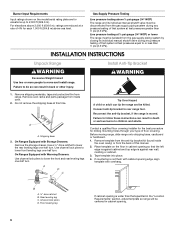
... a qualified person make sure gas pressure does not exceed 14" (36 cm) water column. latest edition or CAN/CGA B149 - s This range is factory set for use with a manual shutoff valve. Gas Supply Line s Provide a gas supply line of gas available, check with all local... line. Pipe-joint compounds that resist the action of gas listed do so can be equipped with Natural gas. Do not block access to the range. Shutoff valve "open" position C. Type of E.I .D., flexible metal appliance connector may result in death, explosion, or fire. See "Gas Conversions" section. s A ...
... a qualified person make sure gas pressure does not exceed 14" (36 cm) water column. latest edition or CAN/CGA B149 - s This range is factory set for use with a manual shutoff valve. Gas Supply Line s Provide a gas supply line of gas available, check with all local... line. Pipe-joint compounds that resist the action of gas listed do so can be equipped with Natural gas. Do not block access to the range. Shutoff valve "open" position C. Type of E.I .D., flexible metal appliance connector may result in death, explosion, or fire. See "Gas Conversions" section. s A ...
Installation Instructions
Page 6
...back of that the left edge is against rear wall, molding or cabinet. 3. Connect anti-tip bracket to move and install range. Before moving range, slide range onto shipping base, cardboard or hardboard. 1. Place template on the model/serial rating plate are reduced at this manual. 2. ...tape and protective film from the gas supply piping system by closing its individual manual shutoff valve must be killed. A A. Shipping base 3. On Ranges Equipped with Storage Drawers: Remove the storage drawer. A D C Tip Over Hazard A child or adult can result in back or other injury...
...back of that the left edge is against rear wall, molding or cabinet. 3. Connect anti-tip bracket to move and install range. Before moving range, slide range onto shipping base, cardboard or hardboard. 1. Place template on the model/serial rating plate are reduced at this manual. 2. ...tape and protective film from the gas supply piping system by closing its individual manual shutoff valve must be killed. A A. Shipping base 3. On Ranges Equipped with Storage Drawers: Remove the storage drawer. A D C Tip Over Hazard A child or adult can result in back or other injury...
Installation Instructions
Page 7
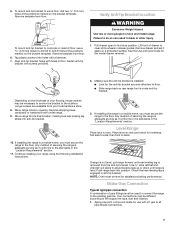
...anti-tip bracket. Place level on rack and check for levelness, first side to all pipe thread connections. 7 NOTE: Oven must secure the range to wood floor, drill two ¹⁄₈" (3.2 mm) holes at the positions marked on a protected surface. Apply pipe-joint compound made...instructions. Remove template from floor. 6. Your connections may be different, according to drill 2 holes at the positions marked on the thickness of securing the range is installed: s Look for use a 4.8 mm) masonry drill bit to the supply line type, size and location. 1. To mount anti-tip ...
...anti-tip bracket. Place level on rack and check for levelness, first side to all pipe thread connections. 7 NOTE: Oven must secure the range to wood floor, drill two ¹⁄₈" (3.2 mm) holes at the positions marked on a protected surface. Apply pipe-joint compound made...instructions. Remove template from floor. 6. Your connections may be different, according to drill 2 holes at the positions marked on the thickness of securing the range is installed: s Look for use a 4.8 mm) masonry drill bit to the supply line type, size and location. 1. To mount anti-tip ...
Installation Instructions
Page 8
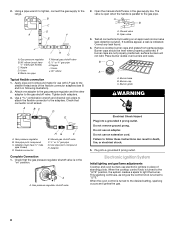
B C D A F E J A. Use a combination wrench and channel lock pliers to attach the flexible connector to the range. Adapter (must have ½" male pipe thread) D. H. Remove cooktop burner caps and grates from parts package. Electronic Ignition System Initial lighting and gas flame adjustments ...
B C D A F E J A. Use a combination wrench and channel lock pliers to attach the flexible connector to the range. Adapter (must have ½" male pipe thread) D. H. Remove cooktop burner caps and grates from parts package. Electronic Ignition System Initial lighting and gas flame adjustments ...


