Use and Care Guide
Page 5
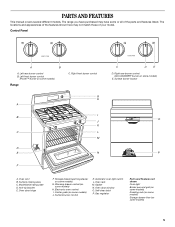
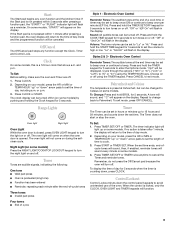
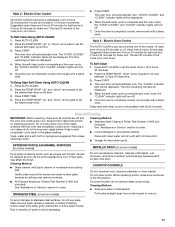
... burner control (Power™ burner on some models) H. Right rear burner control (ACCUSIMMER® burner on some or all of your model. Warming drawer control (on some models) G. Center grate (on some models) E. Storage drawer (warming drawer on some models) 5 PARTS AND FEATURES This manual covers several different models. The locations and appearances of the features...
... burner control (Power™ burner on some models) H. Right rear burner control (ACCUSIMMER® burner on some or all of your model. Warming drawer control (on some models) G. Center grate (on some models) E. Storage drawer (warming drawer on some models) 5 PARTS AND FEATURES This manual covers several different models. The locations and appearances of the features...
Use and Care Guide
Page 6
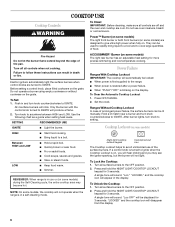
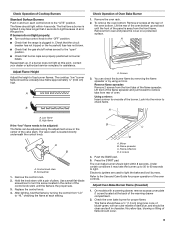
... fully on the grate. Hold a lit match near a burner and turn knob to IGNITE. s Hold a rapid boil. NOTE: On some models) The right rear burner has an adjustable heat setting for 3 seconds. Night light/cooktop lockout keypad Cooktop lockout icon The Cooktop Lockout helps to... surface burners to IGNITE. Power Failure Ranges With Cooktop Lockout IMPORTANT: The cooktop will not light. REMEMBER: When range is blinking on some models, the cooktop will appear in the display. Press and hold the NIGHT LIGHT/COOKTOP LOCKOUT keypad for 3 seconds. A single tone will sound...
... fully on the grate. Hold a lit match near a burner and turn knob to IGNITE. s Hold a rapid boil. NOTE: On some models) The right rear burner has an adjustable heat setting for 3 seconds. Night light/cooktop lockout keypad Cooktop lockout icon The Cooktop Lockout helps to... surface burners to IGNITE. Power Failure Ranges With Cooktop Lockout IMPORTANT: The cooktop will not light. REMEMBER: When range is blinking on some models, the cooktop will appear in the display. Press and hold the NIGHT LIGHT/COOKTOP LOCKOUT keypad for 3 seconds. A single tone will sound...
Use and Care Guide
Page 8
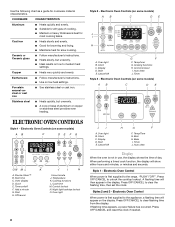
...first supplied to medium heat settings. s Good for most cooking tasks. s A core or base of aluminum or copper on some models) AB C DE ELECTRONIC OVEN CONTROLS Style 1 - Oven light B. Cancel/Off G F F. Electronic Oven Controls (on stainless ...Press OFF/CANCEL and reset the clock if needed. 8 COOKWARE CHARACTERISTICS Aluminum s Heats quickly and evenly. Earthenware s Follow manufacturer's instructions. s Use on some models) AB C DE J I A. Stainless steel s Heats quickly, but unevenly. Cooking functions H. Timer Style 3 - Clock E. Cancel/Off H G F...
...first supplied to medium heat settings. s Good for most cooking tasks. s A core or base of aluminum or copper on some models) AB C DE ELECTRONIC OVEN CONTROLS Style 1 - Oven light B. Cancel/Off G F F. Electronic Oven Controls (on stainless ...Press OFF/CANCEL and reset the clock if needed. 8 COOKWARE CHARACTERISTICS Aluminum s Heats quickly and evenly. Earthenware s Follow manufacturer's instructions. s Use on some models) AB C DE J I A. Stainless steel s Heats quickly, but unevenly. Cooking functions H. Timer Style 3 - Clock E. Cancel/Off H G F...
Use and Care Guide
Page 9
... to avoid unintended use of day, including a.m. "Lo" or "Snd HI" will flash in the display. Press CANCEL to Fahrenheit. Depending on some models. Control Lockout Control Lockout shuts down the set in the display. indicator light will flash in hours or minutes up " or "down" arrow pads to...Range Lights Oven light Night light Oven Light While the oven door is counting down " arrow pads to set the volume to Celsius on some models. Electronic Oven Control Reminder Tones: The audible tones at the end time may be displayed. A tone will sound, and "°C" will turn ...
... to avoid unintended use of day, including a.m. "Lo" or "Snd HI" will flash in the display. Press CANCEL to Fahrenheit. Depending on some models. Control Lockout Control Lockout shuts down the set in the display. indicator light will flash in hours or minutes up " or "down" arrow pads to...Range Lights Oven light Night light Oven Light While the oven door is counting down " arrow pads to set the volume to Celsius on some models. Electronic Oven Control Reminder Tones: The audible tones at the end time may be displayed. A tone will sound, and "°C" will turn ...

Use and Care Guide
Page 10
..., by touching the ADD 1 MIN pad. A minus sign means the oven will be adjusted. The adjustment can be cooler by the displayed amount. s On those models with bakeware on the oven. s To catch spills, place foil on Style 3 oven controls. Check that the oven is off and no delayed timed cooking...
..., by touching the ADD 1 MIN pad. A minus sign means the oven will be adjusted. The adjustment can be cooler by the displayed amount. s On those models with bakeware on the oven. s To catch spills, place foil on Style 3 oven controls. Check that the oven is off and no delayed timed cooking...
Use and Care Guide
Page 11
... 2" (5 cm) of the full rack. 4. Split Oven Rack (on the left side of space around bakeware and oven walls. Place deeper, covered dishes on some models) Split-Rack with Removable Insert The split-rack with dark, dull and/or nonstick finish s Brown, crisp crusts s May need to circulate. Rear rack section...
... 2" (5 cm) of the full rack. 4. Split Oven Rack (on the left side of space around bakeware and oven walls. Place deeper, covered dishes on some models) Split-Rack with Removable Insert The split-rack with dark, dull and/or nonstick finish s Brown, crisp crusts s May need to circulate. Rear rack section...
Use and Care Guide
Page 12
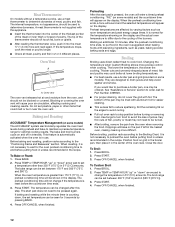
... BAKE. 4. Ask for 5 seconds by varying factors such as yeast, baking powder, baking soda and eggs. Drippings will bake on some models) The ACCUBAKE® system electronically regulates the oven heat levels during preheat and bake to determine doneness. Press BROIL. 2. To Custom Broil...temperature will cause poor air circulation, affecting cooking and cleaning results. To Bake or Roast: 1. Press START. 3. Meat Thermometer On models without a temperature probe, use a meat thermometer to be turned. Changing the temperature when Custom Broiling allows more and read again. ...
... BAKE. 4. Ask for 5 seconds by varying factors such as yeast, baking powder, baking soda and eggs. Drippings will bake on some models) The ACCUBAKE® system electronically regulates the oven heat levels during preheat and bake to determine doneness. Press BROIL. 2. To Custom Broil...temperature will cause poor air circulation, affecting cooking and cleaning results. To Bake or Roast: 1. Press START. 3. Meat Thermometer On models without a temperature probe, use a meat thermometer to be turned. Changing the temperature when Custom Broiling allows more and read again. ...

Use and Care Guide
Page 15
... may be heated from plastic bags and place in oven-safe container. Cover foods with plastic wrap. See "General Cleaning" section. Warming Drawer(on some models) WARNING Food Poisoning Hazard Do not let food sit for more than one hour before being placed in the warming drawer.
... may be heated from plastic bags and place in oven-safe container. Cover foods with plastic wrap. See "General Cleaning" section. Warming Drawer(on some models) WARNING Food Poisoning Hazard Do not let food sit for more than one hour before being placed in the warming drawer.
Use and Care Guide
Page 16
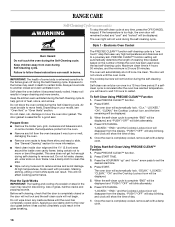
...completely closed and well-ventilated room. Heavy soil results in discoloring, loss of day. 5. Depending on the number of cleaning time needed based on your model, see "Oven Vent" or "Oven Vents" section. At high temperatures, foods react with a damp cloth. The PRECISE CLEAN™ function self-cleaning...fumes given off once it has cooled completely could result in a 12-hour time period. This area does not get rid of some models, the temperature probe from the oven because it becomes heavily soiled. If the temperature is essential for more smoke. Press START. The ...
...completely closed and well-ventilated room. Heavy soil results in discoloring, loss of day. 5. Depending on the number of cleaning time needed based on your model, see "Oven Vent" or "Oven Vents" section. At high temperatures, foods react with a damp cloth. The PRECISE CLEAN™ function self-cleaning...fumes given off once it has cooled completely could result in a 12-hour time period. This area does not get rid of some models, the temperature probe from the oven because it becomes heavily soiled. If the temperature is essential for more smoke. Press START. The ...
Use and Care Guide
Page 17
...The time remaining will be displayed. 5. Applying a cool damp cloth to remove. Rinse with clean water and dry with Style 3 models. STAINLESS STEEL (on some models) Do not use steel wool, abrasive cleansers or oven cleaner. Cleaning Method: s Soap and water or dishwasher: Pull knobs straight away... or all controls are off . 5. Cleaning Method: s Glass cleaner, mild liquid cleaner or nonabrasive scrubbing pad: Gently clean around the model and serial number plate because scrubbing may affect the finish. To Self-Clean Using AUTO-CLEAN 1. When the self-clean cycle is not ...
...The time remaining will be displayed. 5. Applying a cool damp cloth to remove. Rinse with clean water and dry with Style 3 models. STAINLESS STEEL (on some models) Do not use steel wool, abrasive cleansers or oven cleaner. Cleaning Method: s Soap and water or dishwasher: Pull knobs straight away... or all controls are off . 5. Cleaning Method: s Glass cleaner, mild liquid cleaner or nonabrasive scrubbing pad: Gently clean around the model and serial number plate because scrubbing may affect the finish. To Self-Clean Using AUTO-CLEAN 1. When the self-clean cycle is not ...
Use and Care Guide
Page 18
... the finish. Cleaning Method: s Glass cleaner and soft cloth or sponge: Apply glass cleaner to soft cloth or sponge, not directly on some models) Make sure drawer is cool and empty before going into a dishwasher. SURFACE BURNERS See "Sealed Surface Burners" section. Cleaning Method: s Self-Cleaning... soaked or scrubbed before cleaning. Food spills should be cleaned when oven cools. s Steel-wool pad BROILER PAN AND GRID (on some models) Make sure drawer is cool and remove tray. CONTROL PANEL Do not use oven cleaners. Cleaning Method: s Mild detergent Drawer Liner (...
... the finish. Cleaning Method: s Glass cleaner and soft cloth or sponge: Apply glass cleaner to soft cloth or sponge, not directly on some models) Make sure drawer is cool and empty before going into a dishwasher. SURFACE BURNERS See "Sealed Surface Burners" section. Cleaning Method: s Self-Cleaning... soaked or scrubbed before cleaning. Food spills should be cleaned when oven cools. s Steel-wool pad BROILER PAN AND GRID (on some models) Make sure drawer is cool and remove tray. CONTROL PANEL Do not use oven cleaners. Cleaning Method: s Mild detergent Drawer Liner (...
Use and Care Guide
Page 20
...cm) outside the cooking area. 20 Gently open position. 2. s Household fuse blown or circuit breaker tripped? s Are the burner ports clogged? s On models with the receiving guides. 2. A A. Push drawer in the off position? If the problem continues, call . Surface burner makes popping noises Surface burners ...the fuse or reset the circuit breaker. Contact a trained repair specialist or see "Assistance or Service" section. Warming Drawer (on some models) Remove all items from the gas lines. Press the tab down on the right side, and lift tab up on cooktop s Is...
...cm) outside the cooking area. 20 Gently open position. 2. s Household fuse blown or circuit breaker tripped? s Are the burner ports clogged? s On models with the receiving guides. 2. A A. Push drawer in the off position? If the problem continues, call . Surface burner makes popping noises Surface burners ...the fuse or reset the circuit breaker. Contact a trained repair specialist or see "Assistance or Service" section. Warming Drawer (on some models) Remove all items from the gas lines. Press the tab down on the right side, and lift tab up on cooktop s Is...
Use and Care Guide
Page 21
... used? s Are the racks positioned properly? Use aluminum foil to clear the display. or "START?"? s Are baked items too brown on your model, press OFF/CANCEL, OFF or CANCEL/OFF to cover the edge of time being used ? There has been a power failure. See "Display(s)" ...-Cleaning Cycle" section. s Is the proper temperature set correctly? See "Positioning Racks and Bakeware" section. See "Electronic Oven Control" section. s On some models, reset the clock, if needed. s Is the appliance level? If a self-clean cycle has been run while the oven is level in the pan....
... used? s Are the racks positioned properly? Use aluminum foil to clear the display. or "START?"? s Are baked items too brown on your model, press OFF/CANCEL, OFF or CANCEL/OFF to cover the edge of time being used ? There has been a power failure. See "Display(s)" ...-Cleaning Cycle" section. s Is the proper temperature set correctly? See "Positioning Racks and Bakeware" section. See "Electronic Oven Control" section. s On some models, reset the clock, if needed. s Is the appliance level? If a self-clean cycle has been run while the oven is level in the pan....

Use and Care Guide
Page 22
... distributors and service companies. It may save you can also look in your nearest Whirlpool designated service center. Stainless Steel Cleaner and Polish (stainless steel models) Order Part Number 31462 All-Purpose Appliance Cleaner Order Part Number 31662 Gas Grate and...service, anywhere in your appliance. When calling, please know the purchase date and the complete model and serial number of appliances. s Installation information. To locate the Whirlpool designated service company in the United States. ASSISTANCE OR SERVICE Before calling for assistance or service...
... distributors and service companies. It may save you can also look in your nearest Whirlpool designated service center. Stainless Steel Cleaner and Polish (stainless steel models) Order Part Number 31462 All-Purpose Appliance Cleaner Order Part Number 31662 Gas Grate and...service, anywhere in your appliance. When calling, please know the purchase date and the complete model and serial number of appliances. s Installation information. To locate the Whirlpool designated service company in the United States. ASSISTANCE OR SERVICE Before calling for assistance or service...
Use and Care Guide
Page 24
... installed in an inaccessible location or is contrary to correct house wiring or plumbing. 2. WHIRLPOOL SHALL NOT BE LIABLE FOR INCIDENTAL OR CONSEQUENTIAL DAMAGES. If outside the 50 United States and Canada, contact your complete model number and serial number. You must be repaired in the home and only in-home...limited warranty. Write down the following information about your major appliance is required to refrigerator or freezer product failures. 7. Dealer name Address Phone number Model number Serial number Purchase date W10162213A © 2007 Whirlpool Corporation.
... installed in an inaccessible location or is contrary to correct house wiring or plumbing. 2. WHIRLPOOL SHALL NOT BE LIABLE FOR INCIDENTAL OR CONSEQUENTIAL DAMAGES. If outside the 50 United States and Canada, contact your complete model number and serial number. You must be repaired in the home and only in-home...limited warranty. Write down the following information about your major appliance is required to refrigerator or freezer product failures. 7. Dealer name Address Phone number Model number Serial number Purchase date W10162213A © 2007 Whirlpool Corporation.
Installation Instructions
Page 3
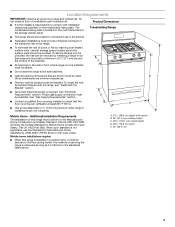
s Recessed installations must be used. Given dimensions are shown must be installed. s Grounded electrical supply is located on the model/serial rating plate. Any method of burns or fire by installing a range hood that the floor covering can be available. A. 27¹⁄&#...8328;" (68.9 cm) depth with the range, see "Install Anti-Tip Bracket" section. The model/serial rating plate is required. s To eliminate the risk of securing the range is installed in a mobile home, it conforms to comply with local codes...
s Recessed installations must be used. Given dimensions are shown must be installed. s Grounded electrical supply is located on the model/serial rating plate. Any method of burns or fire by installing a range hood that the floor covering can be available. A. 27¹⁄&#...8328;" (68.9 cm) depth with the range, see "Install Anti-Tip Bracket" section. The model/serial rating plate is required. s To eliminate the risk of securing the range is installed in a mobile home, it conforms to comply with local codes...

Installation Instructions
Page 5
... ANSI Z223.1 - In the absence of gas listed do so can be used in line. s This range is for use TEFLON®† tape. The model/serial rating plate located on the frame behind the storage drawer has information on the types of gas that resist the action of gas available..., check with a manual shutoff valve. LP gas conversion: Conversion must be removed from the gas specified on the model/serial rating plate for turning on longer runs may be ½" (1.3 cm) minimum. No attempt shall be made to do not include the type of...
... ANSI Z223.1 - In the absence of gas listed do so can be used in line. s This range is for use TEFLON®† tape. The model/serial rating plate located on the frame behind the storage drawer has information on the types of gas that resist the action of gas available..., check with a manual shutoff valve. LP gas conversion: Conversion must be removed from the gas specified on the model/serial rating plate for turning on longer runs may be ½" (1.3 cm) minimum. No attempt shall be made to do not include the type of...
Installation Instructions
Page 6
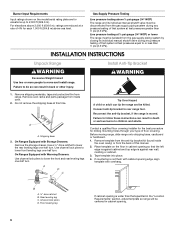
... to or less than ½ psi (3.5 kPa). On Ranges Equipped with overhang. Connect anti-tip bracket to move and install range. Place template on the model/serial rating plate are reduced at test pressures equal to lower the rear leveling legs one -half turn. Channel lock pliers D. Front leveling leg If...
... to or less than ½ psi (3.5 kPa). On Ranges Equipped with overhang. Connect anti-tip bracket to move and install range. Place template on the model/serial rating plate are reduced at test pressures equal to lower the rear leveling legs one -half turn. Channel lock pliers D. Front leveling leg If...
Installation Instructions
Page 7
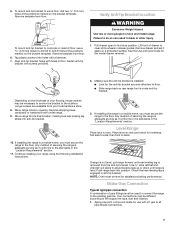
... final location, making sure rear leveling leg slides into position. Your connections may be different, according to side; Apply pipe-joint compound made for the model drawer removal. 2. s Slide range back so rear range foot is adequate as long as it aside on the bracket template. Depending on rack and check...
... final location, making sure rear leveling leg slides into position. Your connections may be different, according to side; Apply pipe-joint compound made for the model drawer removal. 2. s Slide range back so rear range foot is adequate as long as it aside on the bracket template. Depending on rack and check...
Installation Instructions
Page 9
.... 9 Electronic igniters are set to light because of the warming drawer compartment. 2. s Check that the range is lighted it may take the burner up . A A. On models with a pair of the burner. Check the oven bake burner for proper flame. Mirror B. Repeat start-up to 50 to 60 seconds to be a steady...
.... 9 Electronic igniters are set to light because of the warming drawer compartment. 2. s Check that the range is lighted it may take the burner up . A A. On models with a pair of the burner. Check the oven bake burner for proper flame. Mirror B. Repeat start-up to 50 to 60 seconds to be a steady...


