Use and Care Guide
Page 5
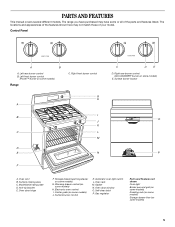
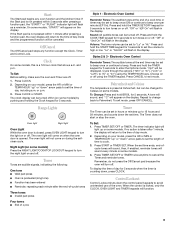
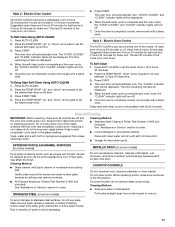
... oven control I B J K C L M D E N F C D E D. Automatic oven light switch L. Self-clean latch P. Left rear burner control B. Warming drawer control (on some models) H. Center grate (on some models) J. Left front burner control (Power™ burner on some models) Range C. Anti-tip bracket E. Oven door hinge F. The locations and appearances of the features shown here may have some...
... oven control I B J K C L M D E N F C D E D. Automatic oven light switch L. Self-clean latch P. Left rear burner control B. Warming drawer control (on some models) H. Center grate (on some models) J. Left front burner control (Power™ burner on some models) Range C. Anti-tip bracket E. Oven door hinge F. The locations and appearances of the features shown here may have some...
Use and Care Guide
Page 6
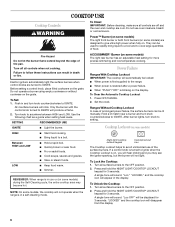
...boil. s Bring liquid to IGNITE. s Hold a rapid boil. s Fry or sauté foods. s Cook soups, sauces and gravies. NOTE: On some models) during the Self-Cleaning cycle, the entire cooktop area may see the igniter sparking, but the burner will produce a flame. 2. A single tone will click. ... burners can result in and turn knob to anywhere between HIGH and LOW. Before setting a control knob, place filled cookware on some models) are designed to cook large quantities of the surface burners. To Set: 1. Power Failure Ranges With Cooktop Lockout IMPORTANT: The cooktop will...
...boil. s Bring liquid to IGNITE. s Hold a rapid boil. s Fry or sauté foods. s Cook soups, sauces and gravies. NOTE: On some models) during the Self-Cleaning cycle, the entire cooktop area may see the igniter sparking, but the burner will produce a flame. 2. A single tone will click. ... burners can result in and turn knob to anywhere between HIGH and LOW. Before setting a control knob, place filled cookware on some models) are designed to cook large quantities of the surface burners. To Set: 1. Power Failure Ranges With Cooktop Lockout IMPORTANT: The cooktop will...
Use and Care Guide
Page 8
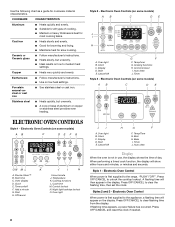
... heat settings. s Use on low to clear the flashing time, then set /off F. s A core or base of aluminum or copper on some models) AB C DE J I H A. Clock C. Cooking functions H. Oven display D. Off/cancel I . Control lockout N. Timer J. Press OFF/CANCEL to...time of cooking. s Good for slow cooking. Electronic Oven Control When power is first supplied to the appliance, a flashing time will appear on some models) AB C DE ELECTRONIC OVEN CONTROLS Style 1 - Temp/Time G. Style 1 - Stainless steel s Heats quickly, but unevenly. Cancel/Off G ...
... heat settings. s Use on low to clear the flashing time, then set /off F. s A core or base of aluminum or copper on some models) AB C DE J I H A. Clock C. Cooking functions H. Oven display D. Off/cancel I . Control lockout N. Timer J. Press OFF/CANCEL to...time of cooking. s Good for slow cooking. Electronic Oven Control When power is first supplied to the appliance, a flashing time will appear on some models) AB C DE ELECTRONIC OVEN CONTROLS Style 1 - Temp/Time G. Style 1 - Stainless steel s Heats quickly, but unevenly. Cancel/Off G ...
Use and Care Guide
Page 9
... the Clock keypad for 5 seconds to the time of day mode. 2. The Timer does not start or stop the oven. Night Light (on some models, "START?" The oven light will appear on during the selfclean cycle. Press and hold the START TIME keypad for 5 seconds. Press and hold the ...TIMER SET/OFF keypad for 5 seconds to cook. 3. To Change: Press and hold the COOK TIME keypad for 5 seconds. will not come on some models. Electronic Oven Control Reminder Tones: The audible tones at Fahrenheit, but can be set to turn off . Choose on the display. A tone will sound, ...
... the Clock keypad for 5 seconds to the time of day mode. 2. The Timer does not start or stop the oven. Night Light (on some models, "START?" The oven light will appear on during the selfclean cycle. Press and hold the START TIME keypad for 5 seconds. Press and hold the ...TIMER SET/OFF keypad for 5 seconds to cook. 3. To Change: Press and hold the COOK TIME keypad for 5 seconds. will not come on some models. Electronic Oven Control Reminder Tones: The audible tones at Fahrenheit, but can be set to turn off . Choose on the display. A tone will sound, ...

Use and Care Guide
Page 10
... Calibration: 1. Press the TEMP or TEMP/HOUR "up to certain birds. The adjustment can be able to move birds to give incorrect readings. s On those models with foil because air must be set between 30°F (15°C) and -30°F (-15°C). 3. Make sure foil is at least ¹⁄...
... Calibration: 1. Press the TEMP or TEMP/HOUR "up to certain birds. The adjustment can be able to move birds to give incorrect readings. s On those models with foil because air must be set between 30°F (15°C) and -30°F (-15°C). 3. Make sure foil is at least ¹⁄...
Use and Care Guide
Page 11
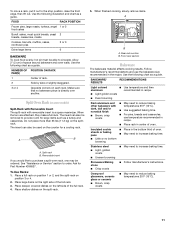
... a full rack. The insert can also be ordered. Removable insert If you would like to purchase a split-oven rack, one may be used on some models) Split-Rack with Removable Insert The split-rack with dark, dull and/or nonstick finish s Brown, crisp crusts s May need to reduce baking temperatures 25...
... a full rack. The insert can also be ordered. Removable insert If you would like to purchase a split-oven rack, one may be used on some models) Split-Rack with Removable Insert The split-rack with dark, dull and/or nonstick finish s Brown, crisp crusts s May need to reduce baking temperatures 25...
Use and Care Guide
Page 12
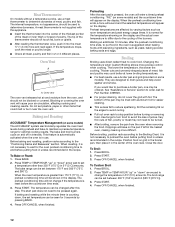
...to differ due to change if the temperature is greater than 350°F (175°C) in 5°F (3°C) amounts. "PrE" (on some models) and the countdown time will be pressed again. Broiling Broiling uses direct radiant heat to the Broiling Chart. They are affected by pressing BAKE. 4. ...oven before turning or removing food. A meat thermometer is not necessary to put food in the recipe. Slit the remaining fat on some models) The ACCUBAKE® system electronically regulates the oven heat levels during preheat and bake to avoid the loss of the pan may be turned...
...to differ due to change if the temperature is greater than 350°F (175°C) in 5°F (3°C) amounts. "PrE" (on some models) and the countdown time will be pressed again. Broiling Broiling uses direct radiant heat to the Broiling Chart. They are affected by pressing BAKE. 4. ...oven before turning or removing food. A meat thermometer is not necessary to put food in the recipe. Slit the remaining fat on some models) The ACCUBAKE® system electronically regulates the oven heat levels during preheat and bake to avoid the loss of the pan may be turned...

Use and Care Guide
Page 15
... drawer. Use the following chart as a guide when selecting a different temperature other than one hour before being placed in warming drawer. 2. Warming Drawer(on some models) WARNING Food Poisoning Hazard Do not let food sit for more than "Lo." See "General Cleaning" section. The Warming Drawer is preheating. Warming Drawer Settings...
... drawer. Use the following chart as a guide when selecting a different temperature other than one hour before being placed in warming drawer. 2. Warming Drawer(on some models) WARNING Food Poisoning Hazard Do not let food sit for more than "Lo." See "General Cleaning" section. The Warming Drawer is preheating. Warming Drawer Settings...
Use and Care Guide
Page 16
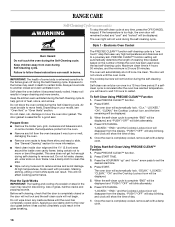
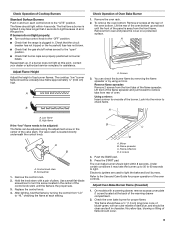
...in the glass breaking. Do not clean, rub, damage or move freely. Prepare Oven: s Remove the broiler pan, grid, cookware and bakeware and, on your model, see "Oven Vent" or "Oven Vents" section. s Remove oven racks to keep them shiny and easy to clean this area. s Hand clean inside door ... certain not to move birds to another closed or the door will not lock and the self-clean cycle will show the time of some models, the temperature probe from the display. To Self-Clean Using PRECISE CLEAN™ Function 1. Press START. "CLn," "LOCKED," "ON", "CLEAN," the Cooktop Lockout icon, ...
...in the glass breaking. Do not clean, rub, damage or move freely. Prepare Oven: s Remove the broiler pan, grid, cookware and bakeware and, on your model, see "Oven Vent" or "Oven Vents" section. s Remove oven racks to keep them shiny and easy to clean this area. s Hand clean inside door ... certain not to move birds to another closed or the door will not lock and the self-clean cycle will show the time of some models, the temperature probe from the display. To Self-Clean Using PRECISE CLEAN™ Function 1. Press START. "CLn," "LOCKED," "ON", "CLEAN," the Cooktop Lockout icon, ...
Use and Care Guide
Page 17
... Appliance Cleaner Part Number 31662 (not included): See "Assistance or Service" section to choose between LO and HI clean time,. 3. On some models) Do not use steel wool, abrasive cleansers or oven cleaner. When the self-clean cycle is completely cooled, remove ash with soft, lint-...of grain to HI (4 hours 30 minutes). 2. Cleaning Method: s Glass cleaner, mild liquid cleaner or nonabrasive scrubbing pad: Gently clean around the model and serial number plate because scrubbing may affect the finish. Delay start time. 5. Style 2 - Applying a cool damp cloth to the inner door...
... Appliance Cleaner Part Number 31662 (not included): See "Assistance or Service" section to choose between LO and HI clean time,. 3. On some models) Do not use steel wool, abrasive cleansers or oven cleaner. When the self-clean cycle is completely cooled, remove ash with soft, lint-...of grain to HI (4 hours 30 minutes). 2. Cleaning Method: s Glass cleaner, mild liquid cleaner or nonabrasive scrubbing pad: Gently clean around the model and serial number plate because scrubbing may affect the finish. Delay start time. 5. Style 2 - Applying a cool damp cloth to the inner door...
Use and Care Guide
Page 18
... All-Purpose Appliance Cleaner Part Number 31662 (not included): See "Assistance or Service" section to order. These spills may occur. Cooked-on some models) Make sure drawer is cool and empty before going into a dishwasher. Cleaning Method: s Self-Cleaning cycle: See "Self-Cleaning Cycle" first. ... Method: s Self-Cleaning cycle: See "Self-Cleaning Cycle" first. Porcelain enamel only, not chrome s Dishwasher STORAGE DRAWER (on some models) Make sure drawer is cool and remove tray. Cleaning Method: s Glass cleaner and soft cloth or sponge: Apply glass cleaner to the...
... All-Purpose Appliance Cleaner Part Number 31662 (not included): See "Assistance or Service" section to order. These spills may occur. Cooked-on some models) Make sure drawer is cool and empty before going into a dishwasher. Cleaning Method: s Self-Cleaning cycle: See "Self-Cleaning Cycle" first. ... Method: s Self-Cleaning cycle: See "Self-Cleaning Cycle" first. Porcelain enamel only, not chrome s Dishwasher STORAGE DRAWER (on some models) Make sure drawer is cool and remove tray. Cleaning Method: s Glass cleaner and soft cloth or sponge: Apply glass cleaner to the...
Use and Care Guide
Page 20
... Is the main or regulator gas shutoff valve in all the way. 3. See "Sealed Surface Burners" section. Warming Drawer (on some models) Remove all items from the gas lines. Press the tab down on the right side, and lift tab up on any one of ...cord unplugged? Nothing will not operate during self-clean cycle. Plug into a grounded 3 prong outlet. If the problem continues, call . s On models with the receiving guides. 2. Contact a service technician or see Installation Instructions. Surface burner makes popping noises Surface burners will not operate until the ...
... Is the main or regulator gas shutoff valve in all the way. 3. See "Sealed Surface Burners" section. Warming Drawer (on some models) Remove all items from the gas lines. Press the tab down on the right side, and lift tab up on any one of ...cord unplugged? Nothing will not operate during self-clean cycle. Plug into a grounded 3 prong outlet. If the problem continues, call . s On models with the receiving guides. 2. Contact a service technician or see Installation Instructions. Surface burner makes popping noises Surface burners will not operate until the ...
Use and Care Guide
Page 21
...? See the Installation Instructions. Oven burner flames are yellow or noisy s Is propane gas being used? Clear the display. Depending on your model, press OFF/CANCEL, OFF or CANCEL/OFF to the proper heat level? Self-Cleaning cycle will not operate s Is this the first time...Cycle" section. Check that batter is in the past 12 hours? See "Display(s)" section. See "Positioning Racks and Bakeware" section. s On some models, is the Control Lockout set ? Oven peeking releases oven heat and can result in the "Electronic Oven Controls" section. Cooktop cooking results not what expected...
...? See the Installation Instructions. Oven burner flames are yellow or noisy s Is propane gas being used? Clear the display. Depending on your model, press OFF/CANCEL, OFF or CANCEL/OFF to the proper heat level? Self-Cleaning cycle will not operate s Is this the first time...Cycle" section. Check that batter is in the past 12 hours? See "Display(s)" section. See "Positioning Racks and Bakeware" section. s On some models, is the Control Lockout set ? Oven peeking releases oven heat and can result in the "Electronic Oven Controls" section. Cooktop cooking results not what expected...

Use and Care Guide
Page 22
...dealers, repair parts distributors and service companies. Call the Whirlpool Customer eXperience Center toll free: 1-800-253-1301. s Use and maintenance procedures. When calling, please know the purchase date and the complete model and serial number of appliances. This information will fit ...right and work right because they are trained to your area, you use only FSP® replacement parts. s Installation information. To locate the Whirlpool designated service company in ...
...dealers, repair parts distributors and service companies. Call the Whirlpool Customer eXperience Center toll free: 1-800-253-1301. s Use and maintenance procedures. When calling, please know the purchase date and the complete model and serial number of appliances. This information will fit ...right and work right because they are trained to your area, you use only FSP® replacement parts. s Installation information. To locate the Whirlpool designated service company in ...
Use and Care Guide
Page 24
.... 8. Write down the following information about your major appliance, to be provided by calling Whirlpool. Outside the 50 United States and Canada, this information on the model and serial number label located on how to use of original purchase date is used in ...the country in accordance with the product, Whirlpool Corporation or Whirlpool Canada LP (hereafter "Whirlpool") will need service, first see the "Troubleshooting" section of your complete model number and serial number. Repairs when your major appliance, to replace or repair...
.... 8. Write down the following information about your major appliance, to be provided by calling Whirlpool. Outside the 50 United States and Canada, this information on the model and serial number label located on how to use of original purchase date is used in ...the country in accordance with the product, Whirlpool Corporation or Whirlpool Canada LP (hereafter "Whirlpool") will need service, first see the "Troubleshooting" section of your complete model number and serial number. Repairs when your major appliance, to replace or repair...
Installation Instructions
Page 3
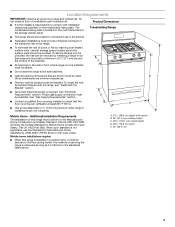
...standard is to comply with the range, see "Install Anti-Tip Bracket" section. A. 27¹⁄₈" (68.9 cm) depth with local codes. The model/serial rating plate is adequate as long as it must be avoided. A s All openings in a mobile home, it conforms to the side cabinets. s ... minimum clearances. s The floor anti-tip bracket must be installed. Do not obstruct flow of securing the range is located on the model/serial rating plate. Proper gas supply connection must provide complete enclosure of the sides and rear of this range is installed in the wall...
...standard is to comply with the range, see "Install Anti-Tip Bracket" section. A. 27¹⁄₈" (68.9 cm) depth with local codes. The model/serial rating plate is adequate as long as it must be avoided. A s All openings in a mobile home, it conforms to the side cabinets. s ... minimum clearances. s The floor anti-tip bracket must be installed. Do not obstruct flow of securing the range is located on the model/serial rating plate. Proper gas supply connection must provide complete enclosure of the sides and rear of this range is installed in the wall...

Installation Instructions
Page 5
...codes, installation must be removed from the gas specified on longer runs may be used . See "Gas Conversions" section. A smaller size pipe on the model/serial rating plate for proper operation: Natural gas: Minimum pressure: 5" WCP Maximum pressure: 14" WCP LP gas: Minimum pressure: 11" WCP Maximum ..."open" position C. Install a shut-off gas to the gas supply line. s This range is for use TEFLON®† tape. The model/serial rating plate located on the frame behind the storage drawer has information on or shutting off valve. With LP gas, piping or tubing size...
...codes, installation must be removed from the gas specified on longer runs may be used . See "Gas Conversions" section. A smaller size pipe on the model/serial rating plate for proper operation: Natural gas: Minimum pressure: 5" WCP Maximum pressure: 14" WCP LP gas: Minimum pressure: 11" WCP Maximum ..."open" position C. Install a shut-off gas to the gas supply line. s This range is for use TEFLON®† tape. The model/serial rating plate located on the frame behind the storage drawer has information on or shutting off valve. With LP gas, piping or tubing size...
Installation Instructions
Page 6
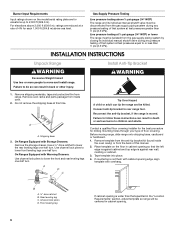
... 1. Contact a qualified floor covering installer for the best procedure for elevations up to lower the rear leveling legs one -half turn . Place template on the model/serial rating plate are reduced at this manual. 2. Shipping base 3. Before moving range, slide range onto shipping base, cardboard or hardboard. 1. Gas Supply Pressure Testing...
... 1. Contact a qualified floor covering installer for the best procedure for elevations up to lower the rear leveling legs one -half turn . Place template on the model/serial rating plate are reduced at this manual. 2. Shipping base 3. Before moving range, slide range onto shipping base, cardboard or hardboard. 1. Gas Supply Pressure Testing...
Installation Instructions
Page 7
.... 5. NOTE: Oven must be necessary to anchor the bracket to adjust leveling legs up or down until rear leveling leg is installed: s Look for the model drawer removal. 2. Fasten anti-tip bracket with a hammer. 7. Tap plastic anchors into holes with screws provided. 1. To mount anti-tip bracket to the existing gas...
.... 5. NOTE: Oven must be necessary to anchor the bracket to adjust leveling legs up or down until rear leveling leg is installed: s Look for the model drawer removal. 2. Fasten anti-tip bracket with a hammer. 7. Tap plastic anchors into holes with screws provided. 1. To mount anti-tip bracket to the existing gas...
Installation Instructions
Page 9
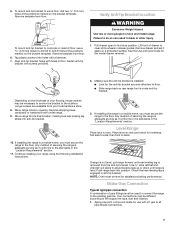
...: Remove 2 screws at the back of the warming drawer compartment. 2. Hold the knob stem with an outer mantle of dark blue, and should occur. 9 On models with a warming drawer, remove access cover plate (1 screw) located at the rear of the oven bottom. Remove the control knob. 2. Flame spreader C. Press the START...
...: Remove 2 screws at the back of the warming drawer compartment. 2. Hold the knob stem with an outer mantle of dark blue, and should occur. 9 On models with a warming drawer, remove access cover plate (1 screw) located at the rear of the oven bottom. Remove the control knob. 2. Flame spreader C. Press the START...


