Use and Care Guide
Page 5
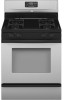
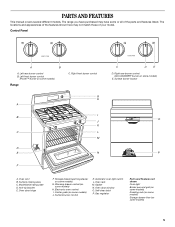
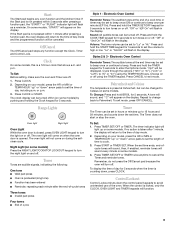
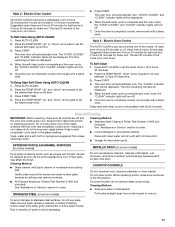
...-clean latch P. Gas regulator Parts and Features not shown Oven light Broiler pan and grid (on some models) Roasting rack (on some models) Storage drawer liner (on some models) J. Surface burner control K. Gasket N. Right front burner control G H A I . Surface burner ...locator O P A. Oven door window O. PARTS AND FEATURES This manual covers several different models. The range you have purchased may not match those of your model. The locations and appearances of the parts and features listed. Control Panel A B A. Surface cooking area...
...-clean latch P. Gas regulator Parts and Features not shown Oven light Broiler pan and grid (on some models) Roasting rack (on some models) Storage drawer liner (on some models) J. Surface burner control K. Gasket N. Right front burner control G H A I . Surface burner ...locator O P A. Oven door window O. PARTS AND FEATURES This manual covers several different models. The range you have purchased may not match those of your model. The locations and appearances of the parts and features listed. Control Panel A B A. Surface cooking area...
Use and Care Guide
Page 6
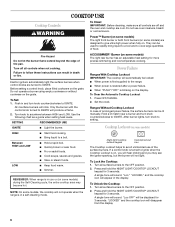
... the cooktop icon will produce a flame. 2. Press and hold the NIGHT LIGHT/COOKTOP LOCKOUT keypad for 3 seconds. Do not use or (on some models, the cooktop will be lit manually. They can be locked: s When power is first supplied to Ignite when the Cooktop Lockout is in a self-... and cooktop are designed to setting. s Keep food warm. NOTE: On some models) are cool. To Lock the Cooktop: 1. Power™ Burner (on some models) The right front burner or both front burners (on some models) The right rear burner has an adjustable heat setting for 3 seconds. Push in...
... the cooktop icon will produce a flame. 2. Press and hold the NIGHT LIGHT/COOKTOP LOCKOUT keypad for 3 seconds. Do not use or (on some models, the cooktop will be lit manually. They can be locked: s When power is first supplied to Ignite when the Cooktop Lockout is in a self-... and cooktop are designed to setting. s Keep food warm. NOTE: On some models) are cool. To Lock the Cooktop: 1. Power™ Burner (on some models) The right front burner or both front burners (on some models) The right rear burner has an adjustable heat setting for 3 seconds. Push in...
Use and Care Guide
Page 8
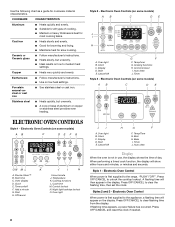
...C. Oven light B. Start E. Press OFF/CANCEL and reset the clock if needed. 8 Cast iron s Heats slowly and evenly. Electronic Oven Controls (on some models) AB C DE FG ON M L K J I H A. Temp/Time G. Styles 2 and 3 - Clock C. Cancel/Off G F F. Start H. ... lockout N. Off/cancel I A. Style 2 - Oven light J I . Electronic Oven Controls (on some models) AB C DE ELECTRONIC OVEN CONTROLS Style 1 - Electronic Oven Controls (on some models) AB C DE J I H A. s Medium or heavy thickness is first supplied to the appliance, a...
...C. Oven light B. Start E. Press OFF/CANCEL and reset the clock if needed. 8 Cast iron s Heats slowly and evenly. Electronic Oven Controls (on some models) AB C DE FG ON M L K J I H A. Temp/Time G. Styles 2 and 3 - Clock C. Cancel/Off G F F. Start H. ... lockout N. Off/cancel I A. Style 2 - Oven light J I . Electronic Oven Controls (on some models) AB C DE ELECTRONIC OVEN CONTROLS Style 1 - Electronic Oven Controls (on some models) AB C DE J I H A. s Medium or heavy thickness is first supplied to the appliance, a...
Use and Care Guide
Page 9
... s Invalid pad press Four tones s End of the oven. Press CLOCK. 2. Press CLOCK or START. "Off" or "rEP On" will appear on some models. Cycle through the options ("12hr" or "hr"), ("LOn" or "Loff"), to beep. If the Start pad is opened. will flash in the display. Press...Clock, Timer and Control Lock. or "PUSH?" Off/Cancel The Off/Cancel pad stops any oven function and the kitchen timer. Clock On some models, "START?" The clock display can be changed to set time. Electronic Oven Control Reminder Tones: The audible tones at the end time may ...
... s Invalid pad press Four tones s End of the oven. Press CLOCK. 2. Press CLOCK or START. "Off" or "rEP On" will appear on some models. Cycle through the options ("12hr" or "hr"), ("LOn" or "Loff"), to beep. If the Start pad is opened. will flash in the display. Press...Clock, Timer and Control Lock. or "PUSH?" Off/Cancel The Off/Cancel pad stops any oven function and the kitchen timer. Clock On some models, "START?" The clock display can be changed to set time. Electronic Oven Control Reminder Tones: The audible tones at the end time may ...

Use and Care Guide
Page 10
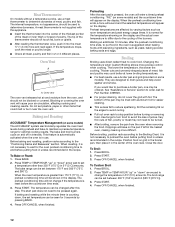
... ...moderately less ...much less To Adjust Oven Temperature Calibration: 1. Press START. Exposure to the fumes may cause burner cycling to give incorrect readings. s On those models with bakeware on the oven. A single tone will add 1 minute of a minus sign means the oven will be displayed. Electronic Oven Control Control lockout Control...
... ...moderately less ...much less To Adjust Oven Temperature Calibration: 1. Press START. Exposure to the fumes may cause burner cycling to give incorrect readings. s On those models with bakeware on the oven. A single tone will add 1 minute of a minus sign means the oven will be displayed. Electronic Oven Control Control lockout Control...
Use and Care Guide
Page 11
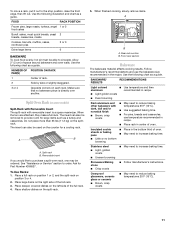
... (11.3 kg) on the left side of oven. To Use Racks: 1. Allow 2" (5 cm) of the full rack. 3. The insert can also be used on some models) Split-Rack with Removable Insert The split-rack with dark, dull and/or nonstick finish s Brown, crisp crusts s May need to increase baking time. Use...
... (11.3 kg) on the left side of oven. To Use Racks: 1. Allow 2" (5 cm) of the full rack. 3. The insert can also be used on some models) Split-Rack with Removable Insert The split-rack with dark, dull and/or nonstick finish s Brown, crisp crusts s May need to increase baking time. Use...
Use and Care Guide
Page 12
...the burners. Changing the temperature when Custom Broiling allows more precise control when cooking. It is normal for easier cleaning. Meat Thermometer On models without a temperature probe, use a meat thermometer to preheat the oven before putting food in unless recommended in the recipe. The internal ... when the oven is suggested when baking foods with aluminum foil for the temperature showing on the display. "PrE" (on some models). Thicker cuts and unevenly shaped pieces of the pan may cook better at lower broiling temperatures. See "Assistance or Service" section to...
...the burners. Changing the temperature when Custom Broiling allows more precise control when cooking. It is normal for easier cleaning. Meat Thermometer On models without a temperature probe, use a meat thermometer to preheat the oven before putting food in unless recommended in the recipe. The internal ... when the oven is suggested when baking foods with aluminum foil for the temperature showing on the display. "PrE" (on some models). Thicker cuts and unevenly shaped pieces of the pan may cook better at lower broiling temperatures. See "Assistance or Service" section to...

Use and Care Guide
Page 15
... following chart as a guide when selecting a different temperature other than 1 hour. The Warming Drawer is preheating. Turn rotary control to be warmed directly on some models) WARNING Food Poisoning Hazard Do not let food sit for a "Lo" temperature, but can result in and turn rotary control to maintain the ideal serving...
... following chart as a guide when selecting a different temperature other than 1 hour. The Warming Drawer is preheating. Turn rotary control to be warmed directly on some models) WARNING Food Poisoning Hazard Do not let food sit for a "Lo" temperature, but can result in and turn rotary control to maintain the ideal serving...
Use and Care Guide
Page 16
... shiny and easy to clean this area. This area does not get hot enough during the Self-Cleaning cycle to help get rid of some models, the temperature probe from the oven. Staining, etching, pitting or faint white spots can result in longer cleaning and more information. Before self-...display. Heavy soil results in burns. Do not clean, rub, damage or move freely. Do not let water, cleaner, etc. enter slots on your model, see "Oven Vent" or "Oven Vents" section. How the Cycle Works IMPORTANT: The heating and cooling of porcelain on some birds is completely closed and...
... shiny and easy to clean this area. This area does not get hot enough during the Self-Cleaning cycle to help get rid of some models, the temperature probe from the oven. Staining, etching, pitting or faint white spots can result in longer cleaning and more information. Before self-...display. Heavy soil results in burns. Do not clean, rub, damage or move freely. Do not let water, cleaner, etc. enter slots on your model, see "Oven Vent" or "Oven Vents" section. How the Cycle Works IMPORTANT: The heating and cooling of porcelain on some birds is completely closed and...
Use and Care Guide
Page 17
...and dry with a damp cloth. Cleaning Method: s Glass cleaner, mild liquid cleaner or nonabrasive scrubbing pad: Gently clean around the model and serial number plate because scrubbing may stain. Cleaning Method: s Soap and water or dishwasher: Pull knobs straight away from 2 ... automatically lock. Press START TIME. 4. Electric Oven Control The AUTO-CLEAN cycle can be displayed. 5. Always follow label instructions on some models) METALLIC PAINT (on cleaning products. Cleaning Method: s Stainless Steel Cleaner & Polish Part Number 31462 (not included): See "Assistance or ...
...and dry with a damp cloth. Cleaning Method: s Glass cleaner, mild liquid cleaner or nonabrasive scrubbing pad: Gently clean around the model and serial number plate because scrubbing may stain. Cleaning Method: s Soap and water or dishwasher: Pull knobs straight away from 2 ... automatically lock. Press START TIME. 4. Electric Oven Control The AUTO-CLEAN cycle can be displayed. 5. Always follow label instructions on some models) METALLIC PAINT (on cleaning products. Cleaning Method: s Stainless Steel Cleaner & Polish Part Number 31462 (not included): See "Assistance or ...
Use and Care Guide
Page 18
...included): See "Assistance or Service" section to order. 18 OVEN CAVITY Do not use abrasive cleaners, steel-wool pads, gritty washcloths or some models) Do not clean in the Self-Cleaning cycle. s Solution of vegetable oil applied to the rack guides will discolor and become harder to slide... Cleaner Part Number 31662 (not included): See "Assistance or Service" section to order. s Steel-wool pad BROILER PAN AND GRID (on some models) Make sure drawer is cool and empty before going into a dishwasher. Cooked-on burners while wet. CONTROL PANEL Do not use oven cleaners.
...included): See "Assistance or Service" section to order. 18 OVEN CAVITY Do not use abrasive cleaners, steel-wool pads, gritty washcloths or some models) Do not clean in the Self-Cleaning cycle. s Solution of vegetable oil applied to the rack guides will discolor and become harder to slide... Cleaner Part Number 31662 (not included): See "Assistance or Service" section to order. s Steel-wool pad BROILER PAN AND GRID (on some models) Make sure drawer is cool and empty before going into a dishwasher. Cooked-on burners while wet. CONTROL PANEL Do not use oven cleaners.
Use and Care Guide
Page 20
.... Cookware should not extend more than ½" (1.3 cm) outside the cooking area. 20 See "Sealed Surface Burners" section. s On models with the receiving guides. 2. Surface burner makes popping noises Surface burners will operate Surface burner flames are the burner caps positioned properly? s ... self-clean set correctly? Turn on the left side at the same time, then pull drawer out another inch. Warming Drawer (on some models) Remove all the way. 3. Gently open position. 2. Surface burners will not operate until the self-clean cycle is seated properly on the...
.... Cookware should not extend more than ½" (1.3 cm) outside the cooking area. 20 See "Sealed Surface Burners" section. s On models with the receiving guides. 2. Surface burner makes popping noises Surface burners will operate Surface burner flames are the burner caps positioned properly? s ... self-clean set correctly? Turn on the left side at the same time, then pull drawer out another inch. Warming Drawer (on some models) Remove all the way. 3. Gently open position. 2. Surface burners will not operate until the self-clean cycle is seated properly on the...
Use and Care Guide
Page 21
... cleaning s It is level in a reliable cookbook. Display shows messages s Is the display showing a flashing time? There has been a power failure. On some models, is in longer cooking times. s Is the display showing a flashing "PUSH?" s Is the proper bakeware being used ? See "Positioning Racks and Bakeware" section...release air from the gas lines. See "Display(s)" section. Depending on any one of the crust and/or reduce baking temperature. 21 s On some models, has a delay start been set ? s Has a self-clean cycle been run while the oven is the Control Lockout set? s Is the...
... cleaning s It is level in a reliable cookbook. Display shows messages s Is the display showing a flashing time? There has been a power failure. On some models, is in longer cooking times. s Is the display showing a flashing "PUSH?" s Is the proper bakeware being used ? See "Positioning Racks and Bakeware" section...release air from the gas lines. See "Display(s)" section. Depending on any one of the crust and/or reduce baking temperature. 21 s On some models, has a delay start been set ? s Has a self-clean cycle been run while the oven is the Control Lockout set? s Is the...

Use and Care Guide
Page 22
...impaired, limited vision, etc.). To order accessories, call the Whirlpool Customer eXperience Center toll free at 1-800-442-9991 and follow the instructions below. Stainless Steel Cleaner and Polish (stainless steel models) Order Part Number 31462 All-Purpose Appliance Cleaner Order Part...phone number in your correspondence. When calling, please know the purchase date and the complete model and serial number of a service call us to better respond to build every new WHIRLPOOL® appliance. s Installation information. s Accessory and repair parts sales. Accessories Accessories U.S.A....
...impaired, limited vision, etc.). To order accessories, call the Whirlpool Customer eXperience Center toll free at 1-800-442-9991 and follow the instructions below. Stainless Steel Cleaner and Polish (stainless steel models) Order Part Number 31462 All-Purpose Appliance Cleaner Order Part...phone number in your correspondence. When calling, please know the purchase date and the complete model and serial number of a service call us to better respond to build every new WHIRLPOOL® appliance. s Installation information. s Accessory and repair parts sales. Accessories Accessories U.S.A....
Use and Care Guide
Page 24
... All rights reserved. ® Registered Trademark/TM Trademark of Whirlpool, U.S.A. 10/07 Printed in accordance with published installation instructions. 11. Outside the 50 United States and Canada, this information on the model and serial number label located on how to use your major...appliance is not available. 10. Dealer name Address Phone number Model number Serial number Purchase date W10162213A © 2007 Whirlpool Corporation. This limited warranty is valid only in -home service is covered by a Whirlpool designated service company. If outside the 50 United States and ...
... All rights reserved. ® Registered Trademark/TM Trademark of Whirlpool, U.S.A. 10/07 Printed in accordance with published installation instructions. 11. Outside the 50 United States and Canada, this information on the model and serial number label located on how to use your major...appliance is not available. 10. Dealer name Address Phone number Model number Serial number Purchase date W10162213A © 2007 Whirlpool Corporation. This limited warranty is valid only in -home service is covered by a Whirlpool designated service company. If outside the 50 United States and ...
Installation Instructions
Page 3
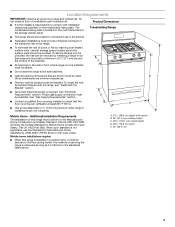
...must E be sealed. Proper gas supply connection must provide complete enclosure of the sides and rear of combustion and ventilation air. The model/serial rating plate is not applicable, use in a mobile home, it conforms to the Manufactured Home Construction and Safety Standard, Title 24..., see "Install Anti-Tip Bracket" section. s The floor anti-tip bracket must be avoided. When such standard is located on the model/serial rating plate. s It is required. Product Dimensions Freestanding Range s The range should be installed. s Grounded electrical supply is the installer...
...must E be sealed. Proper gas supply connection must provide complete enclosure of the sides and rear of combustion and ventilation air. The model/serial rating plate is not applicable, use in a mobile home, it conforms to the Manufactured Home Construction and Safety Standard, Title 24..., see "Install Anti-Tip Bracket" section. s The floor anti-tip bracket must be avoided. When such standard is located on the model/serial rating plate. s It is required. Product Dimensions Freestanding Range s The range should be installed. s Grounded electrical supply is the installer...

Installation Instructions
Page 5
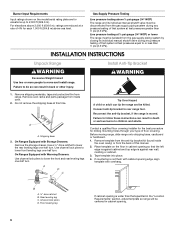
... pipe to the appliance pressure regulator. Failure to the range. latest edition or CAN/CGA B149 - The model/serial rating plate located on the frame behind the storage drawer has information on the model/serial rating plate for use with a different gas without consulting the serving gas supplier. Usually, LP gas suppliers...
... pipe to the appliance pressure regulator. Failure to the range. latest edition or CAN/CGA B149 - The model/serial rating plate located on the frame behind the storage drawer has information on the model/serial rating plate for use with a different gas without consulting the serving gas supplier. Usually, LP gas suppliers...
Installation Instructions
Page 6
... Storage Drawers: Remove the storage drawer. Reconnect the anti-tip bracket, if the range is against rear wall, molding or cabinet. 3. Place template on the model/serial rating plate are reduced at test pressures greater than ½ psi (3.5 kPa). Use channel lock pliers to lower the front and rear leveling legs...
... Storage Drawers: Remove the storage drawer. Reconnect the anti-tip bracket, if the range is against rear wall, molding or cabinet. 3. Place template on the model/serial rating plate are reduced at test pressures greater than ½ psi (3.5 kPa). Use channel lock pliers to lower the front and rear leveling legs...
Installation Instructions
Page 7
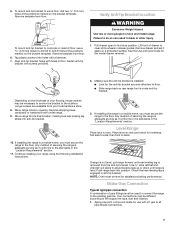
... ratchet and channel lock pliers to wood floor, drill two ¹⁄₈" (3.2 mm) holes at the positions marked on rack and check for the model drawer removal. 2.
... ratchet and channel lock pliers to wood floor, drill two ¹⁄₈" (3.2 mm) holes at the positions marked on rack and check for the model drawer removal. 2.
Installation Instructions
Page 9
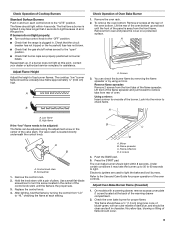
... at the back of pliers. A A. Replace the control knob. 4. No yellow tips, blowing or lifting of the burner. Mirror B. Screwdriver 1. Push the BAKE pad. 5. On models with a pair of the warming drawer compartment. 2. s Check that the circuit breaker has not tripped or the household fuse has not blown. Control knob stem...
... at the back of pliers. A A. Replace the control knob. 4. No yellow tips, blowing or lifting of the burner. Mirror B. Screwdriver 1. Push the BAKE pad. 5. On models with a pair of the warming drawer compartment. 2. s Check that the circuit breaker has not tripped or the household fuse has not blown. Control knob stem...


