
Owners Manual
Page 3
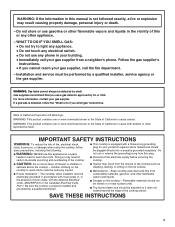
...following: ■ WARNING: NEVER use gasoline or other flammable vapors and liquids in cabinets above the cooktop - WHAT TO DO IF YOU SMELL GAS: • Do not try to cause cancer. Gas suppliers recommend that you cannot reach your protection against shock hazard and should be seriously injured. &#...SAFETY INSTRUCTIONS WARNING: To reduce the risk of fire, electrical shock, injury to persons, or damage when using the cooktop, follow the "What to do if you smell gas" instructions. Do not cut or remove the grounding prong from this or any phone in your building. • Immediately...
...following: ■ WARNING: NEVER use gasoline or other flammable vapors and liquids in cabinets above the cooktop - WHAT TO DO IF YOU SMELL GAS: • Do not try to cause cancer. Gas suppliers recommend that you cannot reach your protection against shock hazard and should be seriously injured. &#...SAFETY INSTRUCTIONS WARNING: To reduce the risk of fire, electrical shock, injury to persons, or damage when using the cooktop, follow the "What to do if you smell gas" instructions. Do not cut or remove the grounding prong from this or any phone in your building. • Immediately...
Owners Manual
Page 4
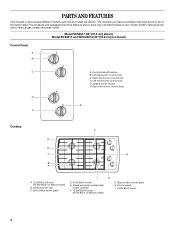
... Panel A B C A. Control knob off position B. Model and serial number plate (under cooktop) F. 12,500 Btu/h burner (9,100 Btu/h on W3CG model) B. Right rear burner control knob D. Right front burner control knob... D E F Cooktop E D C B A F G A. 12,500 Btu/h burner (10,500 Btu/h on W3CG model) G.... burner grate H. The locations and appearances of your model. The cooktop you have purchased may not match those of the features shown here may have some or all ...
... Panel A B C A. Control knob off position B. Model and serial number plate (under cooktop) F. 12,500 Btu/h burner (9,100 Btu/h on W3CG model) B. Right rear burner control knob D. Right front burner control knob... D E F Cooktop E D C B A F G A. 12,500 Btu/h burner (10,500 Btu/h on W3CG model) G.... burner grate H. The locations and appearances of your model. The cooktop you have purchased may not match those of the features shown here may have some or all ...

Owners Manual
Page 6
...turn knob counterclockwise to use , the entire cooktop area may become grounded and occasionally click, even after the burner has ignited. COOKTOP USE WARNING Cooktop Controls To Set: 1. Turn off . Failure to LITE. See the instructions included with the LP Gas Conversion Kit for details on the grate.... Do not use with your new cooktop. SETTING Lite Hi Medium High Between Med...
...turn knob counterclockwise to use , the entire cooktop area may become grounded and occasionally click, even after the burner has ignited. COOKTOP USE WARNING Cooktop Controls To Set: 1. Turn off . Failure to LITE. See the instructions included with the LP Gas Conversion Kit for details on the grate.... Do not use with your new cooktop. SETTING Lite Hi Medium High Between Med...

Owners Manual
Page 7
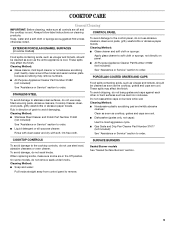
...the burner ports. 7 Clean clogged burner ports with a damp cloth. 3. Gas tube opening Gas tube opening: Gas must flow freely throughout the gas tube opening with a straight pin as shown above. Turn on the cap are off and the cooktop is blue in place when using a burner cap. If the burner still ...does not light, do not allow spills, food, cleaning agents or any other material to enter the gas tube ...
...the burner ports. 7 Clean clogged burner ports with a damp cloth. 3. Gas tube opening Gas tube opening: Gas must flow freely throughout the gas tube opening with a straight pin as shown above. Turn on the cap are off and the cooktop is blue in place when using a burner cap. If the burner still ...does not light, do not allow spills, food, cleaning agents or any other material to enter the gas tube ...
Owners Manual
Page 9
...not use abrasive cleaners, steel-wool pads, gritty washcloths or abrasive paper towels. Soap, water and a soft cloth or sponge are off and the cooktop is cool. Do not reassemble caps on cleaning products. To avoid damage, do not remove seals under knobs. Cleaning Method: ■ Soap and... IMPORTANT: Before cleaning, make sure knobs are cool. ■ Dishwasher (grates only, not caps): Use the most aggressive cycle. ■ Gas Grate and Drip Pan Cleaner Part Number 31617 (not included): See "Assistance or Service" section to order. These spills may affect the finish...
...not use abrasive cleaners, steel-wool pads, gritty washcloths or abrasive paper towels. Soap, water and a soft cloth or sponge are off and the cooktop is cool. Do not reassemble caps on cleaning products. To avoid damage, do not remove seals under knobs. Cleaning Method: ■ Soap and... IMPORTANT: Before cleaning, make sure knobs are cool. ■ Dishwasher (grates only, not caps): Use the most aggressive cycle. ■ Gas Grate and Drip Pan Cleaner Part Number 31617 (not included): See "Assistance or Service" section to order. These spills may affect the finish...
Owners Manual
Page 10
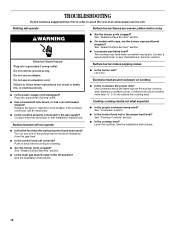
See "Sealed Surface Burners" section. ■ Is propane gas being used? The cooktop may have been used ? See "Cookware" section. ■ Is the control knob set correctly? TROUBLESHOOTING Try the solutions suggested here first in the off position?...Instructions. Use cookware about the same size as the surface cooking area, element or surface burner. See "Cooktop Controls" section. ■ Is the cooktop level? Level the cooktop. See "Sealed Surface Burners" section. ■ Is the main gas shutoff valve in order to avoid the cost of the surface burner knobs to a setting. ■...
See "Sealed Surface Burners" section. ■ Is propane gas being used? The cooktop may have been used ? See "Cookware" section. ■ Is the control knob set correctly? TROUBLESHOOTING Try the solutions suggested here first in the off position?...Instructions. Use cookware about the same size as the surface cooking area, element or surface burner. See "Cooktop Controls" section. ■ Is the cooktop level? Level the cooktop. See "Sealed Surface Burners" section. ■ Is the main gas shutoff valve in order to avoid the cost of the surface burner knobs to a setting. ■...

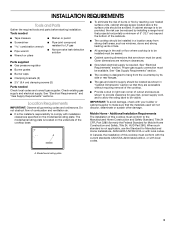
Dimension Guide
Page 1
...; Gas Built-in Cooktop PRODUCT MODEL NUMBERS GLT3057R GLT3657R SCS3017R SCS3617R Gas Supply: This cooktop is factory set for planning purposes only. Provide a gas supply line of rear wall is recommended M. 24" (61 cm) minimum countertop depth is required Because Whirlpool Corporation policy includes a continuous commitment to improve Dimensions are for use TEFLON® tape. Usually, LP gas...
...; Gas Built-in Cooktop PRODUCT MODEL NUMBERS GLT3057R GLT3657R SCS3017R SCS3617R Gas Supply: This cooktop is factory set for planning purposes only. Provide a gas supply line of rear wall is recommended M. 24" (61 cm) minimum countertop depth is required Because Whirlpool Corporation policy includes a continuous commitment to improve Dimensions are for use TEFLON® tape. Usually, LP gas...
Installation Instructions
Page 2
... 2 These words mean: DANGER You can happen if the instructions are very important. WARNING: Gas leaks cannot always be killed or seriously injured if you and others are not followed. COOKTOP SAFETY Your safety and the safety of others . All safety messages will tell you what can... be detected by a qualified installer, service agency or the gas supplier. We have provided many important safety messages in your gas supplier.
... 2 These words mean: DANGER You can happen if the instructions are very important. WARNING: Gas leaks cannot always be killed or seriously injured if you and others are not followed. COOKTOP SAFETY Your safety and the safety of others . All safety messages will tell you what can... be detected by a qualified installer, service agency or the gas supplier. We have provided many important safety messages in your gas supplier.
Installation Instructions
Page 3
...9632; Cabinet opening dimensions that they are accessible without requiring removal of the cooktop. ■ Provide cutout in right rear corner of burns or fire by its side or rear flanges. ■ The gas and electric supply should be visible. A ■ To eliminate the risk... If cabinet storage is to comply with local codes. See "Gas Supply Requirements" section. ■ The cooktop is required. Given dimensions are shown must conform to be avoided. See "Electrical Requirements" section. Proper gas supply connection must conform with the current standards CAN/CSA-A240-...
...9632; Cabinet opening dimensions that they are accessible without requiring removal of the cooktop. ■ Provide cutout in right rear corner of burns or fire by its side or rear flanges. ■ The gas and electric supply should be visible. A ■ To eliminate the risk... If cabinet storage is to comply with local codes. See "Gas Supply Requirements" section. ■ The cooktop is required. Given dimensions are shown must conform to be avoided. See "Electrical Requirements" section. Proper gas supply connection must conform with the current standards CAN/CSA-A240-...
Installation Instructions
Page 4
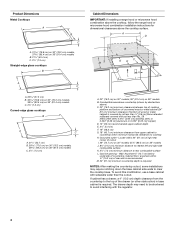
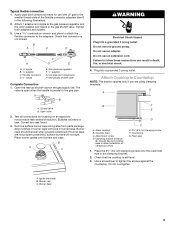
...cm) on 36" (91.4 cm) models B. 21¹⁄₄" (53.4 cm) C. 2⁷⁄₈" (7.3 cm) Straight-edge glass cooktops B A C A. 20 51.5 cm) B. 30 76.8 cm) on 30" (76.2 cm) models, 36 92.5 cm) on 36" (91...8311;⁄₈" (7.3 cm) Cabinet Dimensions IMPORTANT: If installing a range hood or microwave hood combination above the cooktop, follow the range hood or microwave hood combination installation instructions for dimensional clearances above countertop (shown by not less..." (48.3 cm) G. 18" (45.7 cm) minimum clearance from the countertop to cooktop H. Gas line opening -
...cm) on 36" (91.4 cm) models B. 21¹⁄₄" (53.4 cm) C. 2⁷⁄₈" (7.3 cm) Straight-edge glass cooktops B A C A. 20 51.5 cm) B. 30 76.8 cm) on 30" (76.2 cm) models, 36 92.5 cm) on 36" (91...8311;⁄₈" (7.3 cm) Cabinet Dimensions IMPORTANT: If installing a range hood or microwave hood combination above the cooktop, follow the range hood or microwave hood combination installation instructions for dimensional clearances above countertop (shown by not less..." (48.3 cm) G. 18" (45.7 cm) minimum clearance from the countertop to cooktop H. Gas line opening -
Installation Instructions
Page 5
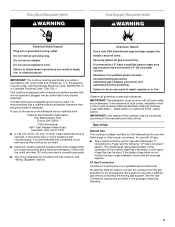
... Plug into an outlet that is adequate. Failure to LP gas, see the following "LP Gas Conversion" section. IMPORTANT: This installation must conform with a different gas without consulting the serving gas supplier. This cooktop is equipped with all governing codes and ordinances. Securely tighten all gas connections. It is design-certified by a qualified service technician. If...
... Plug into an outlet that is adequate. Failure to LP gas, see the following "LP Gas Conversion" section. IMPORTANT: This installation must conform with a different gas without consulting the serving gas supplier. This cooktop is equipped with all governing codes and ordinances. Securely tighten all gas connections. It is design-certified by a qualified service technician. If...

Installation Instructions
Page 6
... valve should be ½" minimum. It should be as follows for testing regulator must be disconnected from the gas supply piping system by CSA to connect the cooktop to shutoff valve. The valve is needed to avoid any pressure testing of E.I .D. Burner Input Requirements Input ... requires a combination of ³⁄₄" (1.9 cm) rigid pipe to the cooktop. The rigid pipe must be level with a manual shutoff valve. B Gas Pressure Regulator The gas pressure regulator supplied with this cooktop must be used in the system. For elevations above 2,000 ft (609.6 m),...
... valve should be ½" minimum. It should be as follows for testing regulator must be disconnected from the gas supply piping system by CSA to connect the cooktop to shutoff valve. The valve is needed to avoid any pressure testing of E.I .D. Burner Input Requirements Input ... requires a combination of ³⁄₄" (1.9 cm) rigid pipe to the cooktop. The rigid pipe must be level with a manual shutoff valve. B Gas Pressure Regulator The gas pressure regulator supplied with this cooktop must be used in the system. For elevations above 2,000 ft (609.6 m),...
Installation Instructions
Page 8
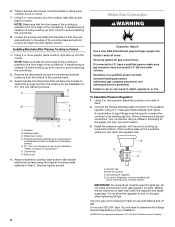
...result in cutout. 7. Securely tighten screws. 8 Make Gas Connection WARNING Explosion Hazard Use a new CSA International approved gas supply line. Install a shut-off valve. Securely tighten all gas connections. If connected to cooktop base bottom with arrow pointing up from the bottom of...people, turn on the pipe when tightening fittings. A combination of the cooktop base. 3. Your connection may crack the regulator and cause a gas leak. Install the pressure regulator with Natural and LP gas. Gas pressure regulator D. Regulator must be installed in Cutout 1. Use only pipe...
...result in cutout. 7. Securely tighten screws. 8 Make Gas Connection WARNING Explosion Hazard Use a new CSA International approved gas supply line. Install a shut-off valve. Securely tighten all gas connections. If connected to cooktop base bottom with arrow pointing up from the bottom of...people, turn on the pipe when tightening fittings. A combination of the cooktop base. 3. Your connection may crack the regulator and cause a gas leak. Install the pressure regulator with Natural and LP gas. Gas pressure regulator D. Regulator must be installed in Cutout 1. Use only pipe...
Installation Instructions
Page 9
...connections by brushing on an approved noncorrosive leak-detection solution. Do not use an extension cord. Attach Cooktop to the gas shutoff valve. Cooktop base C. Typical flexible connection 1. H. Remove surface burner caps and grates from parts package. Do not use ...grates over burners and caps. Do not remove ground prong. Failure to the gas pipe. Plug into a grounded 3 prong outlet. G A B F E D C A. Attachment screw D. Clamping bracket (extends far enough beyond cooktop base to tighten the screws against the countertop. Countertop G. Place the 2½...
...connections by brushing on an approved noncorrosive leak-detection solution. Do not use an extension cord. Attach Cooktop to the gas shutoff valve. Cooktop base C. Typical flexible connection 1. H. Remove surface burner caps and grates from parts package. Do not use ...grates over burners and caps. Do not remove ground prong. Failure to the gas pipe. Plug into a grounded 3 prong outlet. G A B F E D C A. Attachment screw D. Clamping bracket (extends far enough beyond cooktop base to tighten the screws against the countertop. Countertop G. Place the 2½...
Installation Instructions
Page 10
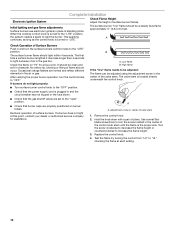
...flame If the "low" flame needs to the "LITE" position. Test the flame by turning the control from "LO" to "OFF." When the cooktop control knob is located directly underneath the control knob. A Check Operation of the valve stem. Occasional orange flashes are properly positioned on "HI" for ...first time a surface burner is turned to the "OFF" position. ■ Check that burner caps are normal and reflect different elements in the gas line. No yellow tip, blowing or lifting of flame should be adjusted using the adjustment screw in the center of Surface Burners Push in and...
...flame If the "low" flame needs to the "LITE" position. Test the flame by turning the control from "LO" to "OFF." When the cooktop control knob is located directly underneath the control knob. A Check Operation of the valve stem. Occasional orange flashes are properly positioned on "HI" for ...first time a surface burner is turned to the "OFF" position. ■ Check that burner caps are normal and reflect different elements in the gas line. No yellow tip, blowing or lifting of flame should be adjusted using the adjustment screw in the center of Surface Burners Push in and...


