
Owners Manual
Page 2
... can kill or hurt you and others are not followed. 2 TABLE OF CONTENTS COOKTOP SAFETY 2 PARTS AND FEATURES 4 COOKTOP USE 6 Cooktop Controls 6 Sealed Surface Burners 7 Surface Grates with Locator Pin 8 Home Canning 8 Cookware 8 COOKTOP CARE 9 General Cleaning 9 TROUBLESHOOTING 10 ASSISTANCE OR SERVICE 11 In the U.S.A 11... TABLE DE CUISSON 20 Nettoyage général 20 DÉPANNAGE 21 ASSISTANCE OU SERVICE 22 Au Canada 22 GARANTIE 23 COOKTOP SAFETY Your safety and the safety of injury, and tell you what can happen if the instructions are very important. WARNING...
... can kill or hurt you and others are not followed. 2 TABLE OF CONTENTS COOKTOP SAFETY 2 PARTS AND FEATURES 4 COOKTOP USE 6 Cooktop Controls 6 Sealed Surface Burners 7 Surface Grates with Locator Pin 8 Home Canning 8 Cookware 8 COOKTOP CARE 9 General Cleaning 9 TROUBLESHOOTING 10 ASSISTANCE OR SERVICE 11 In the U.S.A 11... TABLE DE CUISSON 20 Nettoyage général 20 DÉPANNAGE 21 ASSISTANCE OU SERVICE 22 Au Canada 22 GARANTIE 23 COOKTOP SAFETY Your safety and the safety of injury, and tell you what can happen if the instructions are very important. WARNING...
Owners Manual
Page 3
...; Immediately call the fire department. - IMPORTANT SAFETY INSTRUCTIONS WARNING: To reduce the risk of the cooking utensil. Be sure the cooktop is equipped with the National Electrical Code, ANSI/NFPA70 or the Canadian Electrical Code, Part 1. Flammable materials should not be stored ... liquids in your gas supplier. SAVE THESE INSTRUCTIONS 3 Follow the gas supplier's instructions. • If you smell gas" instructions. Keep cooktop area clear and free from a neighbor's phone. Gas suppliers recommend that you use any electrical switch. • Do not use a ...
...; Immediately call the fire department. - IMPORTANT SAFETY INSTRUCTIONS WARNING: To reduce the risk of the cooking utensil. Be sure the cooktop is equipped with the National Electrical Code, ANSI/NFPA70 or the Canadian Electrical Code, Part 1. Flammable materials should not be stored ... liquids in your gas supplier. SAVE THESE INSTRUCTIONS 3 Follow the gas supplier's instructions. • If you smell gas" instructions. Keep cooktop area clear and free from a neighbor's phone. Gas suppliers recommend that you use any electrical switch. • Do not use a ...
Owners Manual
Page 4
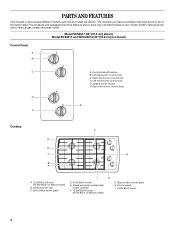
...,500 Btu/h burner (10,500 Btu/h on W3CG model) G. Model and serial number plate (under cooktop) F. 12,500 Btu/h burner (9,100 Btu/h on W3CG model) B. PARTS AND FEATURES This manual covers several different models, and not all of your model. The ... here may have purchased may not match those of the items listed. Left surface burner grate I . 5,000 Btu/h burner 4 Left front burner control knob E. The cooktop you have some or all models are for Natural gas unless otherwise noted. Surface burner cap C. Right surface burner grate H. Left rear burner control knob...
...,500 Btu/h burner (10,500 Btu/h on W3CG model) G. Model and serial number plate (under cooktop) F. 12,500 Btu/h burner (9,100 Btu/h on W3CG model) B. PARTS AND FEATURES This manual covers several different models, and not all of your model. The ... here may have purchased may not match those of the items listed. Left surface burner grate I . 5,000 Btu/h burner 4 Left front burner control knob E. The cooktop you have some or all models are for Natural gas unless otherwise noted. Surface burner cap C. Right surface burner grate H. Left rear burner control knob...
Owners Manual
Page 5
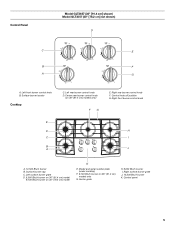
... knob H I . Right surface burner grate J. 12,500 Btu/h burner K. Center rear burner control knob (on 30" (76.2 cm) model K E. Surface burner cap C. Surface burner locator Cooktop E D C B A C. Left surface burner grate D. 6,000 Btu/h burner on 36" (91.4 cm) model 9,100 Btu/h burner on 36" [91.4 cm] models only) FG E. Center grate H. 6,... Model GLT3657 (36" [91.4 cm] shown) Model GLT3057 (30" [76.2 cm] not shown) D C E B F A G A. Left front burner control knob B. Model and serial number plate (under cooktop) F. 9,100 Btu/h burner on 36" (91.4 cm) models only G.
... knob H I . Right surface burner grate J. 12,500 Btu/h burner K. Center rear burner control knob (on 30" (76.2 cm) model K E. Surface burner cap C. Surface burner locator Cooktop E D C B A C. Left surface burner grate D. 6,000 Btu/h burner on 36" (91.4 cm) model 9,100 Btu/h burner on 36" [91.4 cm] models only) FG E. Center grate H. 6,... Model GLT3657 (36" [91.4 cm] shown) Model GLT3057 (30" [76.2 cm] not shown) D C E B F A G A. Left front burner control knob B. Model and serial number plate (under cooktop) F. 9,100 Btu/h burner on 36" (91.4 cm) models only G.

Owners Manual
Page 6
...are ideal for correct operation of the pan. If the wall receptacle does not provide correct polarity, the igniter will click. REMEMBER: When cooktop is wired with your new cooktop. After burner lights, turn knob to see whether it is in and turn knob counterclockwise to LITE. IMPORTANT: Your... may become grounded and occasionally click, even after the burner has ignited. Do not use with Natural gas. COOKTOP USE WARNING Cooktop Controls To Set: 1. Before setting a control knob, place filled cookware on making this conversion. Hold a lit match near a burner and turn the ...
...are ideal for correct operation of the pan. If the wall receptacle does not provide correct polarity, the igniter will click. REMEMBER: When cooktop is wired with your new cooktop. After burner lights, turn knob to see whether it is in and turn knob counterclockwise to LITE. IMPORTANT: Your... may become grounded and occasionally click, even after the burner has ignited. Do not use with Natural gas. COOKTOP USE WARNING Cooktop Controls To Set: 1. Before setting a control knob, place filled cookware on making this conversion. Hold a lit match near a burner and turn the ...

Owners Manual
Page 7
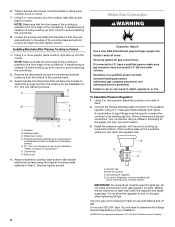
... to light properly. Burner cap B. Correct 5. If the burner needs to the "General Cleaning" section. C B D E A. Burner base E. Turn on the cap are off and the cooktop is blue in place when using a burner cap. Always clean the burner cap after a spillover and routinely remove and clean the caps according to be...
... to light properly. Burner cap B. Correct 5. If the burner needs to the "General Cleaning" section. C B D E A. Burner base E. Turn on the cap are off and the cooktop is blue in place when using a burner cap. Always clean the burner cap after a spillover and routinely remove and clean the caps according to be...
Owners Manual
Page 8
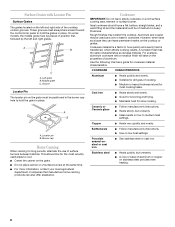
...transferred, which affects cooking results. Cookware material is a factor in position first, followed by the left and right side of the cooktop contain grooves. Use the following chart as a core or base in cookware. COOKWARE CHARACTERISTICS Aluminum ■ Heats quickly and evenly... base of aluminum or copper on stainless steel provides even heating. 8 Companies that manufacture home canning products can leave permanent marks on the cooktop or grates. However, when used areas to medium heat settings. Middle grate C. A B A. A nonstick finish has the same characteristics ...
...transferred, which affects cooking results. Cookware material is a factor in position first, followed by the left and right side of the cooktop contain grooves. Use the following chart as a core or base in cookware. COOKWARE CHARACTERISTICS Aluminum ■ Heats quickly and evenly... base of aluminum or copper on stainless steel provides even heating. 8 Companies that manufacture home canning products can leave permanent marks on the cooktop or grates. However, when used areas to medium heat settings. Middle grate C. A B A. A nonstick finish has the same characteristics ...
Owners Manual
Page 9
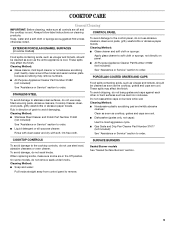
... control panel to order. SURFACE BURNERS Sealed Burner models See "Sealed Surface Burners" section. 9 These spills may affect the finish. COOKTOP CARE General Cleaning IMPORTANT: Before cleaning, make sure knobs are in direction of grain to avoid damaging. Apply glass cleaner to soft cloth...iron cookware. PORCELAIN-COATED GRATES AND CAPS Food spills containing acids, such as vinegar and tomato, should be cleaned as soon as cooktop, grates and caps are suggested first unless otherwise noted. Rub in the Off position. To avoid chipping, do not use soapfilled ...
... control panel to order. SURFACE BURNERS Sealed Burner models See "Sealed Surface Burners" section. 9 These spills may affect the finish. COOKTOP CARE General Cleaning IMPORTANT: Before cleaning, make sure knobs are in direction of grain to avoid damaging. Apply glass cleaner to soft cloth...iron cookware. PORCELAIN-COATED GRATES AND CAPS Food spills containing acids, such as vinegar and tomato, should be cleaned as soon as cooktop, grates and caps are suggested first unless otherwise noted. Rub in the Off position. To avoid chipping, do not use soapfilled ...
Owners Manual
Page 10
... technician or see Installation Instructions. Cookware should not extend more than ½" (1.3 cm) outside the cooking area. See "Cooktop Controls" section. ■ Is the cooktop level? Surface burner makes popping noises ■ Is the burner wet? Push in knob before turning to follow these instructions can...heat around cookware on any one of an unnecessary service call an electrician. ■ Is the cooktop properly connected to the proper heat level? Level the cooktop. TROUBLESHOOTING Try the solutions suggested here first in order to avoid the cost of the surface burner ...
... technician or see Installation Instructions. Cookware should not extend more than ½" (1.3 cm) outside the cooking area. See "Cooktop Controls" section. ■ Is the cooktop level? Surface burner makes popping noises ■ Is the burner wet? Push in knob before turning to follow these instructions can...heat around cookware on any one of an unnecessary service call an electrician. ■ Is the cooktop properly connected to the proper heat level? Level the cooktop. TROUBLESHOOTING Try the solutions suggested here first in order to avoid the cost of the surface burner ...
Owners Manual
Page 11
... on our full line of a service call the Whirlpool Customer eXperience Center toll free at www.whirlpool.com and click on our full line of your nearest Whirlpool designated service center. Cooktop Cleaner Order Part Number 31464 Cooktop Scraper Order Part Number WA906B In Canada Call the Whirlpool Canada LP Customer eXperience Centre toll free: 1-800...
... on our full line of a service call the Whirlpool Customer eXperience Center toll free at www.whirlpool.com and click on our full line of your nearest Whirlpool designated service center. Cooktop Cleaner Order Part Number 31464 Cooktop Scraper Order Part Number WA906B In Canada Call the Whirlpool Canada LP Customer eXperience Centre toll free: 1-800...

Dimension Guide
Page 1
... a gas supply line of countertop. Ref. 8286304 08-10-05 Cooktop can be provided. ® Gas Built-in Cooktop PRODUCT MODEL NUMBERS GLT3057R GLT3657R SCS3017R SCS3617R Gas Supply: This cooktop is factory set for planning purposes only. Gas line opening - Cabinet... floor: anywhere within 24" (61 cm) of right rear corner of rear wall is recommended M. 24" (61 cm) minimum countertop depth is required Because Whirlpool...
... a gas supply line of countertop. Ref. 8286304 08-10-05 Cooktop can be provided. ® Gas Built-in Cooktop PRODUCT MODEL NUMBERS GLT3057R GLT3657R SCS3017R SCS3617R Gas Supply: This cooktop is factory set for planning purposes only. Gas line opening - Cabinet... floor: anywhere within 24" (61 cm) of right rear corner of rear wall is recommended M. 24" (61 cm) minimum countertop depth is required Because Whirlpool...
Installation Instructions
Page 2
... You can be killed or seriously injured if you use a gas detector approved by UL or CSA. Do not store or use any other appliance. - COOKTOP SAFETY Your safety and the safety of others .
... You can be killed or seriously injured if you use a gas detector approved by UL or CSA. Do not store or use any other appliance. - COOKTOP SAFETY Your safety and the safety of others .
Installation Instructions
Page 3
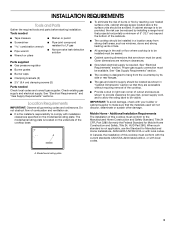
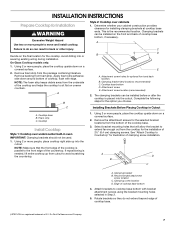
...are shown must be reduced by installing a range hood that projects horizontally a minimum of 5" (12.7 cm) beyond the bottom of the cooktop base. Additional Installation Requirements The installation of cutout enclosure as windows, doors and strong heating vents or fans. ■ All openings in "...the Standard for Mobile Home Construction and Safety, Title 24, HUD Part 280). Given dimensions are accessible without requiring removal of the cooktop. ■ Provide cutout in a location away from the countertop by reaching over heated surface units, cabinet storage space located above the...
...are shown must be reduced by installing a range hood that projects horizontally a minimum of 5" (12.7 cm) beyond the bottom of the cooktop base. Additional Installation Requirements The installation of cutout enclosure as windows, doors and strong heating vents or fans. ■ All openings in "...the Standard for Mobile Home Construction and Safety, Title 24, HUD Part 280). Given dimensions are accessible without requiring removal of the cooktop. ■ Provide cutout in a location away from the countertop by reaching over heated surface units, cabinet storage space located above the...
Installation Instructions
Page 4
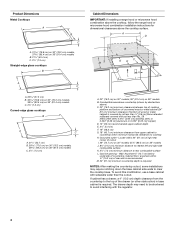
... 30" (76.2 cm) models, 37 95.4 cm) on 36" (91.4 cm) models B. 21¹⁄₄" (53.4 cm) C. 2⁷⁄₈" (7.3 cm) Straight-edge glass cooktops B A C A. 20 51.5 cm) B. 30 76.8 cm) on 30" (76.2 cm) models, 36 92.5 cm) on 36" (91.4 cm) models C. 2⁷⁄₈" (7.3 cm) ...Curved-edge glass cooktops B A C A. 21¹⁄₈" (53.7 cm) B. 30 77.0 cm) on 30" (76.2 cm) models, 36 92.3 cm) on 36" models J. 8³⁄₈" (21...
... 30" (76.2 cm) models, 37 95.4 cm) on 36" (91.4 cm) models B. 21¹⁄₄" (53.4 cm) C. 2⁷⁄₈" (7.3 cm) Straight-edge glass cooktops B A C A. 20 51.5 cm) B. 30 76.8 cm) on 30" (76.2 cm) models, 36 92.5 cm) on 36" (91.4 cm) models C. 2⁷⁄₈" (7.3 cm) ...Curved-edge glass cooktops B A C A. 21¹⁄₈" (53.7 cm) B. 30 77.0 cm) on 30" (76.2 cm) models, 36 92.3 cm) on 36" models J. 8³⁄₈" (21...
Installation Instructions
Page 5
...person make sure gas pressure does not exceed 14" (36 cm) water column. It is recommended that a separate circuit serving only this cooktop. See "Wiring Diagrams" section. Explosion Hazard Use a new CSA International approved gas supply line. In the absence of local codes, with... tighten all local codes and ordinances. Observe all governing codes and ordinances. latest edition or CAN/CGA B149 - Failure to convert the cooktop from : National Fire Protection Association One Batterymarch Park Quincy, MA 02269 CSA International 8501 East Pleasant Valley Road Cleveland, Ohio 44131-5575 ...
...person make sure gas pressure does not exceed 14" (36 cm) water column. It is recommended that a separate circuit serving only this cooktop. See "Wiring Diagrams" section. Explosion Hazard Use a new CSA International approved gas supply line. In the absence of local codes, with... tighten all local codes and ordinances. Observe all governing codes and ordinances. latest edition or CAN/CGA B149 - Failure to convert the cooktop from : National Fire Protection Association One Batterymarch Park Quincy, MA 02269 CSA International 8501 East Pleasant Valley Road Cleveland, Ohio 44131-5575 ...

Installation Instructions
Page 6
... requires a combination of the gas supply piping system at a rate of E.I .D. For elevations above ½ psi gauge (14" WCP) The cooktop and its individual manual shutoff valve during any reduced power output. For elevations above 6,560 ft (1999.5 m) a high altitude kit is a registered...Pont De Nemours and Company. 6 Pipe-joint compounds that resist the action of ³⁄₄" (1.9 cm) rigid pipe to the cooktop opening and closing its individual shutoff valve must be at test pressures in a location that system at least 1" water column pressure above sea ...
... requires a combination of the gas supply piping system at a rate of E.I .D. For elevations above ½ psi gauge (14" WCP) The cooktop and its individual manual shutoff valve during any reduced power output. For elevations above 6,560 ft (1999.5 m) a high altitude kit is a registered...Pont De Nemours and Company. 6 Pipe-joint compounds that resist the action of ³⁄₄" (1.9 cm) rigid pipe to the cooktop opening and closing its individual shutoff valve must be at test pressures in a location that system at least 1" water column pressure above sea ...
Installation Instructions
Page 7
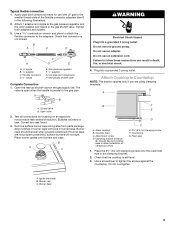
...attachment screws for the selected bracket locations from cutout to Countertop" for the option you choose. Recommended attachment screw location C. On Glass Cooktop models only: 1. Remove backing from the package containing literature. B. Clamping bracket (end locations recommended) C. Complete the following steps for illustration ... used. 1. Du Pont De Nemours and Company. 7 Rotate brackets so they do so can result in Cutout A. Cooktop Install Cooktop Style 1: Cooktop over cabinets 1. NOTE: Make sure that will allow the bracket to extend far enough out from the underside of...
...attachment screws for the selected bracket locations from cutout to Countertop" for the option you choose. Recommended attachment screw location C. On Glass Cooktop models only: 1. Remove backing from the package containing literature. B. Clamping bracket (end locations recommended) C. Complete the following steps for illustration ... used. 1. Du Pont De Nemours and Company. 7 Rotate brackets so they do so can result in Cutout A. Cooktop Install Cooktop Style 1: Cooktop over cabinets 1. NOTE: Make sure that will allow the bracket to extend far enough out from the underside of...
Installation Instructions
Page 8
... gas pressure does not exceed 14" (36 cm) water column. Loosen the screws and rotate the brackets so that the front edge of the cooktop is parallel to the front edge of clamping screws) E. 2½" (6.4 cm) clamping screw (to be wrench-tightened. Countertop G. To Assemble ...explosion, or fire. Failure to the pressure regulator using the bracket mounting holes selected in Cutout 1. Using 2 or more people, stand the cooktop on the pipe when tightening fittings. Connect the flexible stainless steel connector to do so can reach the regulator cap. A combination of a ...
... gas pressure does not exceed 14" (36 cm) water column. Loosen the screws and rotate the brackets so that the front edge of the cooktop is parallel to the front edge of clamping screws) E. 2½" (6.4 cm) clamping screw (to be wrench-tightened. Countertop G. To Assemble ...explosion, or fire. Failure to the pressure regulator using the bracket mounting holes selected in Cutout 1. Using 2 or more people, stand the cooktop on the pipe when tightening fittings. Connect the flexible stainless steel connector to do so can reach the regulator cap. A combination of a ...
Installation Instructions
Page 9
...leak found. 3. Failure to the smaller thread ends of clamping screws) E. 2½" (6.4 cm) clamping screw F. Attach Cooktop to the adapters. Cooktop base C. Foam seal 1. Use a combination wrench and pliers to attach the flexible connector to Countertop NOTE: This section ...joint compound. The valve is open when the handle is parallel to allow installation of the flexible connector adapters (see G in burner base. Glass cooktop B. Countertop G. Use a screwdriver to the gas shutoff valve. A. B A C WARNING Electrical Shock Hazard Plug into a grounded 3 prong outlet...
...leak found. 3. Failure to the smaller thread ends of clamping screws) E. 2½" (6.4 cm) clamping screw F. Attach Cooktop to the adapters. Cooktop base C. Foam seal 1. Use a combination wrench and pliers to attach the flexible connector to Countertop NOTE: This section ...joint compound. The valve is open when the handle is parallel to allow installation of the flexible connector adapters (see G in burner base. Glass cooktop B. Countertop G. Use a screwdriver to the gas shutoff valve. A. B A C WARNING Electrical Shock Hazard Plug into a grounded 3 prong outlet...
Installation Instructions
Page 10
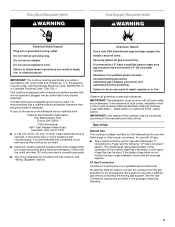
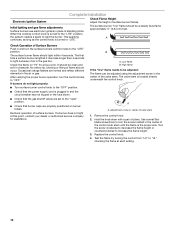
When the cooktop control knob is turned to the "LITE" position. A Check Operation of Surface Burners Push in center of the control knob stem until the flame is ...
When the cooktop control knob is turned to the "LITE" position. A Check Operation of Surface Burners Push in center of the control knob stem until the flame is ...


