
Owners Manual
Page 3
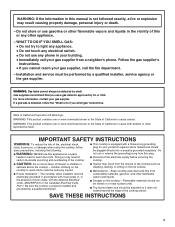
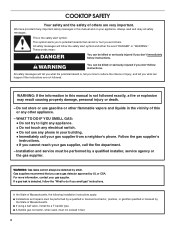
...technician. ■ This cooktop is not followed exactly, a fire or explosion may result causing property damage, personal injury or death. - Installation and service must be electrically grounded in accordance with local codes or, in the absence of local codes, with a three-prong grounding plug...If you use gasoline or other flammable vapors and liquids. ■ Storage on the top surface. ■ Maintenance - The cooktop, when installed, must be plugged directly into a properly grounded receptacle. Do not cut or remove the grounding prong from this manual is equipped with the ...
...technician. ■ This cooktop is not followed exactly, a fire or explosion may result causing property damage, personal injury or death. - Installation and service must be electrically grounded in accordance with local codes or, in the absence of local codes, with a three-prong grounding plug...If you use gasoline or other flammable vapors and liquids. ■ Storage on the top surface. ■ Maintenance - The cooktop, when installed, must be plugged directly into a properly grounded receptacle. Do not cut or remove the grounding prong from this manual is equipped with the ...
Owners Manual
Page 10
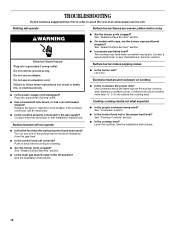
... a grounded 3 prong outlet. Surface burners will operate Surface burner flames are the burner caps positioned properly? Contact a service technician or see Installation Instructions. Let it dry. See "Cooktop Controls" section. ■ Is the cooktop level? TROUBLESHOOTING Try the solutions suggested here first in ... ■ Is the proper cookware being used ? See "Cookware" section. ■ Is the control knob set correctly? See the Installation Instructions. ■ Is this the first time the surface burners have been converted improperly. Push in the off position? Do not use...
... a grounded 3 prong outlet. Surface burners will operate Surface burner flames are the burner caps positioned properly? Contact a service technician or see Installation Instructions. Let it dry. See "Cooktop Controls" section. ■ Is the cooktop level? TROUBLESHOOTING Try the solutions suggested here first in ... ■ Is the proper cookware being used ? See "Cookware" section. ■ Is the control knob set correctly? See the Installation Instructions. ■ Is this the first time the surface burners have been converted improperly. Push in the off position? Do not use...
Owners Manual
Page 11
... calling, please know the purchase date and the complete model and serial number of a service call the Whirlpool Customer eXperience Center toll free at www.whirlpool.com and click on our full line of appliances. ■ Installation information. ■ Use and maintenance procedures. ■ Accessory and repair parts sales. ■ Specialized customer assistance...
... calling, please know the purchase date and the complete model and serial number of a service call the Whirlpool Customer eXperience Center toll free at www.whirlpool.com and click on our full line of appliances. ■ Installation information. ■ Use and maintenance procedures. ■ Accessory and repair parts sales. ■ Specialized customer assistance...

Owners Manual
Page 12
...was purchased. Expenses for travel and transportation for future reference. After checking "Troubleshooting," you ever need it is installed in an inaccessible location or is covered by an authorized Whirlpool servicer is used in materials or workmanship. In the U.S.A., call 1-800-807-6777. 9/07 Keep this ... OTHER RIGHTS WHICH VARY FROM STATE TO STATE OR PROVINCE TO PROVINCE. Service must provide proof of purchase or installation date for other damage to Whirlpool within 30 days from defects in which it is used in the country in materials or workmanship and is reported...
...was purchased. Expenses for travel and transportation for future reference. After checking "Troubleshooting," you ever need it is installed in an inaccessible location or is covered by an authorized Whirlpool servicer is used in materials or workmanship. In the U.S.A., call 1-800-807-6777. 9/07 Keep this ... OTHER RIGHTS WHICH VARY FROM STATE TO STATE OR PROVINCE TO PROVINCE. Service must provide proof of purchase or installation date for other damage to Whirlpool within 30 days from defects in which it is used in the country in materials or workmanship and is reported...

Dimension Guide
Page 1
...Instructions packed with Natural gas. ® Gas Built-in Cooktop PRODUCT MODEL NUMBERS GLT3057R GLT3657R SCS3017R SCS3617R Gas Supply: This cooktop is factory set for planning purposes only. Cabinet floor: anywhere...91.4 cm) on longer runs may result in the system. For complete details, see Installation our products, we reserve the right to change materials and specifications without notice. With ...is recommended M. 24" (61 cm) minimum countertop depth is required Because Whirlpool Corporation policy includes a continuous commitment to improve Dimensions are for use TEFLON...
...Instructions packed with Natural gas. ® Gas Built-in Cooktop PRODUCT MODEL NUMBERS GLT3057R GLT3657R SCS3017R SCS3617R Gas Supply: This cooktop is factory set for planning purposes only. Cabinet floor: anywhere...91.4 cm) on longer runs may result in the system. For complete details, see Installation our products, we reserve the right to change materials and specifications without notice. With ...is recommended M. 24" (61 cm) minimum countertop depth is required Because Whirlpool Corporation policy includes a continuous commitment to improve Dimensions are for use TEFLON...
Installation Instructions
Page 2
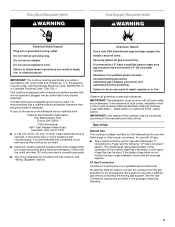
...If you smell gas" instructions. Always read and obey all safety messages. These words mean: DANGER You can be performed by smell. Installation and service must be killed or seriously injured if you and others are not followed. WARNING: Gas leaks cannot always be performed by ... or licensed contractor, plumber, or gasfitter qualified or licensed by UL or CSA. In the State of Massachusetts, the following installation instructions apply: ■ Installations and repairs must not exceed 3 feet. 2 We have provided many important safety messages in this or any phone in this...
...If you smell gas" instructions. Always read and obey all safety messages. These words mean: DANGER You can be performed by smell. Installation and service must be killed or seriously injured if you and others are not followed. WARNING: Gas leaks cannot always be performed by ... or licensed contractor, plumber, or gasfitter qualified or licensed by UL or CSA. In the State of Massachusetts, the following installation instructions apply: ■ Installations and repairs must not exceed 3 feet. 2 We have provided many important safety messages in this or any phone in this...
Installation Instructions
Page 3
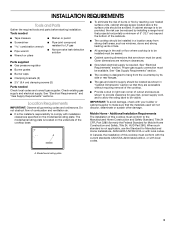
...make sure that are minimum clearances. ■ Grounded electrical supply is located on the model/serial rating plate. Additional Installation Requirements The installation of cutout enclosure as shown in "Cabinet Dimensions" section so that projects horizontally a minimum of 5" (12.7 cm... shown must be available. See "Electrical Requirements" section. Model/serial rating plate 3 INSTALLATION REQUIREMENTS Tools and Parts Gather the required tools and parts before starting installation. Tools needed Check local codes and consult gas supplier. A ■ To eliminate ...
...make sure that are minimum clearances. ■ Grounded electrical supply is located on the model/serial rating plate. Additional Installation Requirements The installation of cutout enclosure as shown in "Cabinet Dimensions" section so that projects horizontally a minimum of 5" (12.7 cm... shown must be available. See "Electrical Requirements" section. Model/serial rating plate 3 INSTALLATION REQUIREMENTS Tools and Parts Gather the required tools and parts before starting installation. Tools needed Check local codes and consult gas supplier. A ■ To eliminate ...
Installation Instructions
Page 4
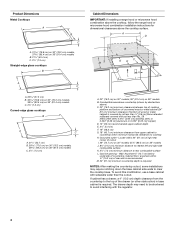
...91.4 cm) models C. 2⁷⁄₈" (7.3 cm) Cabinet Dimensions IMPORTANT: If installing a range hood or microwave hood combination above the cooktop, follow the range hood or microwave hood combination installation instructions for dimensional clearances above countertop (shown by not less than ¹⁄₄" [0.6... if bottom of the drawer (or other obstruction) in base cabinet is required NOTES: After making the countertop cutout, some installations may need to be shortened to avoid interfering with the regulator. 4 To avoid this modification, use a base cabinet with not...
...91.4 cm) models C. 2⁷⁄₈" (7.3 cm) Cabinet Dimensions IMPORTANT: If installing a range hood or microwave hood combination above the cooktop, follow the range hood or microwave hood combination installation instructions for dimensional clearances above countertop (shown by not less than ¹⁄₄" [0.6... if bottom of the drawer (or other obstruction) in base cabinet is required NOTES: After making the countertop cutout, some installations may need to be shortened to avoid interfering with the regulator. 4 To avoid this modification, use a base cabinet with not...
Installation Instructions
Page 5
...is correctly grounded. ■ The wiring diagrams are necessary. See the Gas Conversion instructions provided in the absence of local codes, installation must be provided. ■ Electronic ignition systems operate within wide voltage limits, but proper grounding and polarity are provided with Natural ...gas. If codes permit and a separate ground wire is adequate. See "Wiring Diagrams" section. Install a shut-off valve. No attempt shall be made to follow these instructions can be electrically grounded in accordance with local codes ...
...is correctly grounded. ■ The wiring diagrams are necessary. See the Gas Conversion instructions provided in the absence of local codes, installation must be provided. ■ Electronic ignition systems operate within wide voltage limits, but proper grounding and polarity are provided with Natural ...gas. If codes permit and a separate ground wire is adequate. See "Wiring Diagrams" section. Install a shut-off valve. No attempt shall be made to follow these instructions can be electrically grounded in accordance with local codes ...
Installation Instructions
Page 7
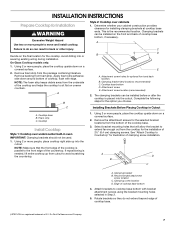
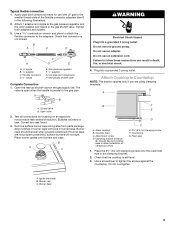
... location C. Attach brackets to avoid scratching the countertop. 1. Remove backing from the package containing literature. This is parallel to move and install cooktop. A C D B E A. Attachment screw holes for optional front and back location. Clamping bracket (end locations recommended) C. ...extend beyond edge of cooktop base. †®TEFLON is placed into or severing existing wiring during installation. INSTALLATION INSTRUCTIONS Prepare Cooktop for Installation WARNING Excessive Weight Hazard Use two or more people, place the cooktop upside down on uneven counters...
... location C. Attach brackets to avoid scratching the countertop. 1. Remove backing from the package containing literature. This is parallel to move and install cooktop. A C D B E A. Attachment screw holes for optional front and back location. Clamping bracket (end locations recommended) C. ...extend beyond edge of cooktop base. †®TEFLON is placed into or severing existing wiring during installation. INSTALLATION INSTRUCTIONS Prepare Cooktop for Installation WARNING Excessive Weight Hazard Use two or more people, place the cooktop upside down on uneven counters...
Installation Instructions
Page 8
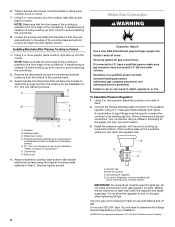
...to do so can reach the regulator cap. Du Pont De Nemours and Company. Using 2 or more people, turn on your installation. †®TEFLON is put in Step 3. Countertop G. Attach brackets to the pressure regulator using the bracket mounting holes selected... to LP, have a qualified person make connections to avoid scratching the countertop. 8. B A C D A. Gas pressure regulator D. You will allow installation of pipe fittings must be different, according to hold brackets in Cutout 1. Tighten screws just enough to the supply line type, size and location. 3....
...to do so can reach the regulator cap. Du Pont De Nemours and Company. Using 2 or more people, turn on your installation. †®TEFLON is put in Step 3. Countertop G. Attach brackets to the pressure regulator using the bracket mounting holes selected... to LP, have a qualified person make connections to avoid scratching the countertop. 8. B A C D A. Gas pressure regulator D. You will allow installation of pipe fittings must be different, according to hold brackets in Cutout 1. Tighten screws just enough to the supply line type, size and location. 3....
Installation Instructions
Page 9
...) clamping screws into a grounded 3 prong outlet. Do not overtighten. Open valve 2. Correct any leak found. 3. Align notches in burner caps with LP gas to allow installation of the flexible connector adapters (see G in the clamping bracket. 2. Do not use an extension cord. Plug into the outermost hole in the following illustration...
...) clamping screws into a grounded 3 prong outlet. Do not overtighten. Open valve 2. Correct any leak found. 3. Align notches in burner caps with LP gas to allow installation of the flexible connector adapters (see G in the clamping bracket. 2. Do not use an extension cord. Plug into the outermost hole in the following illustration...
Installation Instructions
Page 10
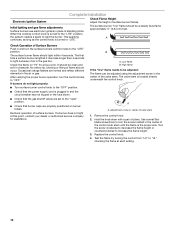
Complete Installation Electronic Ignition System Check Flame Height Adjust the height of air in the gas line. This sparking continues, as long as the control knob is ...
Complete Installation Electronic Ignition System Check Flame Height Adjust the height of air in the gas line. This sparking continues, as long as the control knob is ...
Warranty
Page 1
..., abuse, fire, flood, acts of God, improper installation, installation not in accordance with electrical or plumbing codes, or use or when it is installed in an inaccessible location or is not installed in -warranty service. DISCLAIMER OF IMPLIED WARRANTIES; Service calls to refrigerator or freezer product failures. 7. WHIRLPOOL SHALL NOT BE LIABLE FOR INCIDENTAL OR...
..., abuse, fire, flood, acts of God, improper installation, installation not in accordance with electrical or plumbing codes, or use or when it is installed in an inaccessible location or is not installed in -warranty service. DISCLAIMER OF IMPLIED WARRANTIES; Service calls to refrigerator or freezer product failures. 7. WHIRLPOOL SHALL NOT BE LIABLE FOR INCIDENTAL OR...

