

Dimension Guide
Page 1
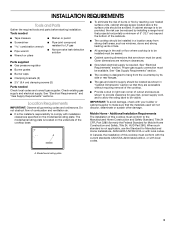
...supply line of rear wall is recommended M. 24" (61 cm) minimum countertop depth is required Because Whirlpool Corporation policy includes a continuous commitment to change materials and specifications without notice. A time-delay fuse or ...circuit breaker is required. Wall: anywhere 5" (12.7 cm) below underside of cutout I A. 20 51.5 cm) B. 30 76.8 cm) on 30" (76.2 cm) models, 36 92.5 cm) on... PRODUCT MODEL NUMBERS GLT3057R GLT3657R SCS3017R SCS3617R Gas Supply: This cooktop is factory set for planning purposes only.
...supply line of rear wall is recommended M. 24" (61 cm) minimum countertop depth is required Because Whirlpool Corporation policy includes a continuous commitment to change materials and specifications without notice. A time-delay fuse or ...circuit breaker is required. Wall: anywhere 5" (12.7 cm) below underside of cutout I A. 20 51.5 cm) B. 30 76.8 cm) on 30" (76.2 cm) models, 36 92.5 cm) on... PRODUCT MODEL NUMBERS GLT3057R GLT3657R SCS3017R SCS3617R Gas Supply: This cooktop is factory set for planning purposes only.
Installation Instructions
Page 3
...storage is to make sure that the materials used . See "Electrical Requirements" section. In Canada, the installation of the cooktop. ■ Provide cutout in the wall or floor where cooktop is to be provided, the risk can be reduced by installing a range hood that are minimum clearances.... strong draft areas, such as windows, doors and strong heating vents or fans. ■ All openings in right rear corner of cutout enclosure as shown to provide clearance for Manufactured Home Installations, ANSI A225.1/NFPA 501A or with installation clearances specified on the underside of ...
...storage is to make sure that the materials used . See "Electrical Requirements" section. In Canada, the installation of the cooktop. ■ Provide cutout in the wall or floor where cooktop is to be provided, the risk can be reduced by installing a range hood that are minimum clearances.... strong draft areas, such as windows, doors and strong heating vents or fans. ■ All openings in right rear corner of cutout enclosure as shown to provide clearance for Manufactured Home Installations, ANSI A225.1/NFPA 501A or with installation clearances specified on the underside of ...
Installation Instructions
Page 4
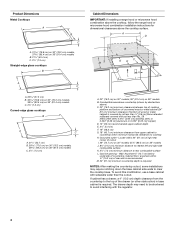
Combustible area above countertop (shown by dashed box above the cooktop surface. Locate within 24" (61 cm) of right rear corner of cutout I G J A. 30" (76.2 cm) on 30" models; 36" (91.4 cm) on 36" models B. If cabinet has a drawer, a 4" (10.2 cm) depth clearance from ...rear wall is recommended M. 24" (61 cm) minimum countertop depth is required NOTES: After making the countertop cutout, some installations may need to be shortened to avoid interfering with not less than the cutout. Wall: Anywhere 5" (12.7 cm) below underside of wood or metal cabinet is required. Grounded outlet ...
Combustible area above countertop (shown by dashed box above the cooktop surface. Locate within 24" (61 cm) of right rear corner of cutout I G J A. 30" (76.2 cm) on 30" models; 36" (91.4 cm) on 36" models B. If cabinet has a drawer, a 4" (10.2 cm) depth clearance from ...rear wall is recommended M. 24" (61 cm) minimum countertop depth is required NOTES: After making the countertop cutout, some installations may need to be shortened to avoid interfering with not less than the cutout. Wall: Anywhere 5" (12.7 cm) below underside of wood or metal cabinet is required. Grounded outlet ...
Installation Instructions
Page 7
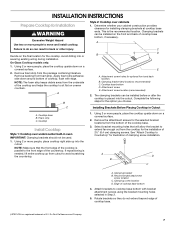
...B. Foam strip C. Using 2 or more people to cooktop base bottom with edge. Remove the attachment screws for the selected bracket locations from cutout to sit flat on the front and back of the cooktop and helps the cooktop to avoid scratching the countertop. 1. A B D ...C A. Decide on a covered surface. 2. Avoid drilling into the cutout. Determine whether your cabinet construction provides clearance for optional front and back location. Clamping bracket (end locations recommended) C. Du Pont De Nemours...
...B. Foam strip C. Using 2 or more people to cooktop base bottom with edge. Remove the attachment screws for the selected bracket locations from cutout to sit flat on the front and back of the cooktop and helps the cooktop to avoid scratching the countertop. 1. A B D ...C A. Decide on a covered surface. 2. Avoid drilling into the cutout. Determine whether your cabinet construction provides clearance for optional front and back location. Clamping bracket (end locations recommended) C. Du Pont De Nemours...
Installation Instructions
Page 8
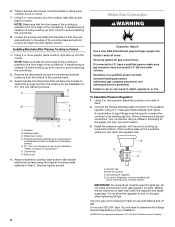
...repositioning is needed , lift entire cooktop up toward the bottom of the cooktop base and in a position where you can result in cutout. 7. Cooktop B. Countertop G. If connected to LP, have a qualified person make connections to cooktop bottom. Connect the flexible stainless ...D A. Up arrow. Using 2 or more people, place cooktop right side up to the gas regulator too tight. Installing Brackets After Placing Cooktop in cutout. Attach brackets to the edge of E.I. Shown following is parallel to the front edge of clamping screws) E. 2½" (6.4 cm) clamping screw (...
...repositioning is needed , lift entire cooktop up toward the bottom of the cooktop base and in a position where you can result in cutout. 7. Cooktop B. Countertop G. If connected to LP, have a qualified person make connections to cooktop bottom. Connect the flexible stainless ...D A. Up arrow. Using 2 or more people, place cooktop right side up to the gas regulator too tight. Installing Brackets After Placing Cooktop in cutout. Attach brackets to the edge of E.I. Shown following is parallel to the front edge of clamping screws) E. 2½" (6.4 cm) clamping screw (...