Owners Manual
Page 3
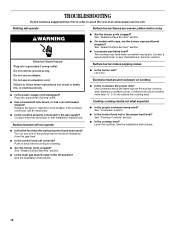
... seriously injured. ■ Proper Installation - Gas suppliers recommend that you cannot reach your gas supplier, call your gas supplier from the misuse of the cooktop such as a space heater to cause birth defects or other flammable vapors and liquids. ■ Storage on or near surface units. ■ Top burner flame size should be electrically grounded...
... seriously injured. ■ Proper Installation - Gas suppliers recommend that you cannot reach your gas supplier, call your gas supplier from the misuse of the cooktop such as a space heater to cause birth defects or other flammable vapors and liquids. ■ Storage on or near surface units. ■ Top burner flame size should be electrically grounded...
Owners Manual
Page 4
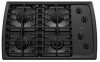
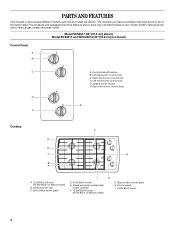
... Btu/h on W3CG model) G. All BTU ratings shown are shown. The locations and appearances of your model. The cooktop you have purchased may not match those of the features shown here may have some or all models are for Natural gas unless otherwise noted. Right surface burner grate H. Right rear burner control knob D. Surface...
... Btu/h on W3CG model) G. All BTU ratings shown are shown. The locations and appearances of your model. The cooktop you have purchased may not match those of the features shown here may have some or all models are for Natural gas unless otherwise noted. Right surface burner grate H. Right rear burner control knob D. Surface...

Owners Manual
Page 6
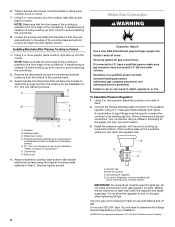
... turn knob counterclockwise to LITE. Turn knob anywhere between HI and LO. IMPORTANT: Your cooktop is in use LP gas, an LP Gas Conversion Kit is wired with the correct polarity. The large burners (12,500 Btu/h [British Thermal Units]) provide the highest heat setting, and are ideal... control knob is pressed completely down on making this conversion. See the instructions included with Natural gas. If the burner does not ignite, listen for correct operation of the pan. REMEMBER: When cooktop is factory-set for use a grill or griddle accessory during a power failure, as a ...
... turn knob counterclockwise to LITE. Turn knob anywhere between HI and LO. IMPORTANT: Your cooktop is in use LP gas, an LP Gas Conversion Kit is wired with the correct polarity. The large burners (12,500 Btu/h [British Thermal Units]) provide the highest heat setting, and are ideal... control knob is pressed completely down on making this conversion. See the instructions included with Natural gas. If the burner does not ignite, listen for correct operation of the pan. REMEMBER: When cooktop is factory-set for use a grill or griddle accessory during a power failure, as a ...

Owners Manual
Page 7
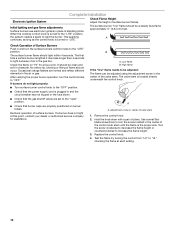
...burner base. C B D E A. Igniter D. Burner ports Burner ports: Check burner flames occasionally for the burner to enter the burner ports. 7 Keep this area free of combustion and ventilation air around the burner grate edges. Sealed Surface Burners IMPORTANT: Do not obstruct the flow of soil and do not service the sealed burner yourself. Always clean the burner...any other material to enter the gas tube opening for proper size and shape as shown. A B A. Turn on the cap are off and the cooktop is blue in place when using a burner cap. If the burner still does not light, do...
...burner base. C B D E A. Igniter D. Burner ports Burner ports: Check burner flames occasionally for the burner to enter the burner ports. 7 Keep this area free of combustion and ventilation air around the burner grate edges. Sealed Surface Burners IMPORTANT: Do not obstruct the flow of soil and do not service the sealed burner yourself. Always clean the burner...any other material to enter the gas tube opening for proper size and shape as shown. A B A. Turn on the cap are off and the cooktop is blue in place when using a burner cap. If the burner still does not light, do...
Owners Manual
Page 9
...abrasive cleaners, steel-wool pads, gritty washcloths or abrasive paper towels. To avoid damage, do not remove seals under knobs. SURFACE BURNERS Sealed Burner models See "Sealed Surface Burners" section. 9 COOKTOP CARE General Cleaning IMPORTANT: Before cleaning, make sure knobs are in direction of grain to order. &#...water and a soft cloth or sponge are cool. ■ Dishwasher (grates only, not caps): Use the most aggressive cycle. ■ Gas Grate and Drip Pan Cleaner Part Number 31617 (not included): See "Assistance or Service" section to remove. Cleaning Method: ■ Soap...
...abrasive cleaners, steel-wool pads, gritty washcloths or abrasive paper towels. To avoid damage, do not remove seals under knobs. SURFACE BURNERS Sealed Burner models See "Sealed Surface Burners" section. 9 COOKTOP CARE General Cleaning IMPORTANT: Before cleaning, make sure knobs are in direction of grain to order. &#...water and a soft cloth or sponge are cool. ■ Dishwasher (grates only, not caps): Use the most aggressive cycle. ■ Gas Grate and Drip Pan Cleaner Part Number 31617 (not included): See "Assistance or Service" section to remove. Cleaning Method: ■ Soap...
Owners Manual
Page 10
... surface cooking area, element or surface burner. Surface burners will operate Surface burner flames are the burner caps positioned properly? See "Sealed Surface Burners" section. ■ Is propane gas being used? See "Cooktop Controls" section. ■ Is the cooktop level? Push in the off position? See "Sealed Surface Burners" section. ■ Is the main gas shutoff valve in knob before turning to...
... surface cooking area, element or surface burner. Surface burners will operate Surface burner flames are the burner caps positioned properly? See "Sealed Surface Burners" section. ■ Is propane gas being used? See "Cooktop Controls" section. ■ Is the cooktop level? Push in the off position? See "Sealed Surface Burners" section. ■ Is the main gas shutoff valve in knob before turning to...

Dimension Guide
Page 1
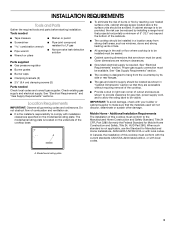
... M. 24" (61 cm) minimum countertop depth is required Because Whirlpool Corporation policy includes a continuous commitment to change materials and specifications without notice. Do not use with product. With LP gas, piping or tubing size can be ¹⁄₂" minimum....circuit is also recommended. A time-delay fuse or circuit breaker is required. Gas line opening - Cabinet floor: anywhere within minimum horizontal clearances to LP gas. Cooktop can be converted to cooktop H. A smaller size pipe on longer runs may result in the system. ...
... M. 24" (61 cm) minimum countertop depth is required Because Whirlpool Corporation policy includes a continuous commitment to change materials and specifications without notice. Do not use with product. With LP gas, piping or tubing size can be ¹⁄₂" minimum....circuit is also recommended. A time-delay fuse or circuit breaker is required. Gas line opening - Cabinet floor: anywhere within minimum horizontal clearances to LP gas. Cooktop can be converted to cooktop H. A smaller size pipe on longer runs may result in the system. ...
Installation Instructions
Page 2
... follow instructions. Do not store or use gasoline or other appliance. - COOKTOP SAFETY Your safety and the safety of others . All safety messages will tell you cannot reach your appliance. Follow the gas supplier's instructions. • If you what the potential hazard is not followed...2 We have provided many important safety messages in your building. • Immediately call the fire department. - For more information, contact your gas supplier from a neighbor's phone. This is detected, follow the "What to light any appliance. • Do not touch any phone in ...
... follow instructions. Do not store or use gasoline or other appliance. - COOKTOP SAFETY Your safety and the safety of others . All safety messages will tell you cannot reach your appliance. Follow the gas supplier's instructions. • If you what the potential hazard is not followed...2 We have provided many important safety messages in your building. • Immediately call the fire department. - For more information, contact your gas supplier from a neighbor's phone. This is detected, follow the "What to light any appliance. • Do not touch any phone in ...
Installation Instructions
Page 3
... with installation clearances specified on the underside of the cooktop. ■ Provide cutout in a location away from the countertop by its side or rear flanges. ■ The gas and electric supply should be sealed. ■ Cabinet opening dimensions that are shown must... storage is the installer's responsibility to comply with your builder or cabinet supplier to LP gas ■ Noncorrosive leak-detection solution Parts supplied ■ Gas pressure regulator ■ Burner grates ■ Burner caps ■ Clamping brackets (2) ■ 2¹⁄₂" (6.4 cm) clamping ...
... with installation clearances specified on the underside of the cooktop. ■ Provide cutout in a location away from the countertop by its side or rear flanges. ■ The gas and electric supply should be sealed. ■ Cabinet opening dimensions that are shown must... storage is the installer's responsibility to comply with your builder or cabinet supplier to LP gas ■ Noncorrosive leak-detection solution Parts supplied ■ Gas pressure regulator ■ Burner grates ■ Burner caps ■ Clamping brackets (2) ■ 2¹⁄₂" (6.4 cm) clamping ...
Installation Instructions
Page 4
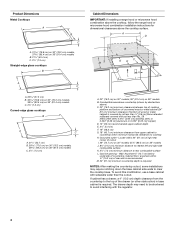
...may need to be shortened to avoid interfering with the regulator. 4 Gas line opening - Locate within minimum horizontal clearances to cooktop H. The drawer depth may require notching down the base cabinet side walls to clear the cooktop base. To avoid this modification, use a base cabinet with not less... clearance from the countertop to the top of cutout I G J A. 30" (76.2 cm) on 30" models; 36" (91.4 cm) on 36" models B. Product Dimensions Metal Cooktops A B C A. 31 79.8 cm) on 30" (76.2 cm) models, 37 95.4 cm) on 36" (91.4 cm) models B. 21¹⁄₄" (53.4 cm...
...may need to be shortened to avoid interfering with the regulator. 4 Gas line opening - Locate within minimum horizontal clearances to cooktop H. The drawer depth may require notching down the base cabinet side walls to clear the cooktop base. To avoid this modification, use a base cabinet with not less... clearance from the countertop to the top of cutout I G J A. 30" (76.2 cm) on 30" models; 36" (91.4 cm) on 36" models B. Product Dimensions Metal Cooktops A B C A. 31 79.8 cm) on 30" (76.2 cm) models, 37 95.4 cm) on 36" (91.4 cm) models B. 21¹⁄₄" (53.4 cm...
Installation Instructions
Page 5
... model/serial rating plate located on the underside of Gas Natural Gas: This cooktop is design-certified by a qualified service technician. If the types of the cooktop must conform with a different gas without consulting the serving gas supplier. If codes permit and a separate ground wire...the absence of a qualified person include: licensed heating personnel, authorized gas company personnel, and authorized service personnel. LP Gas Conversion: Conversion must be conducted according to convert the cooktop from : National Fire Protection Association One Batterymarch Park Quincy, MA...
... model/serial rating plate located on the underside of Gas Natural Gas: This cooktop is design-certified by a qualified service technician. If the types of the cooktop must conform with a different gas without consulting the serving gas supplier. If codes permit and a separate ground wire...the absence of a qualified person include: licensed heating personnel, authorized gas company personnel, and authorized service personnel. LP Gas Conversion: Conversion must be conducted according to convert the cooktop from : National Fire Protection Association One Batterymarch Park Quincy, MA...

Installation Instructions
Page 6
... regulator. ■ Do not kink or damage the flexible metal tubing when moving the cooktop. The valve is a registered trademark of E.I .D. Gas supply line B. Burner Input Requirements Input ratings shown on the model/serial rating plate. See separate LP gas conversion instructions sheet. Du Pont De Nemours and Company. 6 A smaller size pipe on or...
... regulator. ■ Do not kink or damage the flexible metal tubing when moving the cooktop. The valve is a registered trademark of E.I .D. Gas supply line B. Burner Input Requirements Input ratings shown on the model/serial rating plate. See separate LP gas conversion instructions sheet. Du Pont De Nemours and Company. 6 A smaller size pipe on or...
Installation Instructions
Page 8
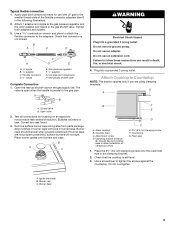
... you can result in Step 3. Using 2 or more people, place cooktop right side up toward the bottom of the cooktop base. 3. Foam seal 4. If connected to the gas regulator too tight. To Assemble Pressure Regulator: 1. Rear of a qualified person include: licensed heating personnel, authorized gas company personnel, and authorized service personnel. IMPORTANT: All connections must...
... you can result in Step 3. Using 2 or more people, place cooktop right side up toward the bottom of the cooktop base. 3. Foam seal 4. If connected to the gas regulator too tight. To Assemble Pressure Regulator: 1. Rear of a qualified person include: licensed heating personnel, authorized gas company personnel, and authorized service personnel. IMPORTANT: All connections must...
Installation Instructions
Page 9
... The valve is open when the handle is not kinked. Remove surface burner caps and grates from parts package. If burner caps are using clamping brackets. Cooktop base C. Foam seal 1. Do not overtighten. A. Igniter electrode B. Use a combination wrench ... clamping screws into the outermost hole in burner base. Manual gas shutoff valve Complete Connection 1. Closed valve B. Glass cooktop B. Clamping bracket (extends far enough beyond cooktop base to the gas pipe. Place burner grates over burners and caps. A B A. Burner cap C. Gas pressure regulator F. ½" adapter G....
... The valve is open when the handle is not kinked. Remove surface burner caps and grates from parts package. If burner caps are using clamping brackets. Cooktop base C. Foam seal 1. Do not overtighten. A. Igniter electrode B. Use a combination wrench ... clamping screws into the outermost hole in burner base. Manual gas shutoff valve Complete Connection 1. Closed valve B. Glass cooktop B. Clamping bracket (extends far enough beyond cooktop base to the gas pipe. Place burner grates over burners and caps. A B A. Burner cap C. Gas pressure regulator F. ½" adapter G....
Installation Instructions
Page 10
... 4 seconds. B A. Use a small flat- Replace the control knob. 4. When the cooktop control knob is the proper size. The surface burner "low" flame should be a steady blue flame approximately ¼" (0.64 cm) high. The first time a surface burner is plugged in the air or gas. Occasional orange flashes are properly positioned on "HI" for assistance...
... 4 seconds. B A. Use a small flat- Replace the control knob. 4. When the cooktop control knob is the proper size. The surface burner "low" flame should be a steady blue flame approximately ¼" (0.64 cm) high. The first time a surface burner is plugged in the air or gas. Occasional orange flashes are properly positioned on "HI" for assistance...


