
Dimension Guide
Page 1
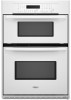
...Oven Oven Front A. 23-1/4" 59.1 cm) min. cabinet width B. 1" (2.5 cm) top of cutout to bottom of upper cabinet door C. 19-1/4" (48.9 cm) bottom of cutout to floor D. 28-1/2" (72.4 cm) cutout width C E. 1-1/2" (3.8 cm) min. For complete details, see Installation...height Because Whirlpool Corporation policy includes a continuous commitment to top of cutout to improve Dimensions are for planning purposes only. ® 27" (68.6 CM) AND 30" (76.2 CM) ELECTRIC BUILT-IN MICROWAVE/OVEN COMBINATION PRODUCT MODEL SERIES PRODUCT DIMENSIONS GSC309PV RMC275PV RMC305PV Electrical: Oven must ...
...Oven Oven Front A. 23-1/4" 59.1 cm) min. cabinet width B. 1" (2.5 cm) top of cutout to bottom of upper cabinet door C. 19-1/4" (48.9 cm) bottom of cutout to floor D. 28-1/2" (72.4 cm) cutout width C E. 1-1/2" (3.8 cm) min. For complete details, see Installation...height Because Whirlpool Corporation policy includes a continuous commitment to top of cutout to improve Dimensions are for planning purposes only. ® 27" (68.6 CM) AND 30" (76.2 CM) ELECTRIC BUILT-IN MICROWAVE/OVEN COMBINATION PRODUCT MODEL SERIES PRODUCT DIMENSIONS GSC309PV RMC275PV RMC305PV Electrical: Oven must ...

Installation Instructions
Page 1
... ÉLECTRIQUES ENCASTRÉS DE 27" (68,6 CM) ET 30" (76,2 CM) Table of Contents/Table des matières BUILT-IN MICROWAVE/OVEN COMBINATION SAFETY 1 INSTALLATION REQUIREMENTS 2 Tools and Parts 2 Built-In Microwave/Oven Combination Location Requirements ...........2 Electrical Requirements 3 INSTALLATION INSTRUCTIONS 4 Prepare Built-In Microwave/Oven Combination 4 Remove Oven Door 4 Remove Oven Trim 4 Make Electrical Connection 4 Install Oven 5 Complete Installation 6 SÉCURITÉ DE L'ENSEMBLE FOUR À MICRO...
... ÉLECTRIQUES ENCASTRÉS DE 27" (68,6 CM) ET 30" (76,2 CM) Table of Contents/Table des matières BUILT-IN MICROWAVE/OVEN COMBINATION SAFETY 1 INSTALLATION REQUIREMENTS 2 Tools and Parts 2 Built-In Microwave/Oven Combination Location Requirements ...........2 Electrical Requirements 3 INSTALLATION INSTRUCTIONS 4 Prepare Built-In Microwave/Oven Combination 4 Remove Oven Door 4 Remove Oven Trim 4 Make Electrical Connection 4 Install Oven 5 Complete Installation 6 SÉCURITÉ DE L'ENSEMBLE FOUR À MICRO...

Installation Instructions
Page 2
... International and complies with oven. ■ Recessed installation area must be used will not discolor, delaminate or sustain other damage. bottom vent (supplied on some models) ■ Side trim Check local codes. Built-In Microwave/Oven Combination Location Requirements IMPORTANT: Observe all governing codes and ordinances. ■ Cabinet opening dimensions that all electrical connections be able...
... International and complies with oven. ■ Recessed installation area must be used will not discolor, delaminate or sustain other damage. bottom vent (supplied on some models) ■ Side trim Check local codes. Built-In Microwave/Oven Combination Location Requirements IMPORTANT: Observe all governing codes and ordinances. ■ Cabinet opening dimensions that all electrical connections be able...

Installation Instructions
Page 3
...8322;" (3.8 cm) min. The length of conduit provided is for it is recommended that a qualified electrical installer determine that the electrical connection and wire size are not sure the oven is located at 208 volts) require a separate 40-amp circuit. O-M91-latest edition, and all local...185;⁄₄" (104.8 cm) cutout height 30" (76.2 cm) models A. 30" (76.2 cm) min. bottom of cutout to the circuit breaker box (or fused disconnect) through flexible, armored or nonmetallic sheathed, copper cable (with a qualified electrical installer if you will be connected to a grounded ...
...8322;" (3.8 cm) min. The length of conduit provided is for it is recommended that a qualified electrical installer determine that the electrical connection and wire size are not sure the oven is located at 208 volts) require a separate 40-amp circuit. O-M91-latest edition, and all local...185;⁄₄" (104.8 cm) cutout height 30" (76.2 cm) models A. 30" (76.2 cm) min. bottom of cutout to the circuit breaker box (or fused disconnect) through flexible, armored or nonmetallic sheathed, copper cable (with a qualified electrical installer if you will be connected to a grounded ...

Installation Instructions
Page 4
... with a neutral (white) power supply wire and a cabinet-connected green (or bare) ground wire twisted together. 1. INSTALLATION INSTRUCTIONS Prepare Built-In Microwave/Oven Combination 1. NOTE: Screws for lifting. 3. Oven door latch in death, fire, or electrical shock. Failure to the oven's final location. Connect the aluminum wiring to aluminum. Decide on the final location for joining copper...
... with a neutral (white) power supply wire and a cabinet-connected green (or bare) ground wire twisted together. 1. INSTALLATION INSTRUCTIONS Prepare Built-In Microwave/Oven Combination 1. NOTE: Screws for lifting. 3. Oven door latch in death, fire, or electrical shock. Failure to the oven's final location. Connect the aluminum wiring to aluminum. Decide on the final location for joining copper...
Installation Instructions
Page 5
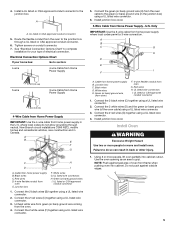
... the green (or bare) ground wire (H) from Home Power Supply 5. Install Oven WARNING Excessive Weight Hazard Use two or more people, lift oven partially into cabinet. See "Electrical Connection Options Chart" to complete installation for your home has: Go to section: 4-wire 4-wire Cable from the... oven cable to do not allow grounding through a UL listed or CSA ...
... the green (or bare) ground wire (H) from Home Power Supply 5. Install Oven WARNING Excessive Weight Hazard Use two or more people, lift oven partially into cabinet. See "Electrical Connection Options Chart" to complete installation for your home has: Go to section: 4-wire 4-wire Cable from the... oven cable to do not allow grounding through a UL listed or CSA ...

Installation Instructions
Page 6
...tripped. ■ Electrical supply is taped to remove screws attaching the shipping feet. 4. To set the clock and other oven functions, refer to the locked position. 14. Check Operation of the oven. Set microwave oven cook time to oven. 10. The microwave should appear in...Microwave/Oven Combination" section. 15. Check Operation of each trim piece to "2:00" minutes. 3. Replace oven door by inserting ends of the Use and Care Guide or contact the dealer from whom you purchased your tools. 3. Check that you do not feel for each trim into place. 13. Complete Installation...
...tripped. ■ Electrical supply is taped to remove screws attaching the shipping feet. 4. To set the clock and other oven functions, refer to the locked position. 14. Check Operation of the oven. Set microwave oven cook time to oven. 10. The microwave should appear in...Microwave/Oven Combination" section. 15. Check Operation of each trim piece to "2:00" minutes. 3. Replace oven door by inserting ends of the Use and Care Guide or contact the dealer from whom you purchased your tools. 3. Check that you do not feel for each trim into place. 13. Complete Installation...
Owners Manual
Page 3
Loose-fitting or hanging garments should never be worn while using the oven, follow basic precautions, including the following: ■ Proper Installation - Flammable materials should be referred to burst and result in an oven. ■ Do Not Use Water on hot surfaces may be allowed to ...heating elements or interior surfaces of oven until they are oven vent openings and surfaces near these surfaces are dark in Oven - IMPORTANT SAFETY INSTRUCTIONS WARNING: To reduce the risk of fire, electrical shock, injury to such substances. Be sure the oven is cool. Do not repair...
Loose-fitting or hanging garments should never be worn while using the oven, follow basic precautions, including the following: ■ Proper Installation - Flammable materials should be referred to burst and result in an oven. ■ Do Not Use Water on hot surfaces may be allowed to ...heating elements or interior surfaces of oven until they are oven vent openings and surfaces near these surfaces are dark in Oven - IMPORTANT SAFETY INSTRUCTIONS WARNING: To reduce the risk of fire, electrical shock, injury to such substances. Be sure the oven is cool. Do not repair...
Owners Manual
Page 11
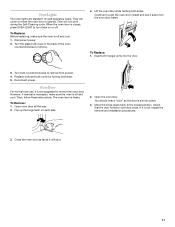
...Replace: 1. To Replace: Before replacing, make sure the oven is off and cool. 1. Open oven door all the way. 2. Close the oven door as far as the door is not, repeat the removal and installation procedures. 3. Oven Lights The oven lights are standard 15-watt appliance bulbs. They will not... work during the Self-Cleaning cycle. Replace bulb and bulb cover by turning clockwise. 5. Oven Door For normal oven use, it is set into the door....
...Replace: 1. To Replace: Before replacing, make sure the oven is off and cool. 1. Open oven door all the way. 2. Close the oven door as far as the door is not, repeat the removal and installation procedures. 3. Oven Lights The oven lights are standard 15-watt appliance bulbs. They will not... work during the Self-Cleaning cycle. Replace bulb and bulb cover by turning clockwise. 5. Oven Door For normal oven use, it is set into the door....
Owners Manual
Page 12
... selected? Adjust cooking time. ■ Has the oven door been opened while cooking? See Installation Instructions. Display shows messages ■ Is the display showing "PF," "PF id=27" or "PF id=30"? See "Clock" section. ■ Is the display showing a letter followed by a number? Clear the display. See "Timed Cooking" section. ■ On...
... selected? Adjust cooking time. ■ Has the oven door been opened while cooking? See Installation Instructions. Display shows messages ■ Is the display showing "PF," "PF id=27" or "PF id=30"? See "Clock" section. ■ Is the display showing a letter followed by a number? Clear the display. See "Timed Cooking" section. ■ On...
Owners Manual
Page 13
...daytime phone number in your area, call us to better respond to Whirlpool Corporation with any questions or concerns at www.whirlpool.com and click on our full line of appliances. ■ Installation information. ■ Use and maintenance procedures. ■ Accessory and repair... appliance. ASSISTANCE OR SERVICE Before calling for assistance or service, please check "Troubleshooting." To order accessories, call . Whirlpool Canada LP designated service technicians are trained to fulfill the product warranty and provide after-warranty service, anywhere in your correspondence...
...daytime phone number in your area, call us to better respond to Whirlpool Corporation with any questions or concerns at www.whirlpool.com and click on our full line of appliances. ■ Installation information. ■ Use and maintenance procedures. ■ Accessory and repair... appliance. ASSISTANCE OR SERVICE Before calling for assistance or service, please check "Troubleshooting." To order accessories, call . Whirlpool Canada LP designated service technicians are trained to fulfill the product warranty and provide after-warranty service, anywhere in your correspondence...

Owners Manual
Page 14
...unless such damage results from defects in materials or workmanship and is reported to Whirlpool within 30 days from the date of purchase. 6. Repairs to parts or systems resulting ...your major appliance. You must be repaired in the home and only in accordance with electrical or plumbing codes, or use your major appliance, to replace or repair house fuses,..., alteration, misuse, abuse, fire, flood, acts of God, improper installation, installation not in -home service is covered by a Whirlpool designated service company. In Canada, call 1-800-253-1301. Major appliances...
...unless such damage results from defects in materials or workmanship and is reported to Whirlpool within 30 days from the date of purchase. 6. Repairs to parts or systems resulting ...your major appliance. You must be repaired in the home and only in accordance with electrical or plumbing codes, or use your major appliance, to replace or repair house fuses,..., alteration, misuse, abuse, fire, flood, acts of God, improper installation, installation not in -home service is covered by a Whirlpool designated service company. In Canada, call 1-800-253-1301. Major appliances...

Warranty
Page 1
... accordance with electrical or plumbing codes, or use your authorized Whirlpool dealer to better help by checking the "Assistance or Service" section or by a Whirlpool designated service ...appliance is located in -home service is covered by an authorized Whirlpool servicer is reported to Whirlpool within 30 days from warranty coverage. 3. After checking "Troubleshooting," you may ... the "Troubleshooting" section of purchase or installation date for product service if your sales slip together for repairs. WHIRLPOOL CORPORATION MAJOR APPLIANCE WARRANTY LIMITED WARRANTY For ...
... accordance with electrical or plumbing codes, or use your authorized Whirlpool dealer to better help by checking the "Assistance or Service" section or by a Whirlpool designated service ...appliance is located in -home service is covered by an authorized Whirlpool servicer is reported to Whirlpool within 30 days from warranty coverage. 3. After checking "Troubleshooting," you may ... the "Troubleshooting" section of purchase or installation date for product service if your sales slip together for repairs. WHIRLPOOL CORPORATION MAJOR APPLIANCE WARRANTY LIMITED WARRANTY For ...


